An Introduction to Forms
Gridfox Forms allow you to collect information from anyone, creating new Records in your Tables with each Form submission.
Forms work across all devices and can be embedded on your existing websites, and can be customised to match your company branding.
Forms can be used for many different purposes, for example:
-
Enquiry Forms
Feed new leads directly into your Gridfox CRM by embedding a Gridfox enquiry Form on your site
-
Staff Feedback
Capture feedback and ideas from your team by sending out a Gridfox Form
-
Event Attendance
Know who is going to attend your next event by asking attendees to complete a Gridfox Form
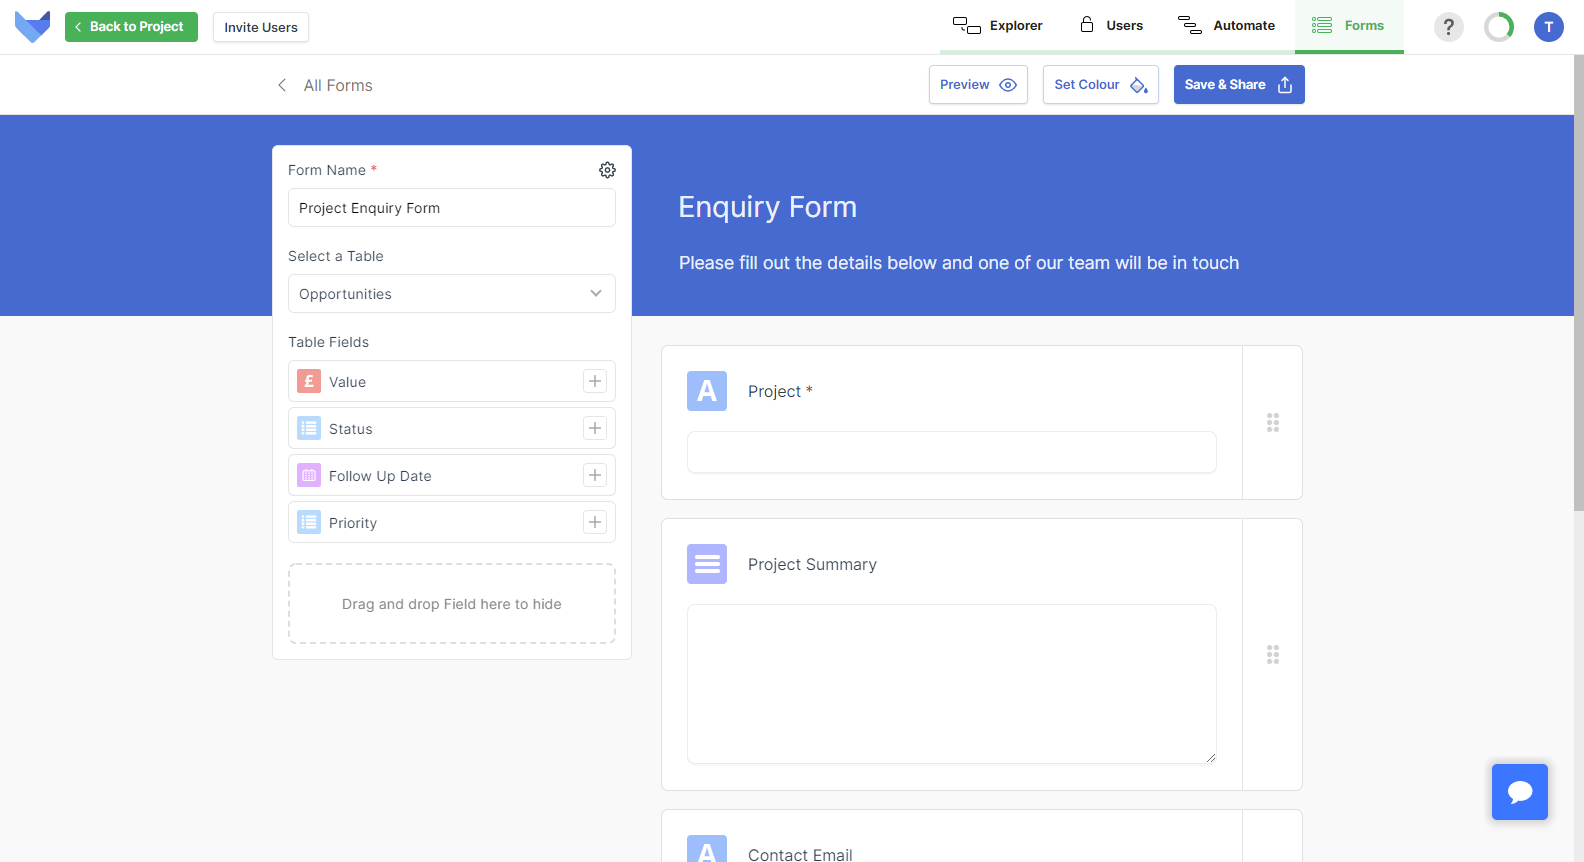
Creating Forms
Forms can be used to capture information from anyone, directly creating Records in your Gridfox Project.
TIP
You can create multiple Forms for the same Table.
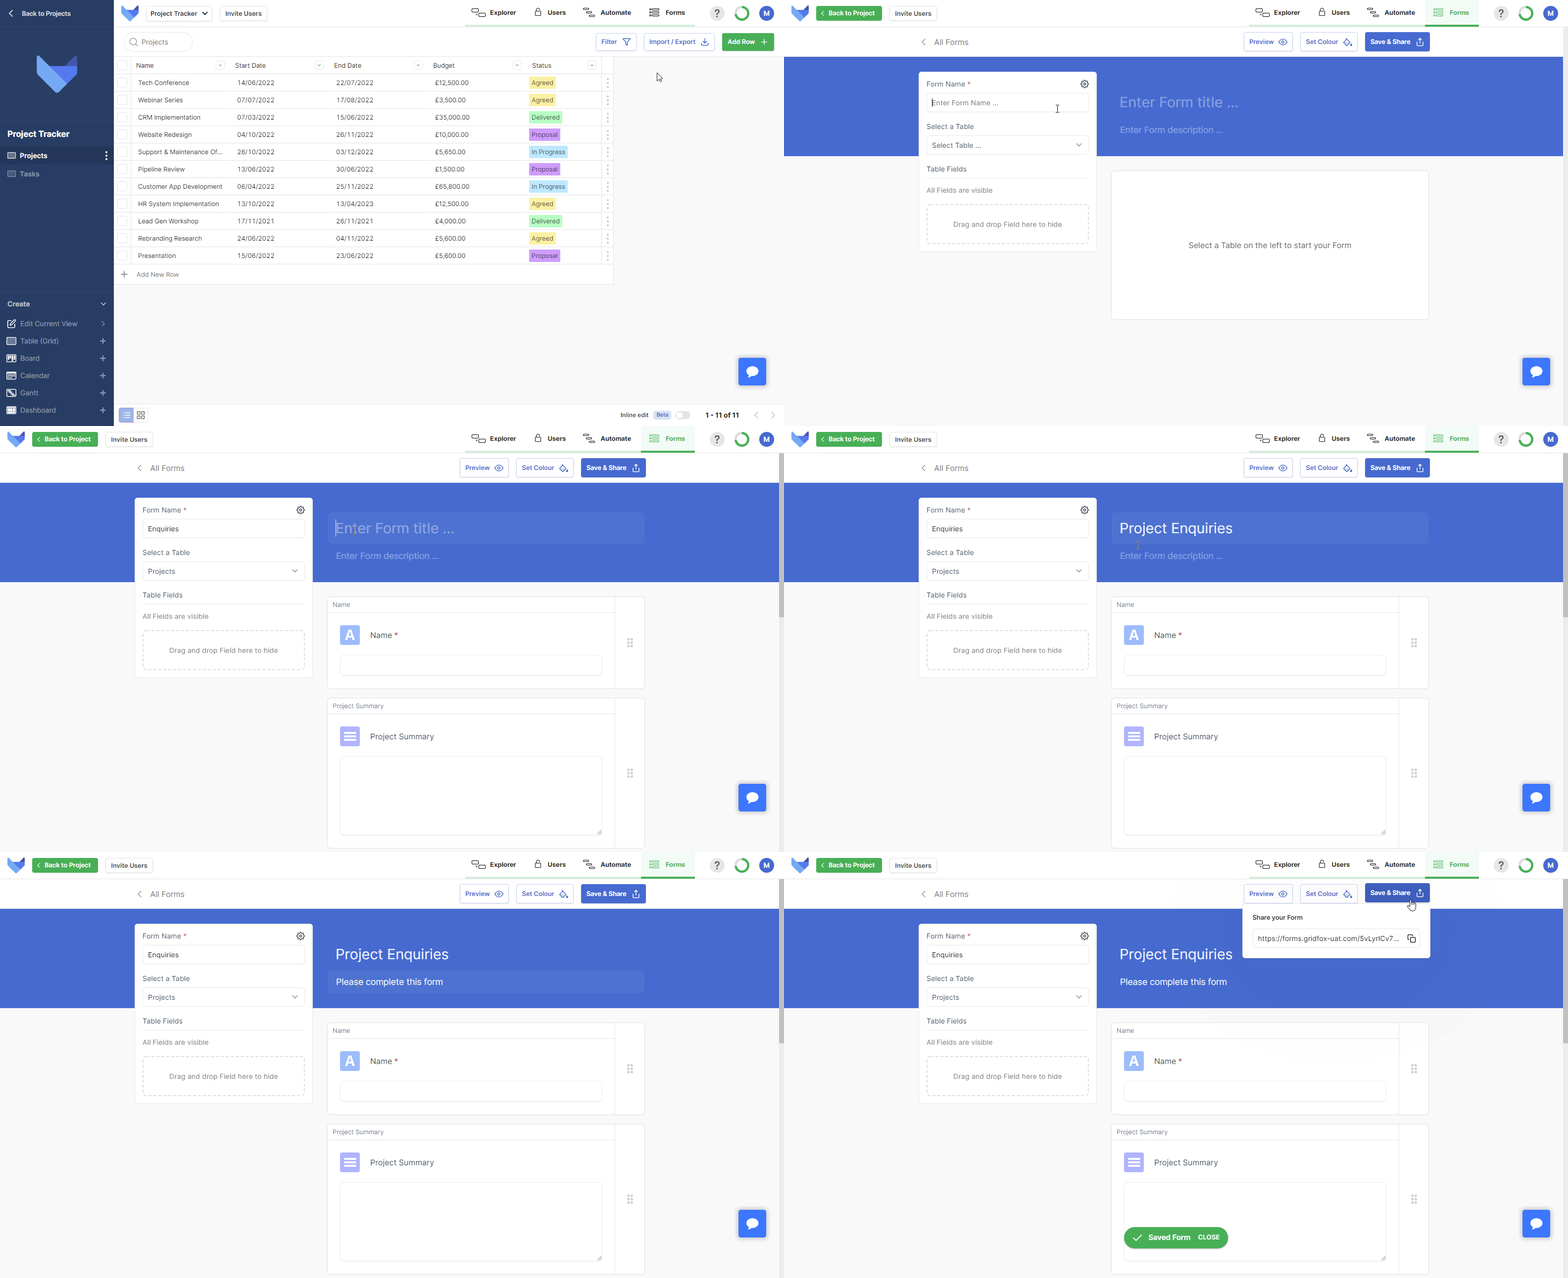
Creating a new Form
- Select the Forms tab in the top right hand corner
- Click New Form
- Enter a Form Name
-
Choose which Table you would like the Form to create Records for
All the Fields currently available on the selected Table will now be shown on the Form
-
Enter a title for the Form and optionally a description
These will be shown to the people that view your Form
- Click Save & Share
Configuring Form Fields
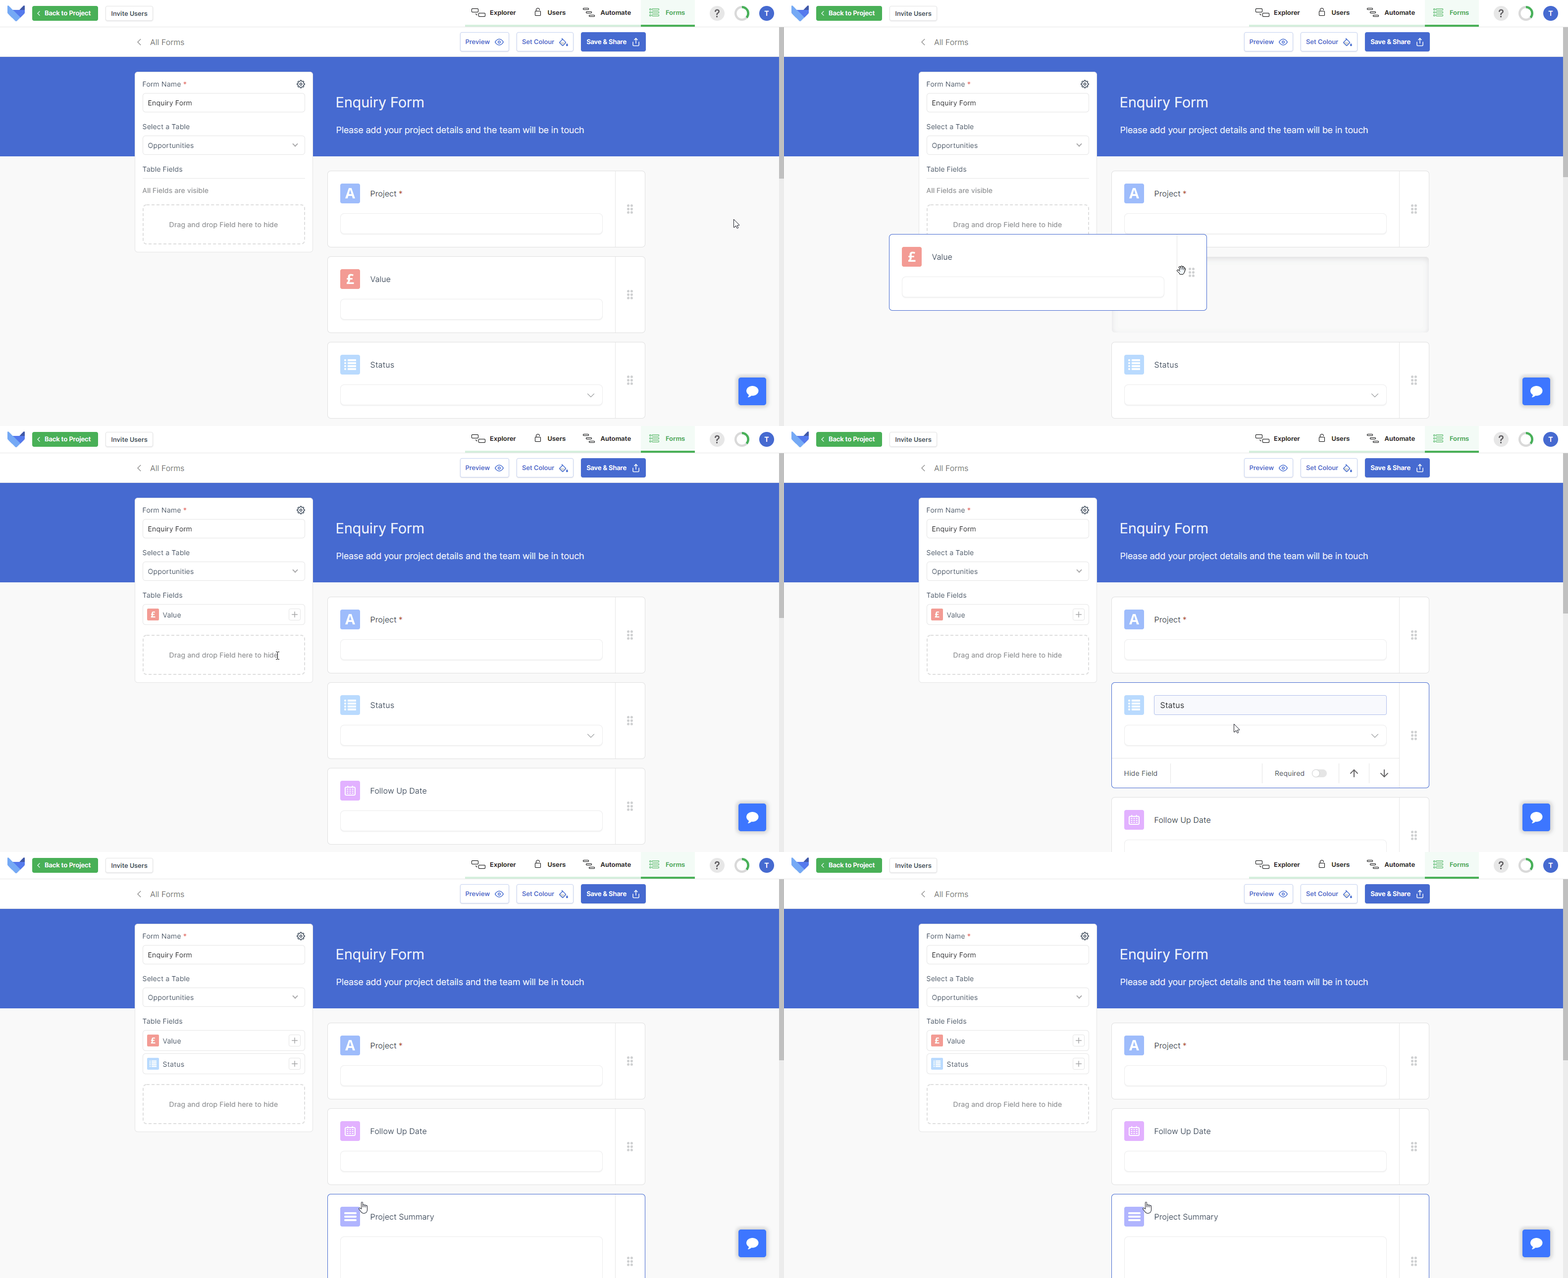
By default, all supported Fields currently on the Table will be shown on the Form.
Fields of Type User, Auto Counter and Formula cannot be shown on Forms. You also cannot include linked Fields such as parent link Fields or Many-to-many link Fields.
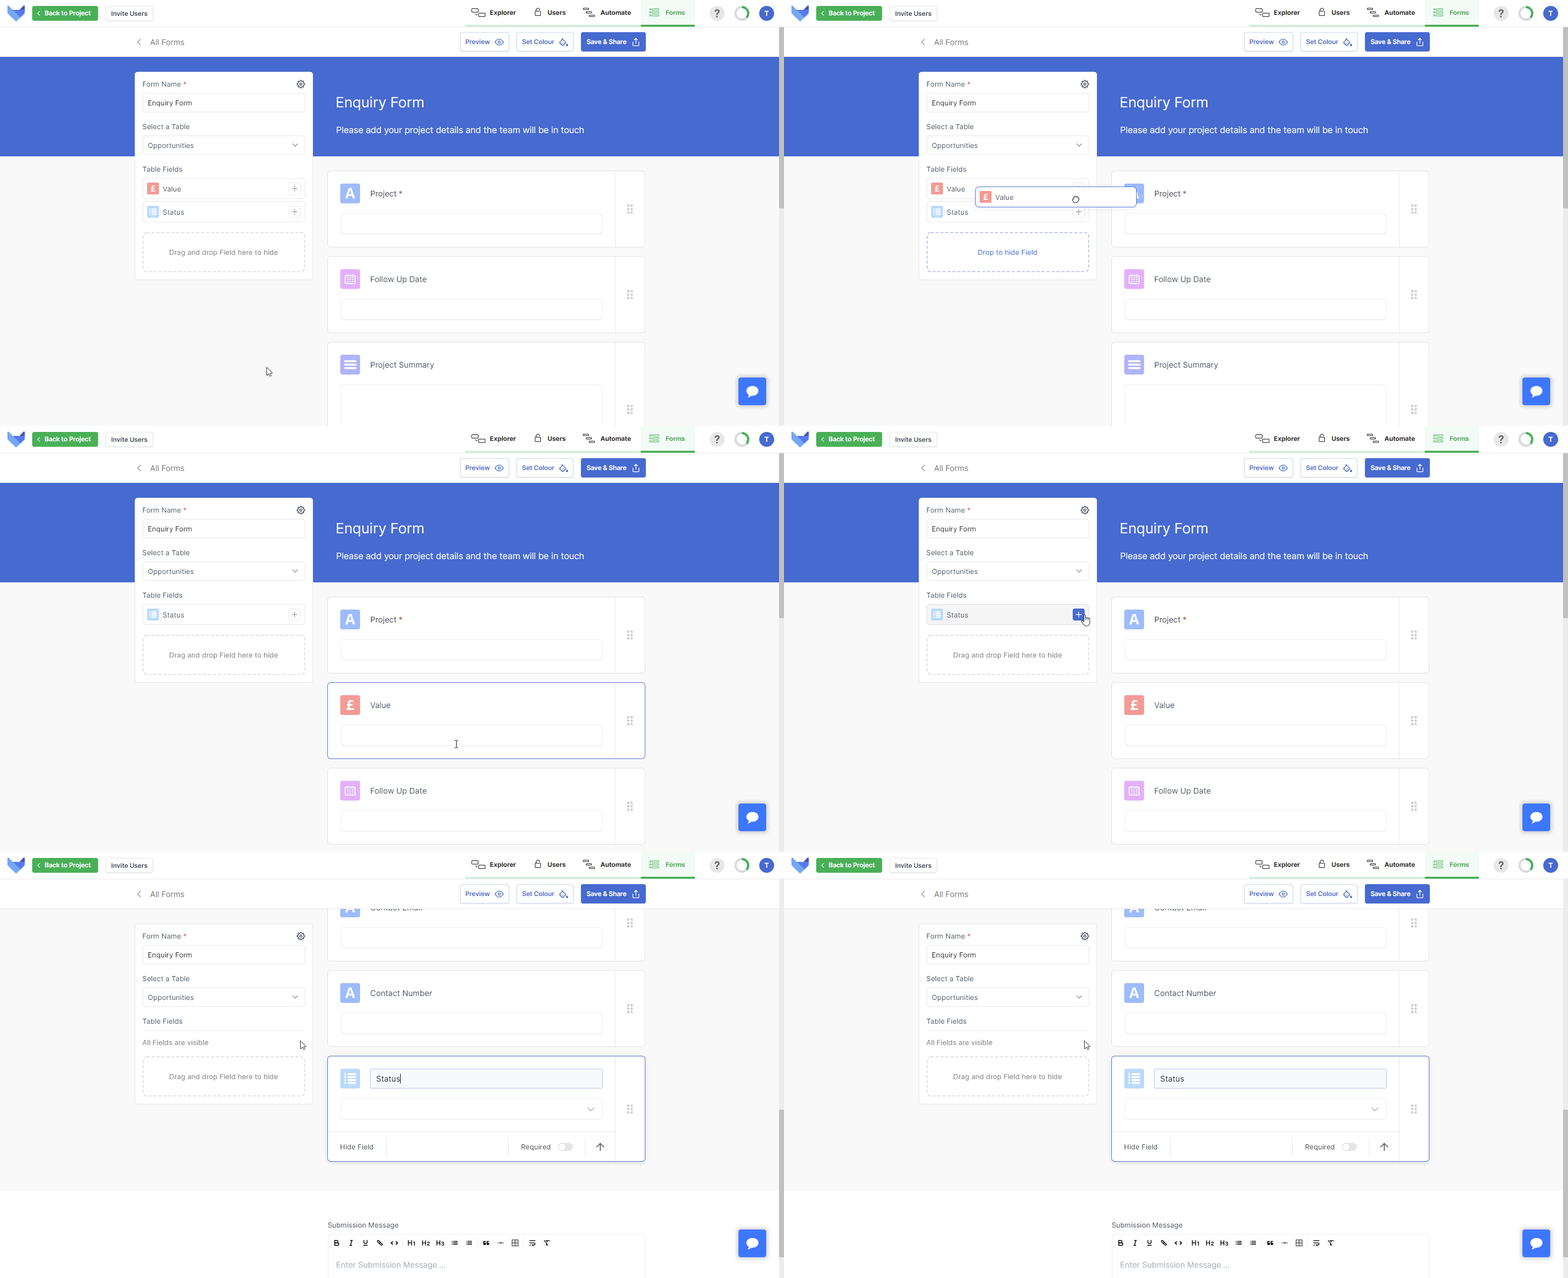
To hide a Field, drag and drop it into the hidden Fields section on the left. You can also click the Hide Field button for the Field.
To show a Field again, either drag it back onto the Form or click the plus button to the right of the Field name.
TIP
If you add a new Field to a Table, it will not be shown by default on any existing Forms for that Table.
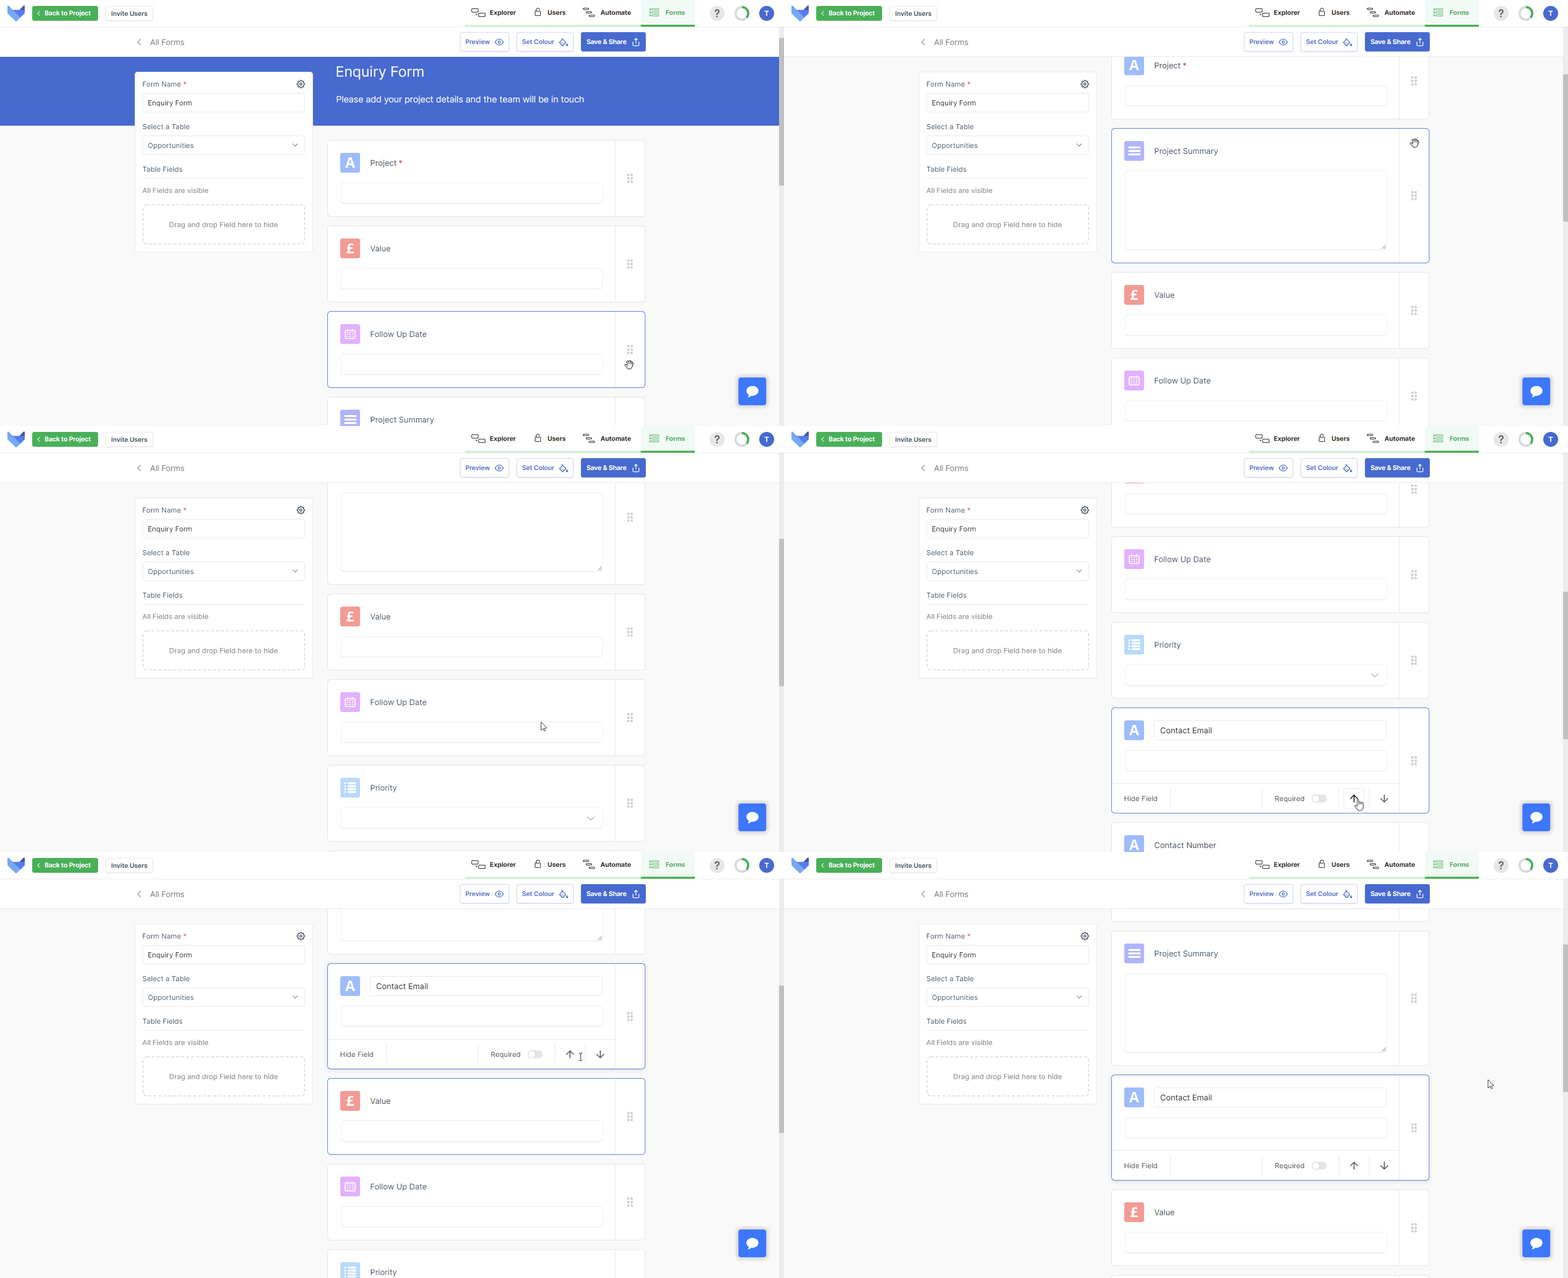
To reorder the Fields on your Form, drag them up and down the list. Alternatively you can use the up and down arrows within a Field.
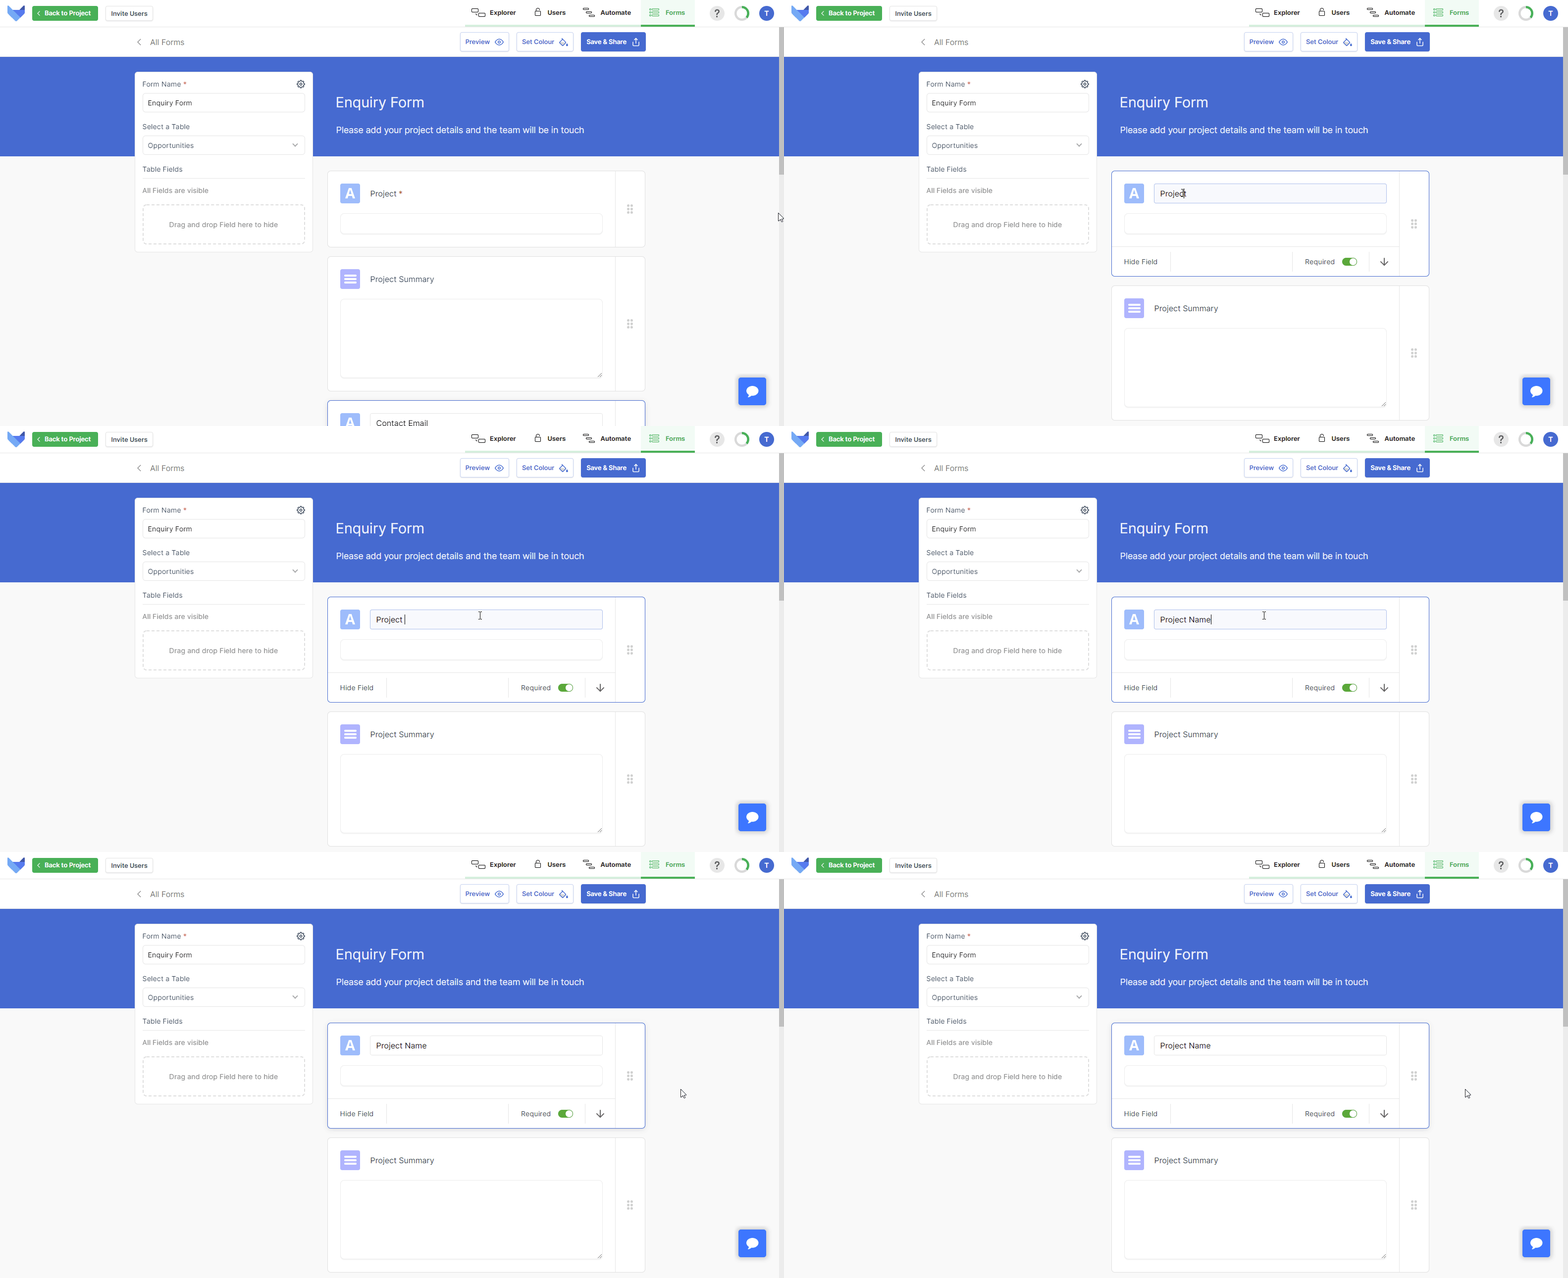
By default, all Fields will have be labelled with the Field name of the Field they relate to. You can change the Field label by clicking into the Field and changing the label text.
Setting Form Fields as Required
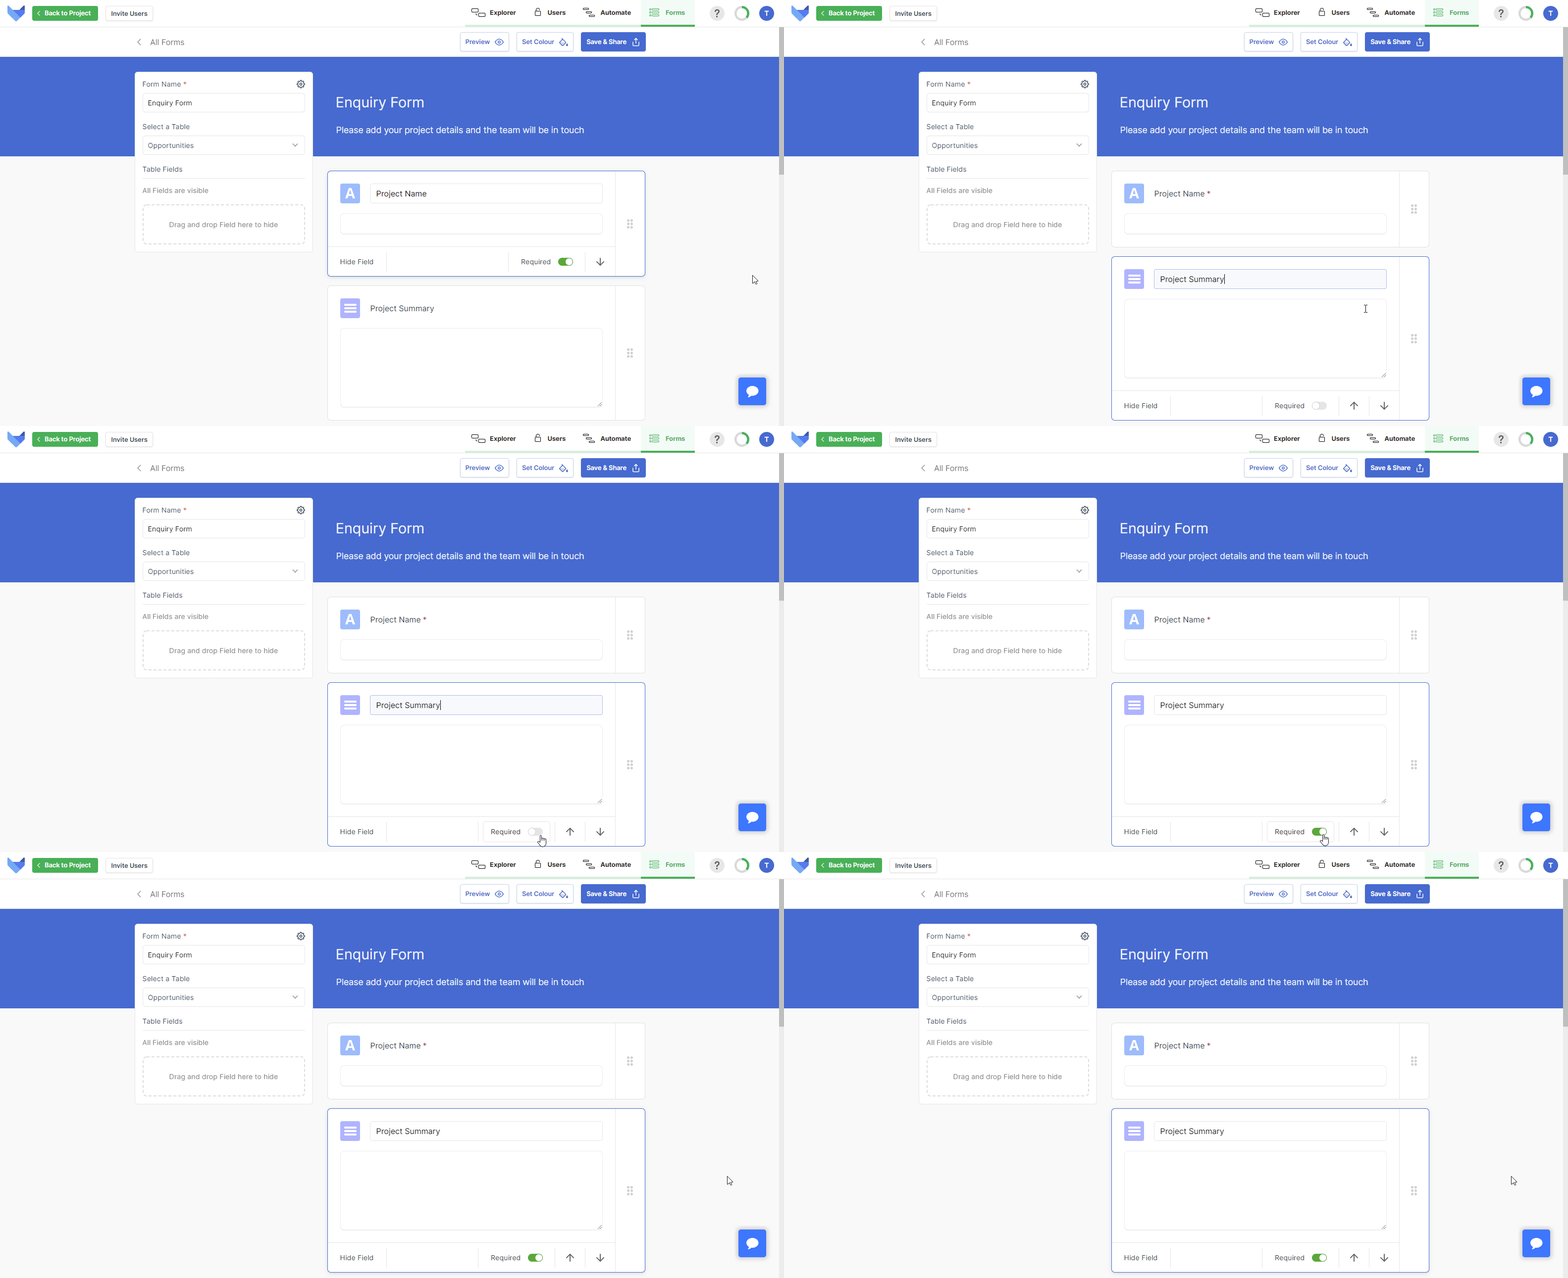
To ensure people give you all the data you need, you can make Form Fields required for submission. Note that this makes the Field required on the Form only, not on the Table itself.
Fields that have been set to be required on the Table cannot be made optional on the Form.
- Click on the Field that you want to set as required
- Toggle the Required setting to on
- Click Save & Share
If you no longer want the Field to be marked as required, simply change toggle this setting off.
Specifying Default Values for Form Fields
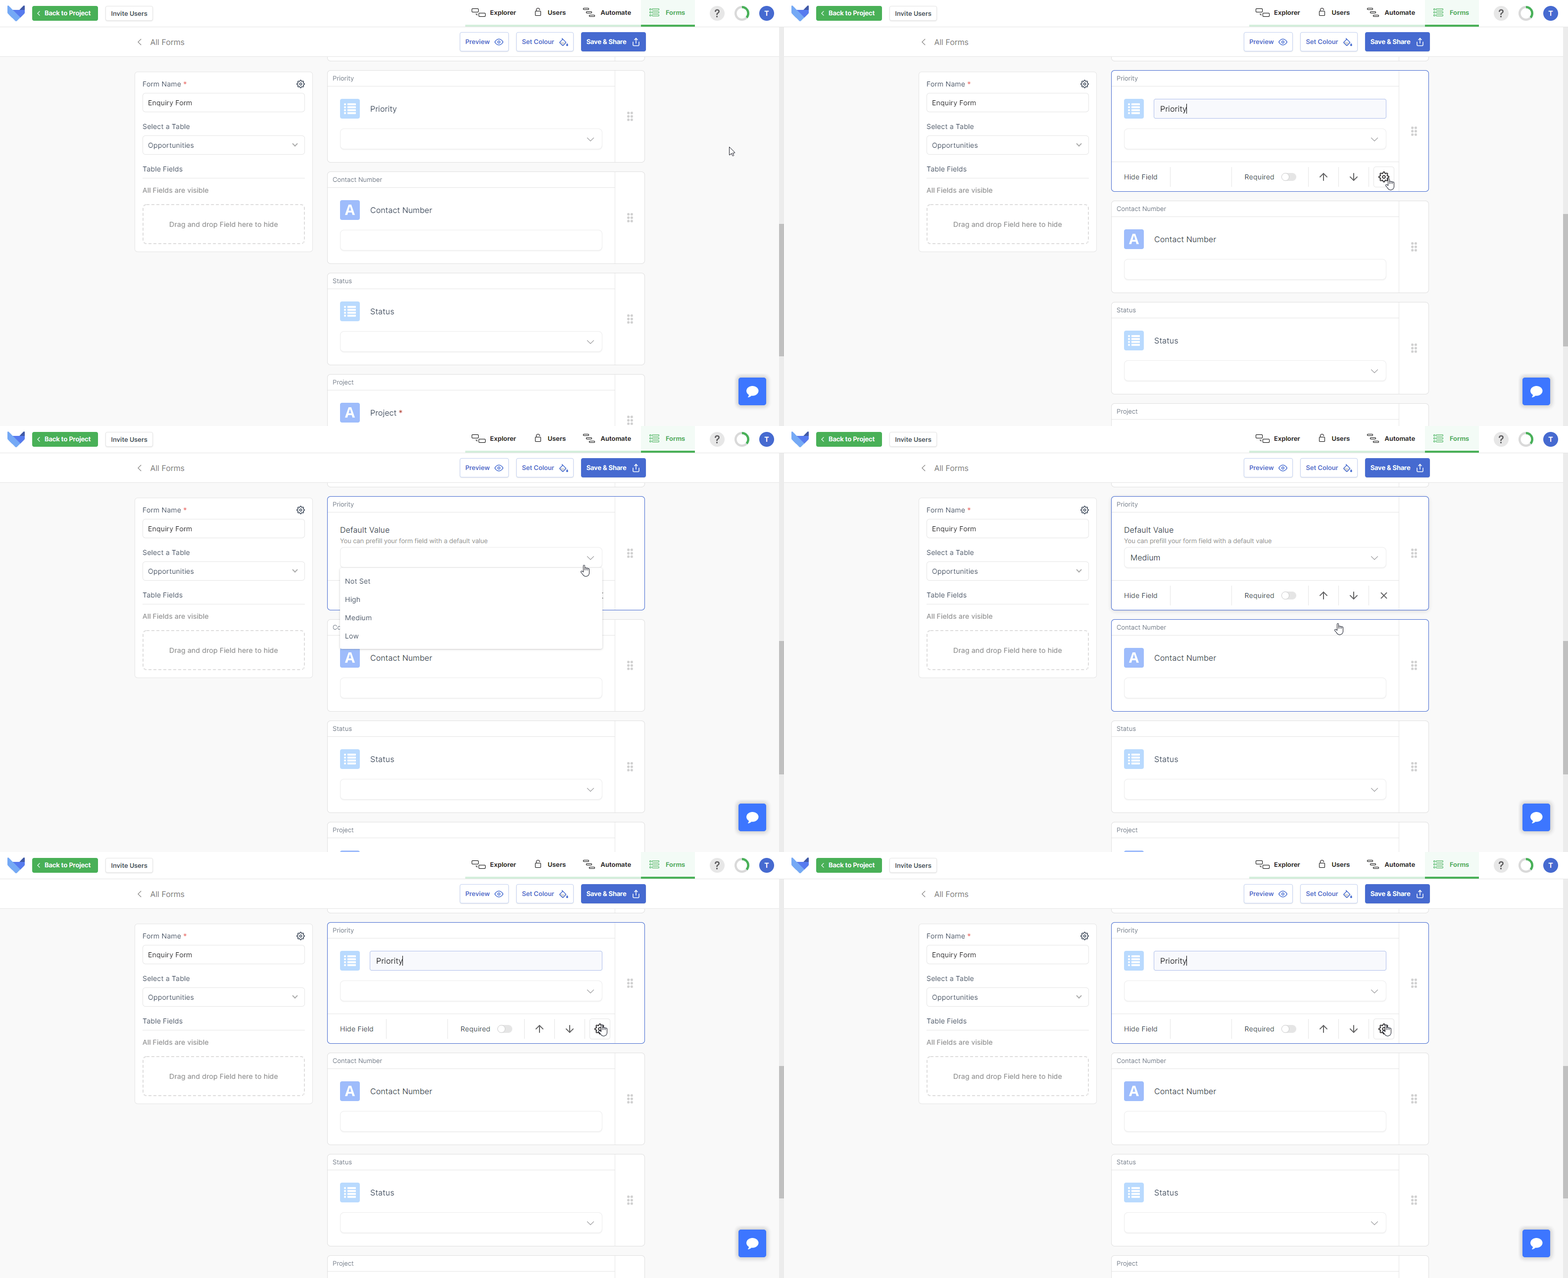
You can choose to set default values in Form Fields. When someone fills in your Form, default values will be shown.
- Click on the Field that you want to set the default value for
- Click the settings cog for that Field
- Enter or choose a default value
- Click Save & Share
Setting Form Colour Scheme
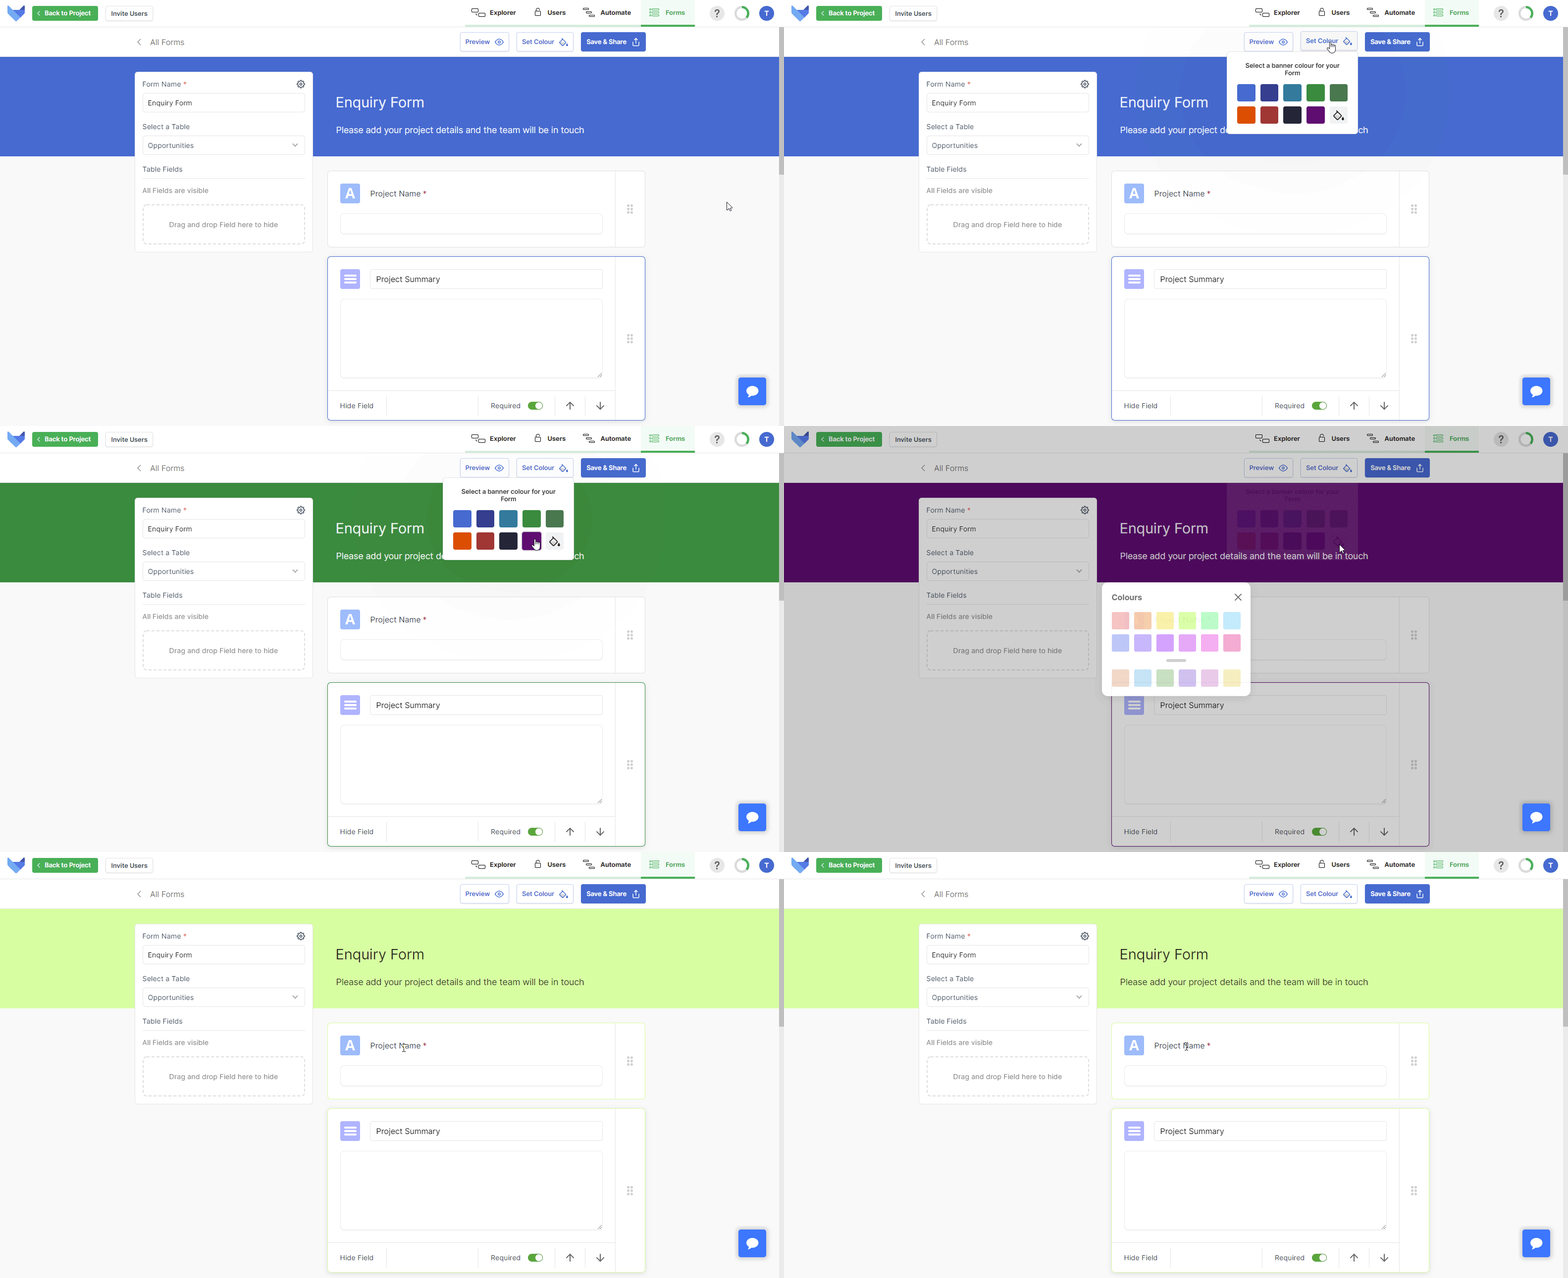
You can choose the colour to use for the Form banner.
- Click Set Colour in the top right
-
Choose a pre-set Form colour option
Alternatively set your own custom colour by clicking the paint can icon
- Click Save & Share to finalise your change
Customising the Form Submission message
You can optionally add a custom message that shows when someone submits a Form response. This could be used to confirm response times to an enquiry, to add a link to your FAQs or website, or to thank them for their response.
NOTE
If you do not specify a Submission Message, then the default Form submission page will be shown.
To specify a Submission Message, either scroll to the bottom of the Form or click the Settings Cog in the Form Settings panel.
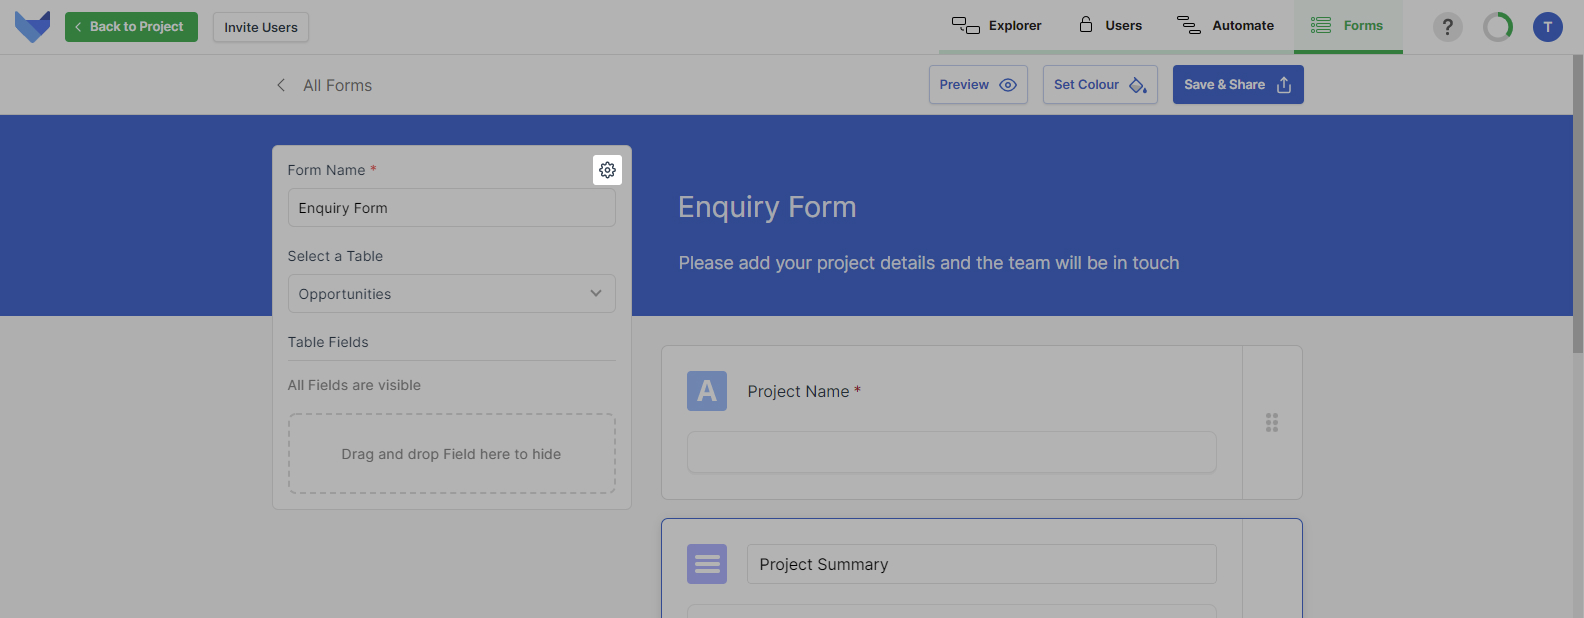
Enter in the message that you would like to show to people that submit a response to this Form.
TIP
There is a character limit of 1000 characters on this message.
Previewing a Form
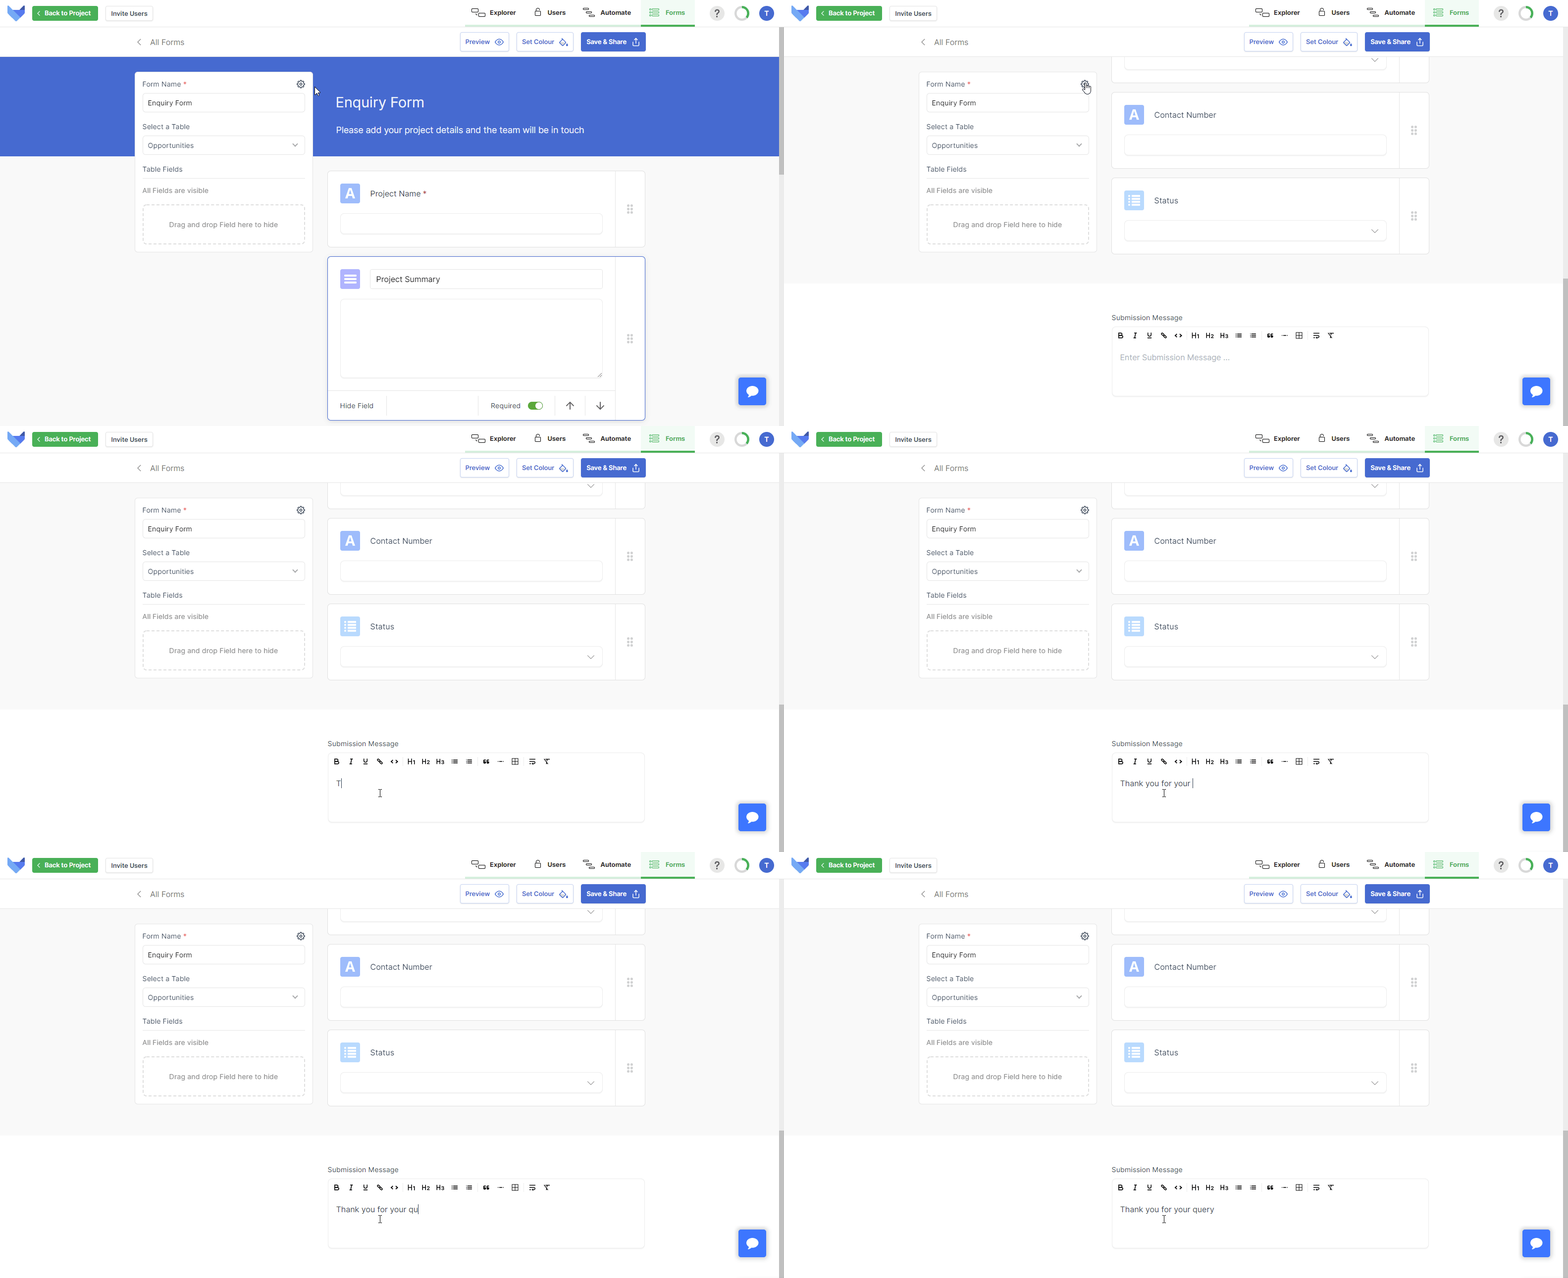
To take a look at your Form before you share it, click the Preview button.
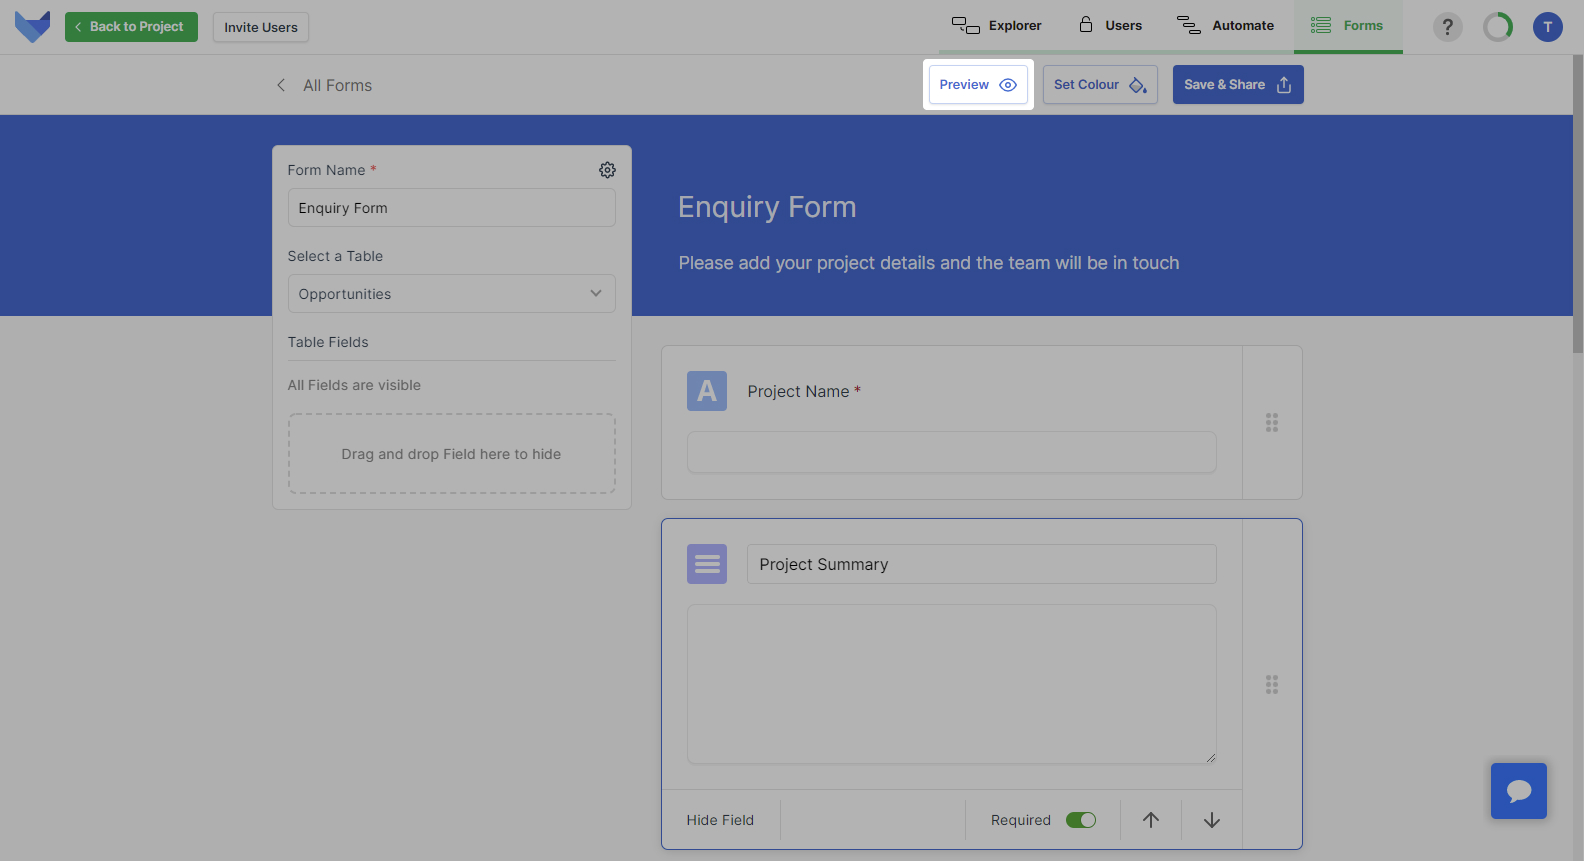
From the preview you can adjust the colour scheme and also choose to save or share the Form.
To return to the Form configuration screen, click Exit Preview or Back to Editor.
Sharing a Form
To share your Form, hover over the Save & Share button and copy the URL.
Anyone with this link can now submit a Form response.
NOTE
The Form link will remain fixed, even if you change the Form configuration. If you make changes to a Form that has been shared, remember that these changes will show as soon as you save the changes to the Form.
When a Form response is submitted, Records will be created in the appropriate Table in your Project. In the Record History, the Record will show to have been created by a Form submission. Any Workflows that are set to trigger on Records creation will be triggered.
Updating Forms
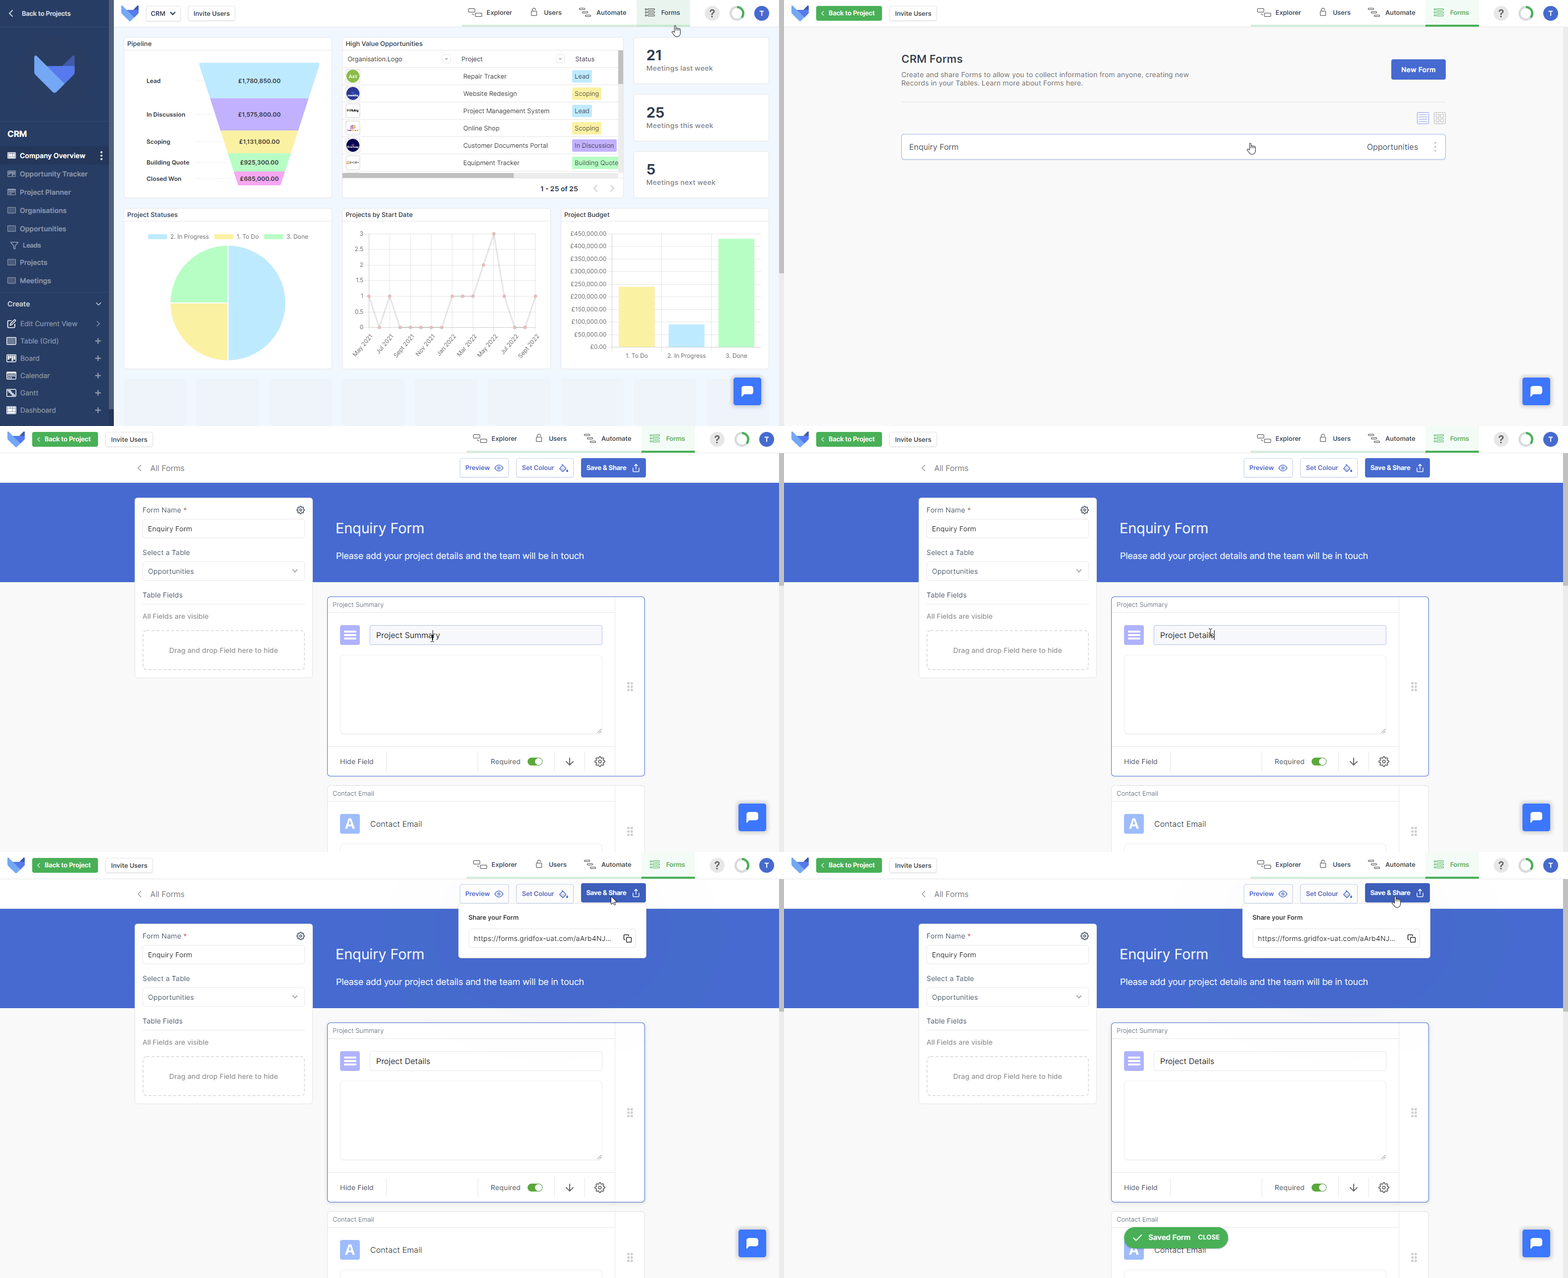
You can make changes to the setup and configuration of your Forms at any time.
- Select the Forms tab in the top right hand corner
- Select the Form that you want to make changes to from the list
-
Make the required changes, such as renaming the Form or changing the Form Fields
See the help page on Creating Forms for more details on how to change Form configuration
- Click Save & Share
The Form will immediately be updated.
NOTE
The Form link will remain fixed, even if you change the Form configuration. If you make changes to a Form that has been shared, remember that these changes will show as soon as you save the changes to the Form.
Deleting Forms
If you no longer require one of your existing Forms, it can be deleted.
NOTE
Deleting a Form cannot be undone.
- Start by selecting the Forms tab in the top right hand corner
- Open the menu for the Form that you would like to delete and select Delete Form
- Confirm the action by clicking Delete.
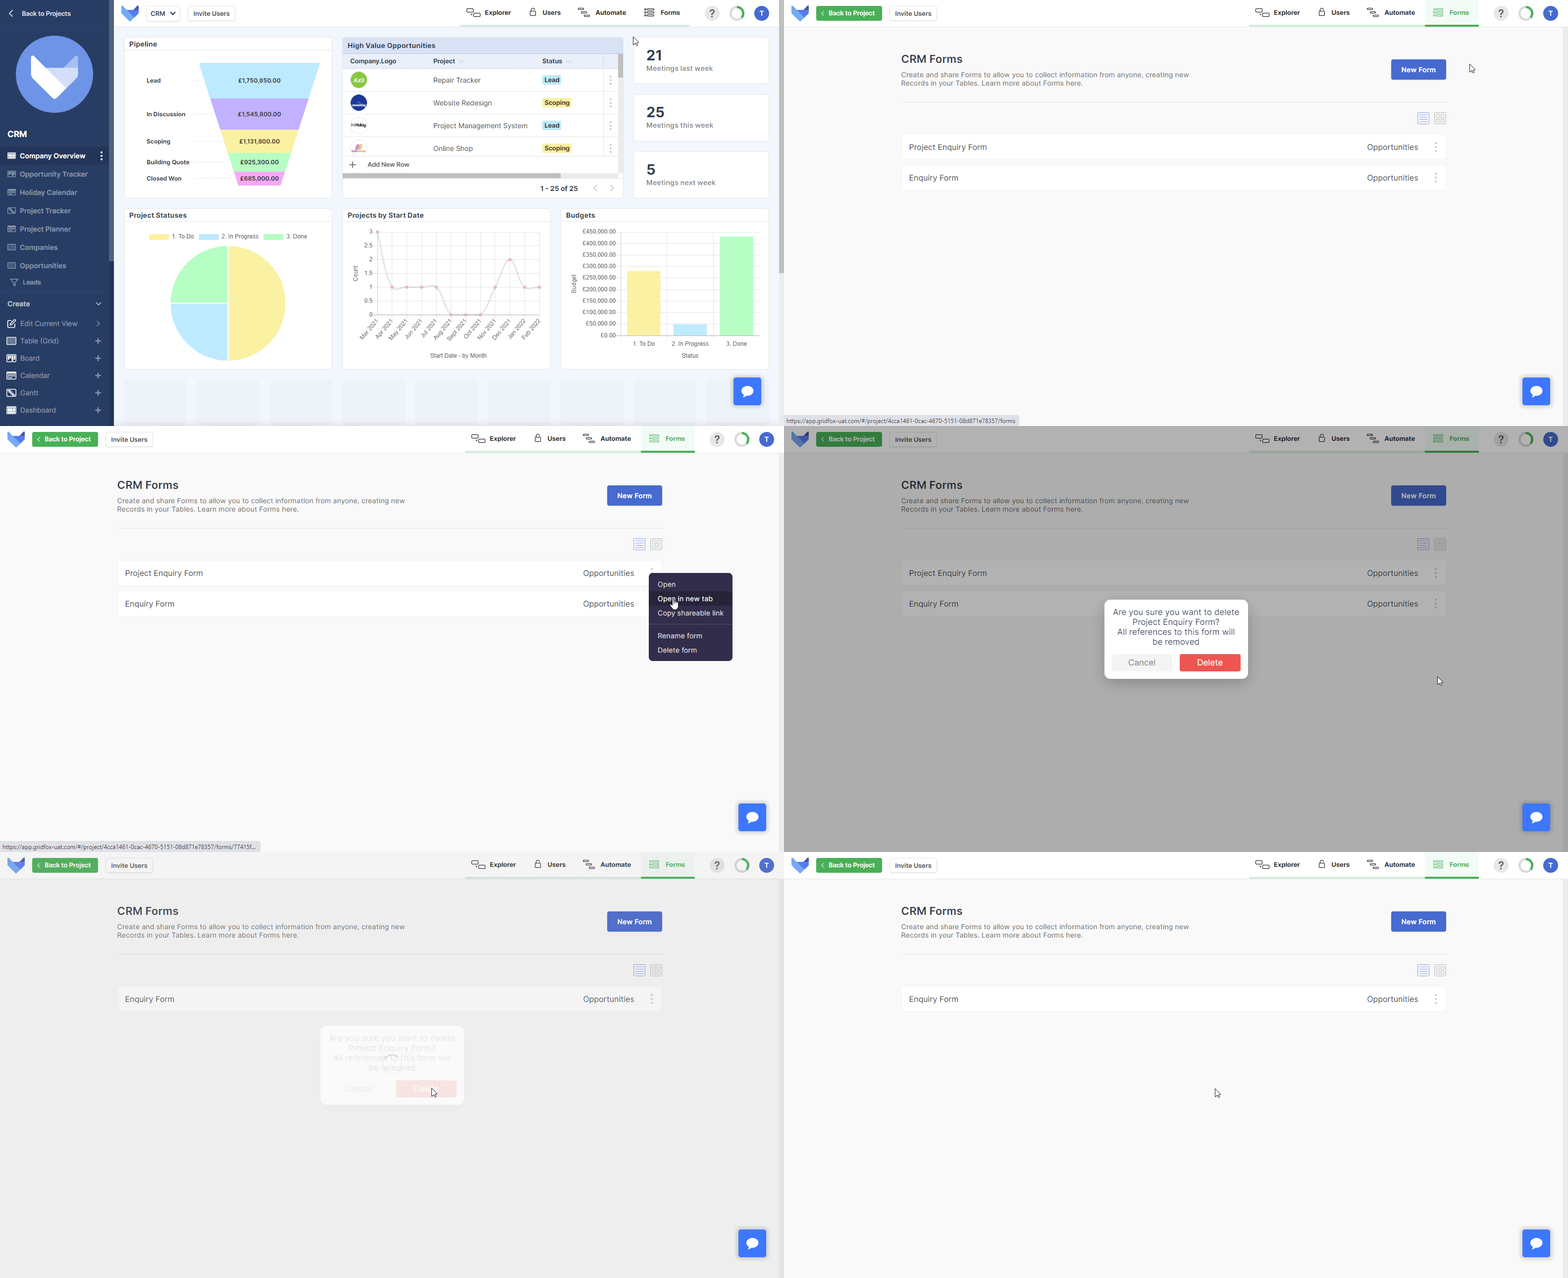
If you have shared the Form link, people will no longer be able to view or submit responses to the Form after it has been deleted.
