Building a simple CRM with Gridfox

Beth King · 21 mins read

Building a simple CRM with Gridfox
Learning Objectives
  • How to create Tables and Fields
  • Ability to link Tables together
  • Differences between the Screen Builder & Table Builder
Prerequisites

Using Gridfox for your Custom CRM

A customer relationship management (CRM) system empowers you and your team to build better relationships with your customers, and potential customers.

By having a single system to track and manage all your customers and associated activities, you can ensure your team is collaborating and working together with the most up to date information.

By using Gridfox to store information about your customers, sales opportunities and activities, you have a custom system that can grow and evolve with you business.

Rather than spending time untangling spreadsheets or administering systems that don’t work for you, with Gridfox you have the freedom to focus on the tasks that matter and drive your business forward.

This tutorial will allow you to set up a Project in Gridfox for your custom CRM. You will get an insight into a variety of features in Gridfox. You can then tweak and configure the Project to allow you to manage your work, your way.

Creating a new Project

The first step to building your custom CRM is to create a Gridfox Project. You will need to have a Gridfox Account that you can create Projects in. Sign up for an Account here.

When you signup, or login to your existing Account, start from the homepage.
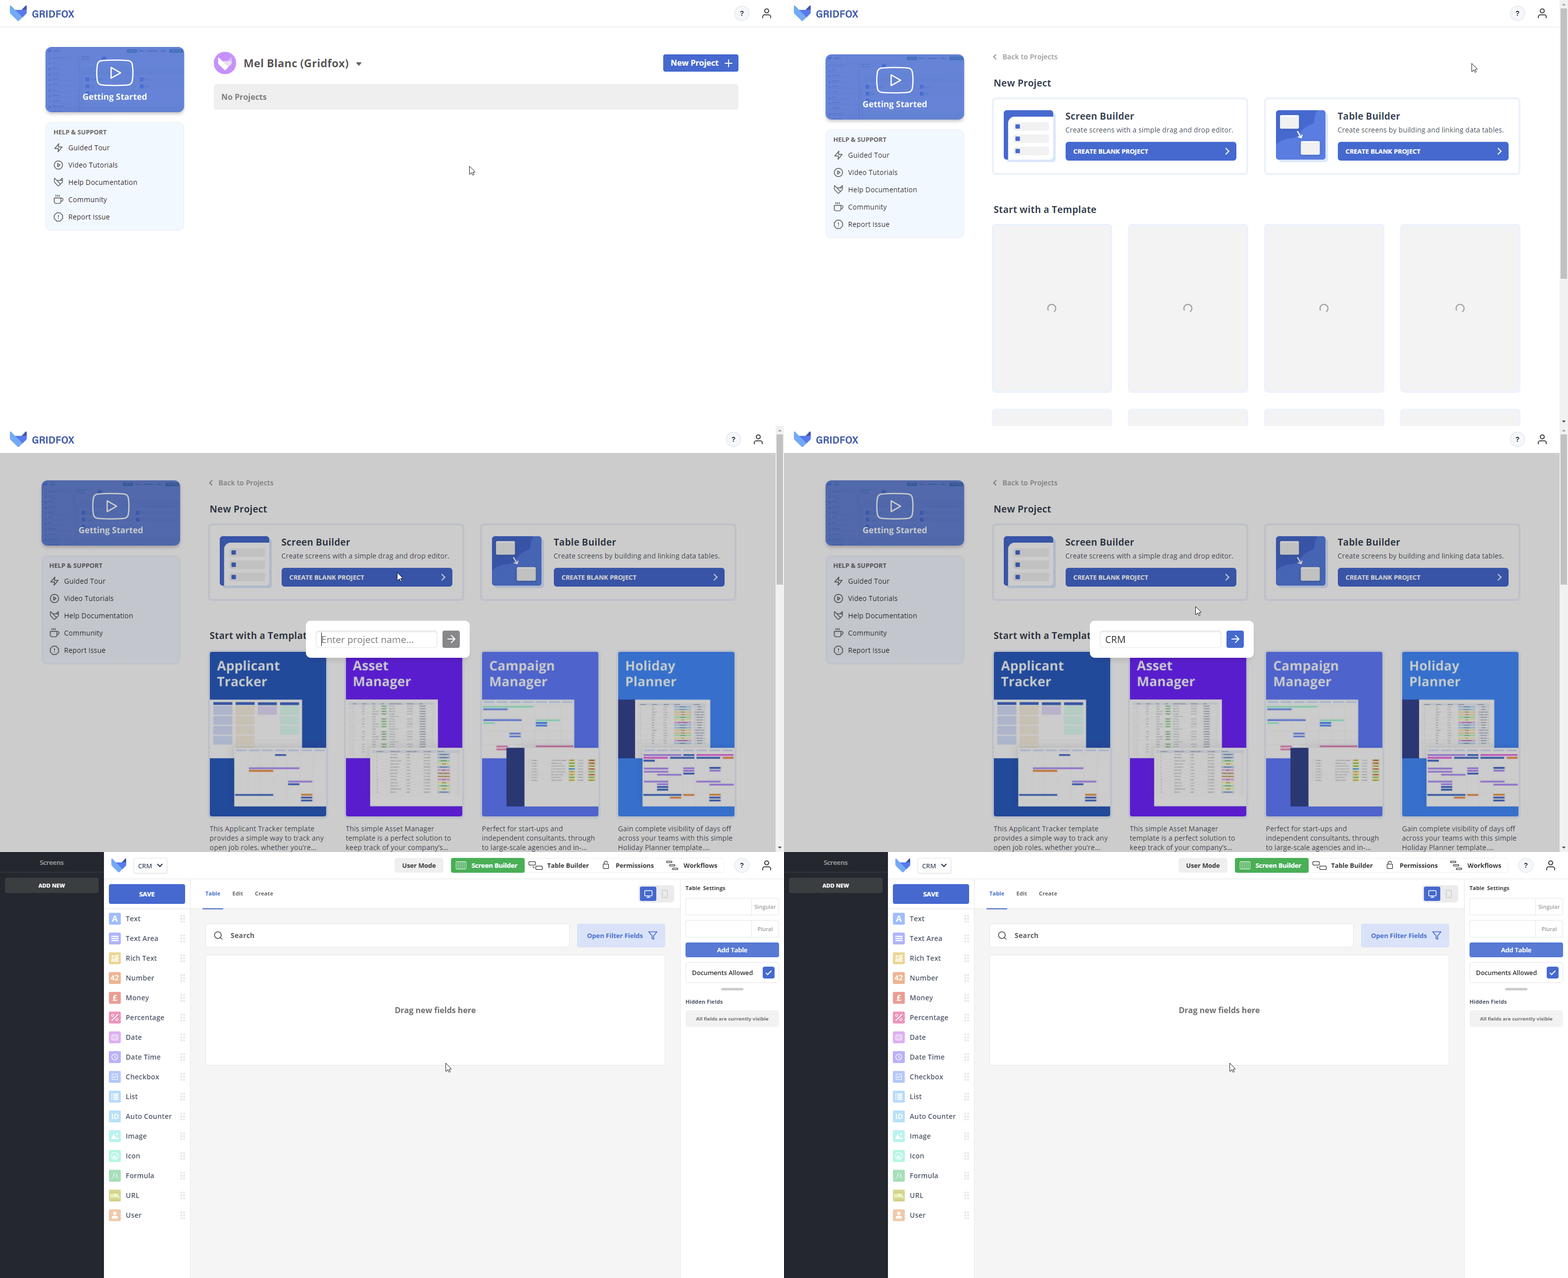
  1. Click New Project
  2. Select Screen Builder
  3. Enter the Project Name as ‘CRM’ and click the next arrow

Creating Project using Screen Builder

We have selected to start building the Project using the Screen Builder.

The Screen Builder allows you to create new Tables and Fields, with a focus on tailoring the layout of each of your Screens.

The Table Builder allows you also to create new Tables and Fields, allowing you to see a birds-eye view of your whole model rather than viewing each Table individually.

You can switch between the Table Builder and Screen Builder at any time.

We will use both over the course of this tutorial.

Creating a Companies Table

Firstly, we need to create a Table that we can store Company information in. Tables are used to store data in your app and contain lists of Records of the same type.

  1. In Table Settings in the right hand menu, enter ‘Company’ as the Singular Table Name

    • The Plural Name will populate automatically when you click out of the Singular Table Name box
  2. Drag a Text Field from the left hand menu onto the canvas and label it ‘Name’
  3. Drag a List Field from the left hand menu onto the canvas and label it ‘Sector’
  4. Open the Field Configuration for the Sector Field and add the following List Items:
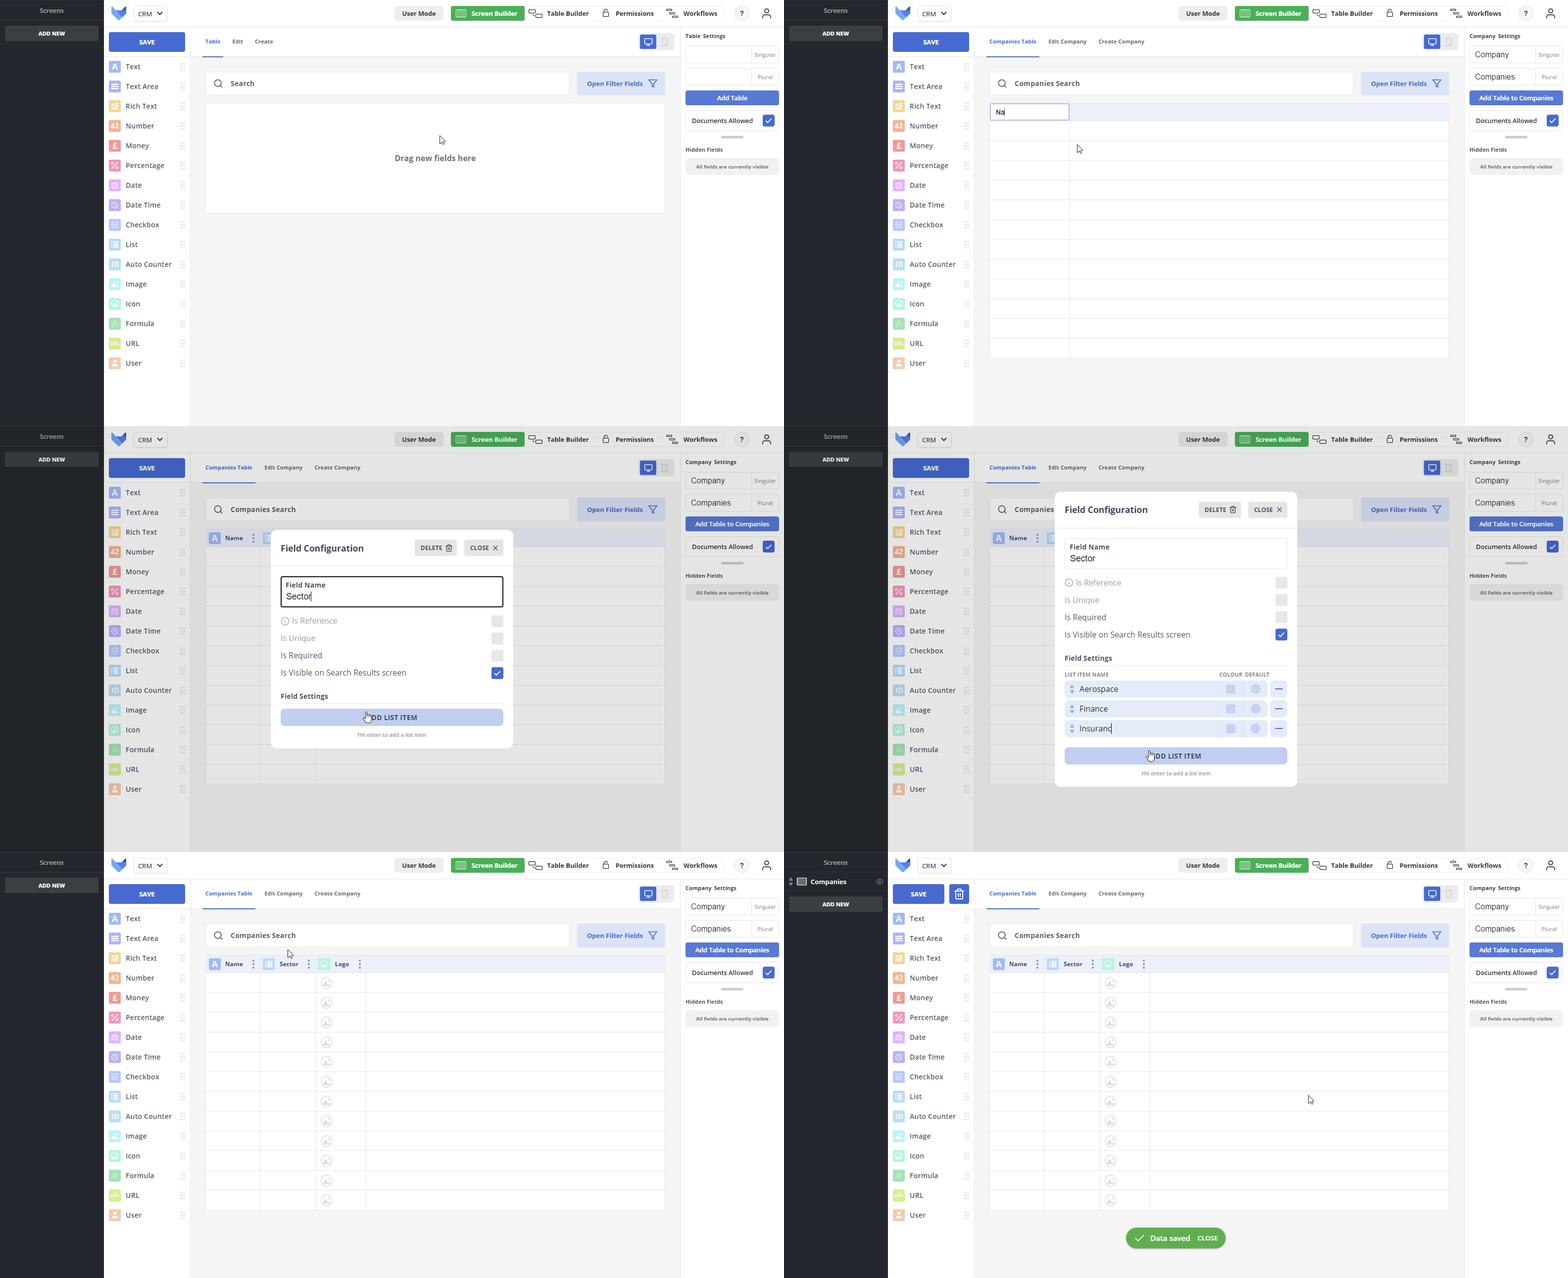
    • Aerospace
    • Finance
    • Insurance
  5. Drag an Icon Field from the left hand menu onto the canvas and label it ‘Logo’
  6. Click Save
  7. Select Name as the Reference Field
  8. Click Save

Create Company Table

Adding Company Records

Now that the Company Table has been created, you can start storing the list of Companies as Records.
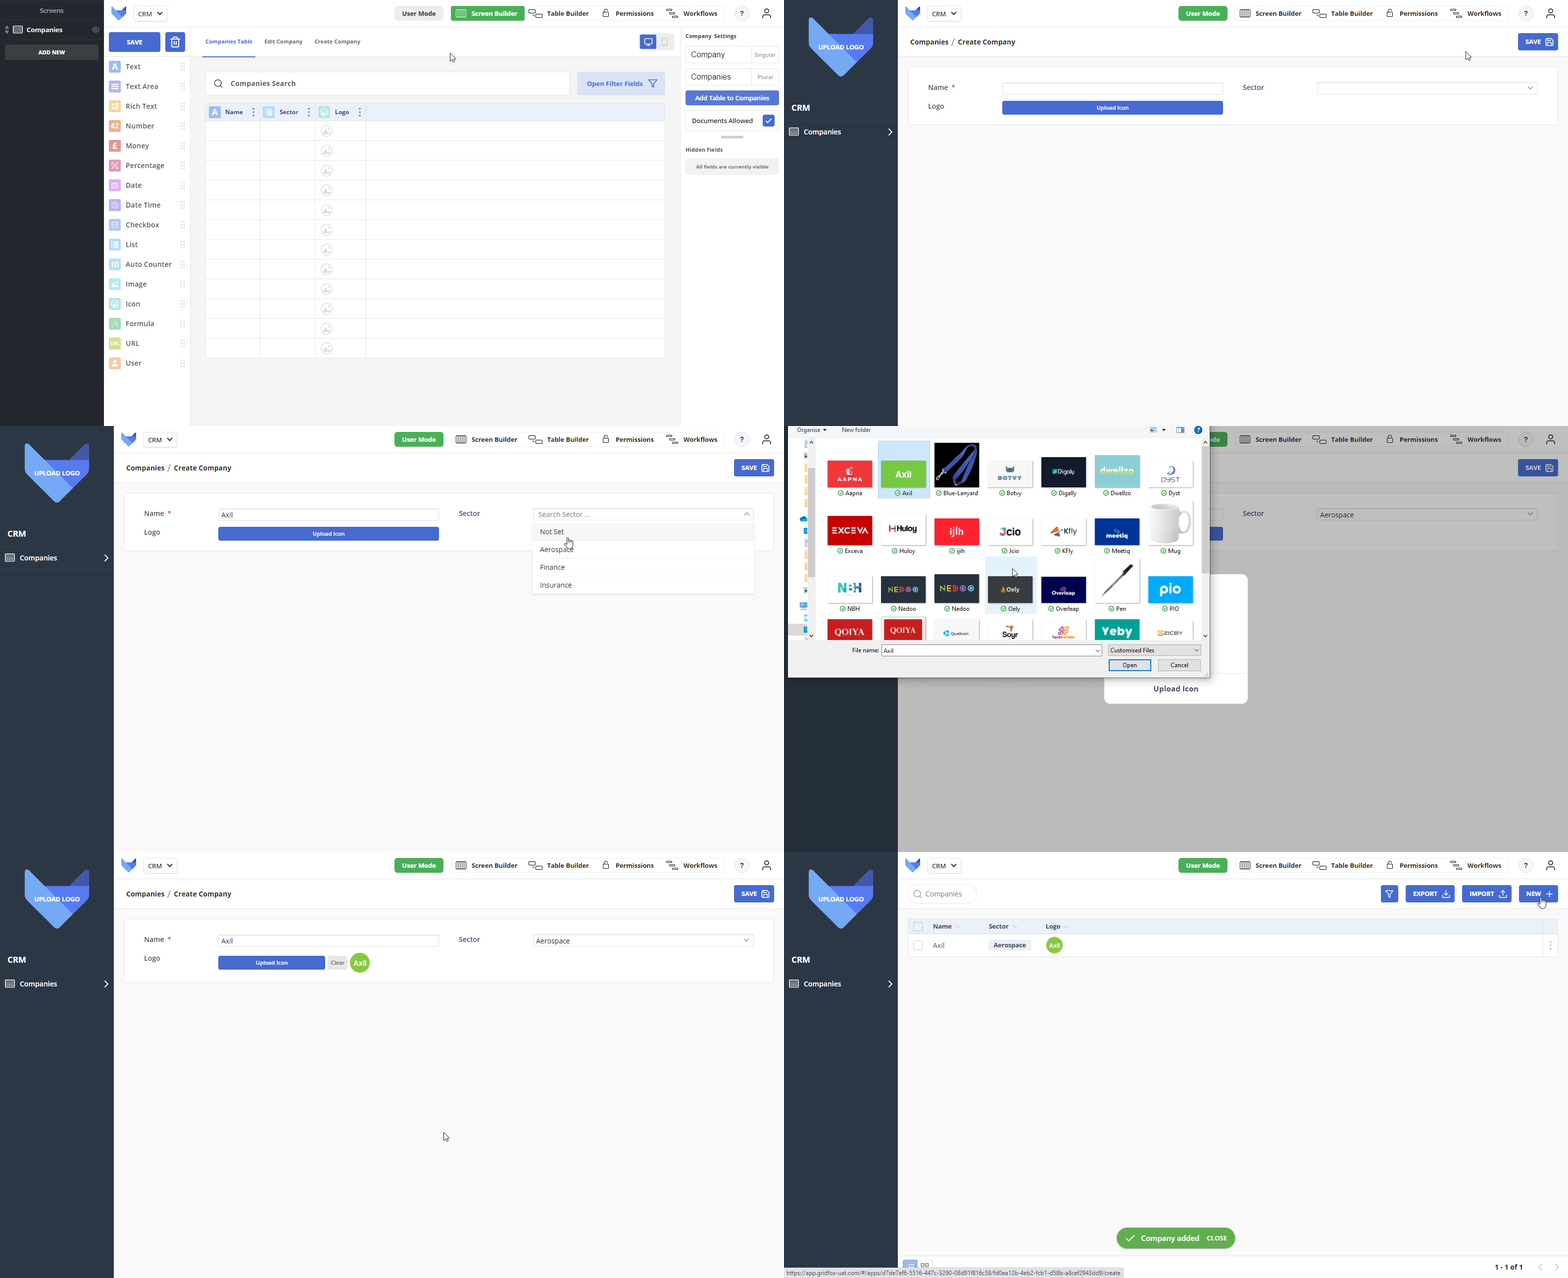
  1. Click User Mode
  2. Click New to create a new Company Record
  3. Enter a Company Name, choose a Sector, upload a Logo and click Save
  4. Repeat step 3 until you have a small set of Company Records

Adding a Company Record

Linking a Sales Opportunity Table

We can now create a new Table to capture sales opportunity information. The new Opportunity Table can be linked to the existing Company Table so that you can see which Opportunities are related to which Company.
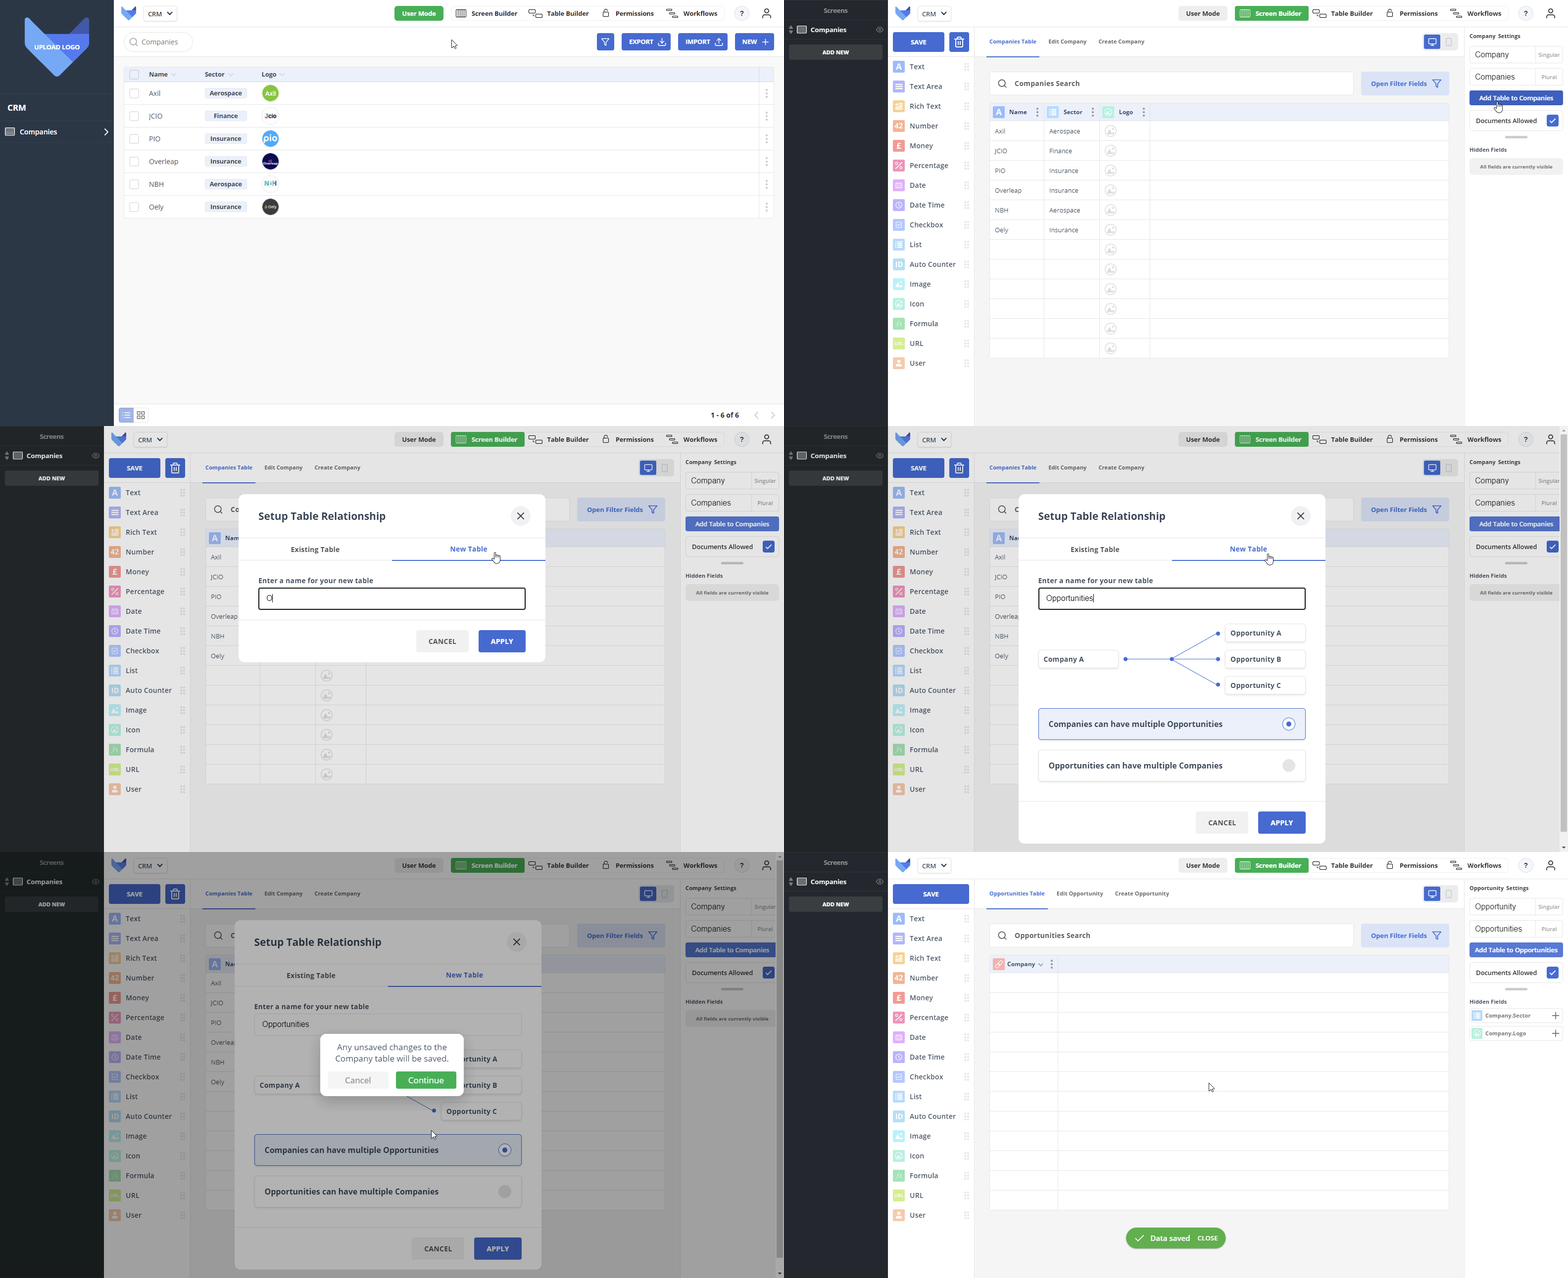
  1. Click Screen Builder
  2. Click Add Table to Companies
  3. Select the New Table tab
  4. Enter ‘Opportunities’ in the Table Name box
  5. Ensure the relationship direction is ‘Companies can have multiple Opportunities’
  6. Click Apply
  7. Click Continue

Add Linked Opportunity Table

Adding Fields to the Opportunities Table

Now that the Opportunity Table has been created and is linked to the Company Table, we can add some Fields to the Opportunity Table to allow the sales team to store details about their sales opportunities.

  1. Add the following Fields to the Opportunities Table:
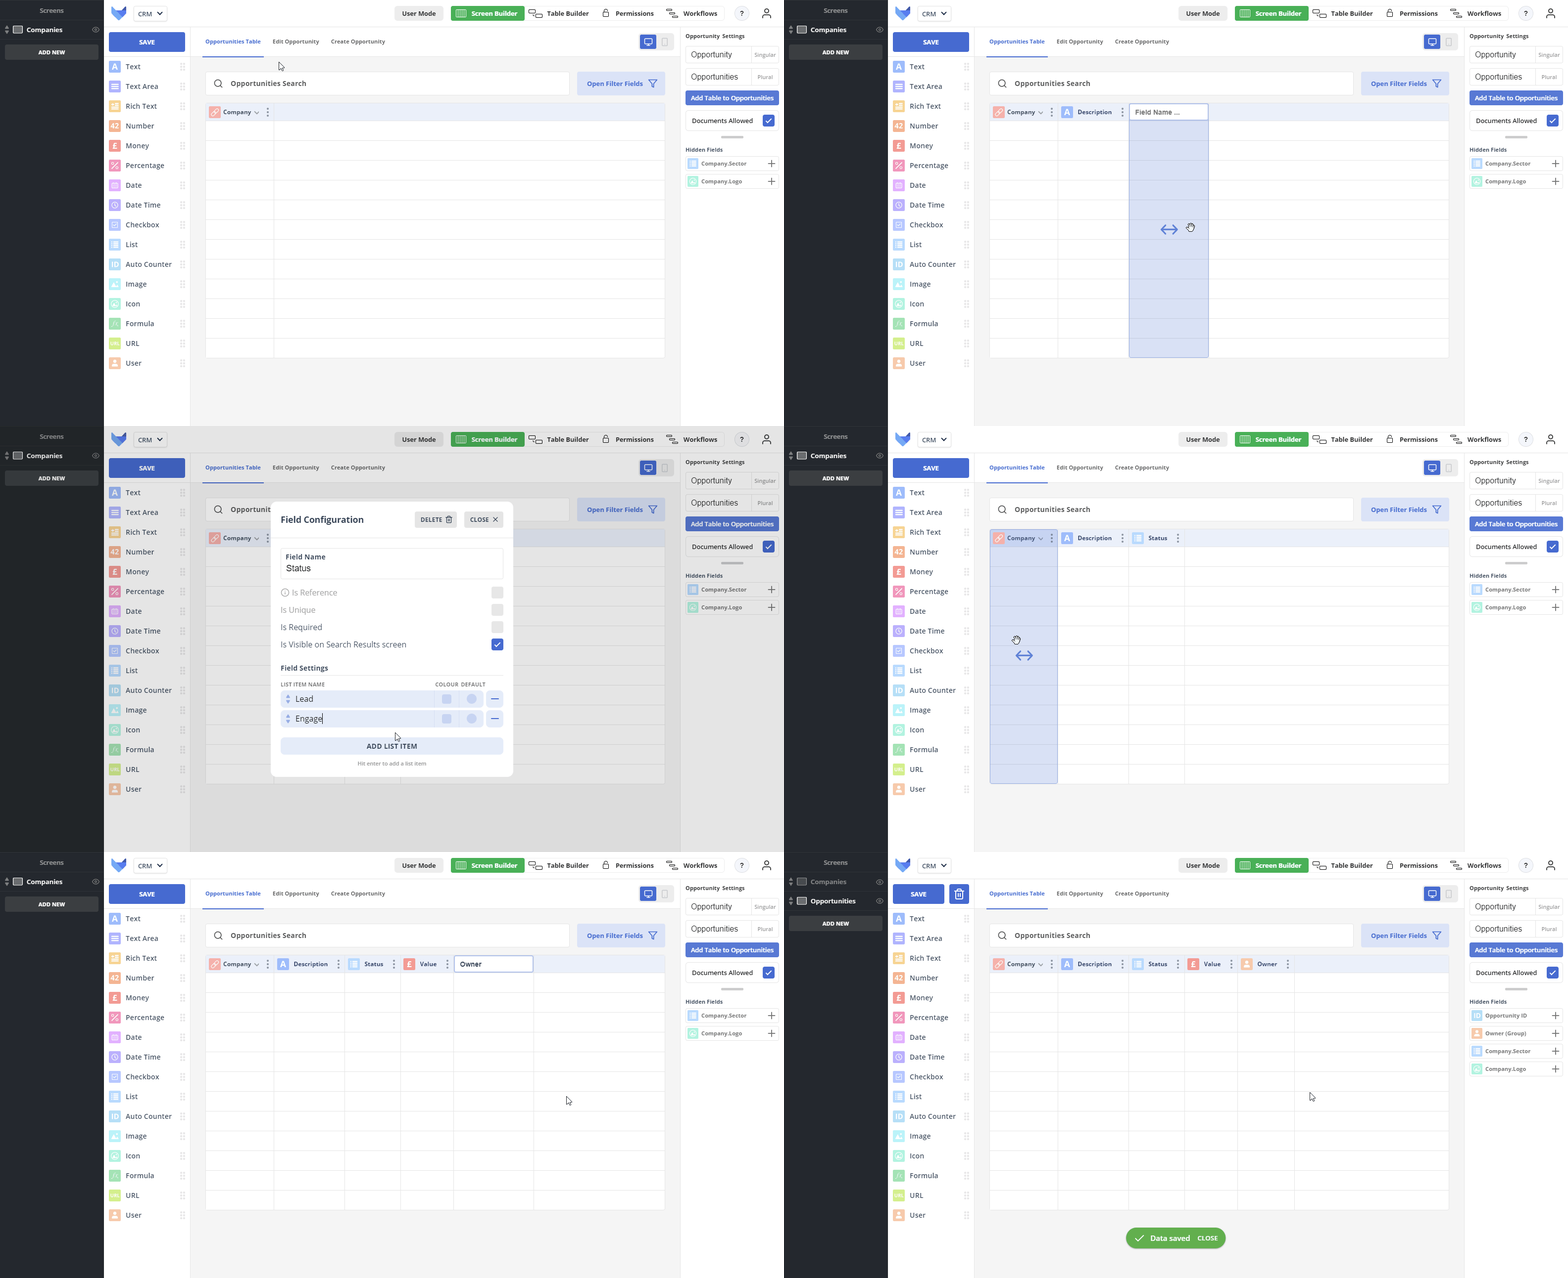
    • Text Field called Description
    • List Field called Status with Statuses of ‘Lead’, ‘Engaged’, ‘Quoting’ and ‘Closed Won’
    • Money Field called Value
    • User Field called Owner
  2. Click Save
  3. Select Add new Auto Counter Field in the Reference Field picker
  4. Click Save

Adding Fields to Opportunity Table

Creating Linked Records

Now that the Tables are linked together, when we look at an Opportunity Record we will be able to see which Company it is linked to. When we look at a Company Record we will be able to see all related Opportunities.
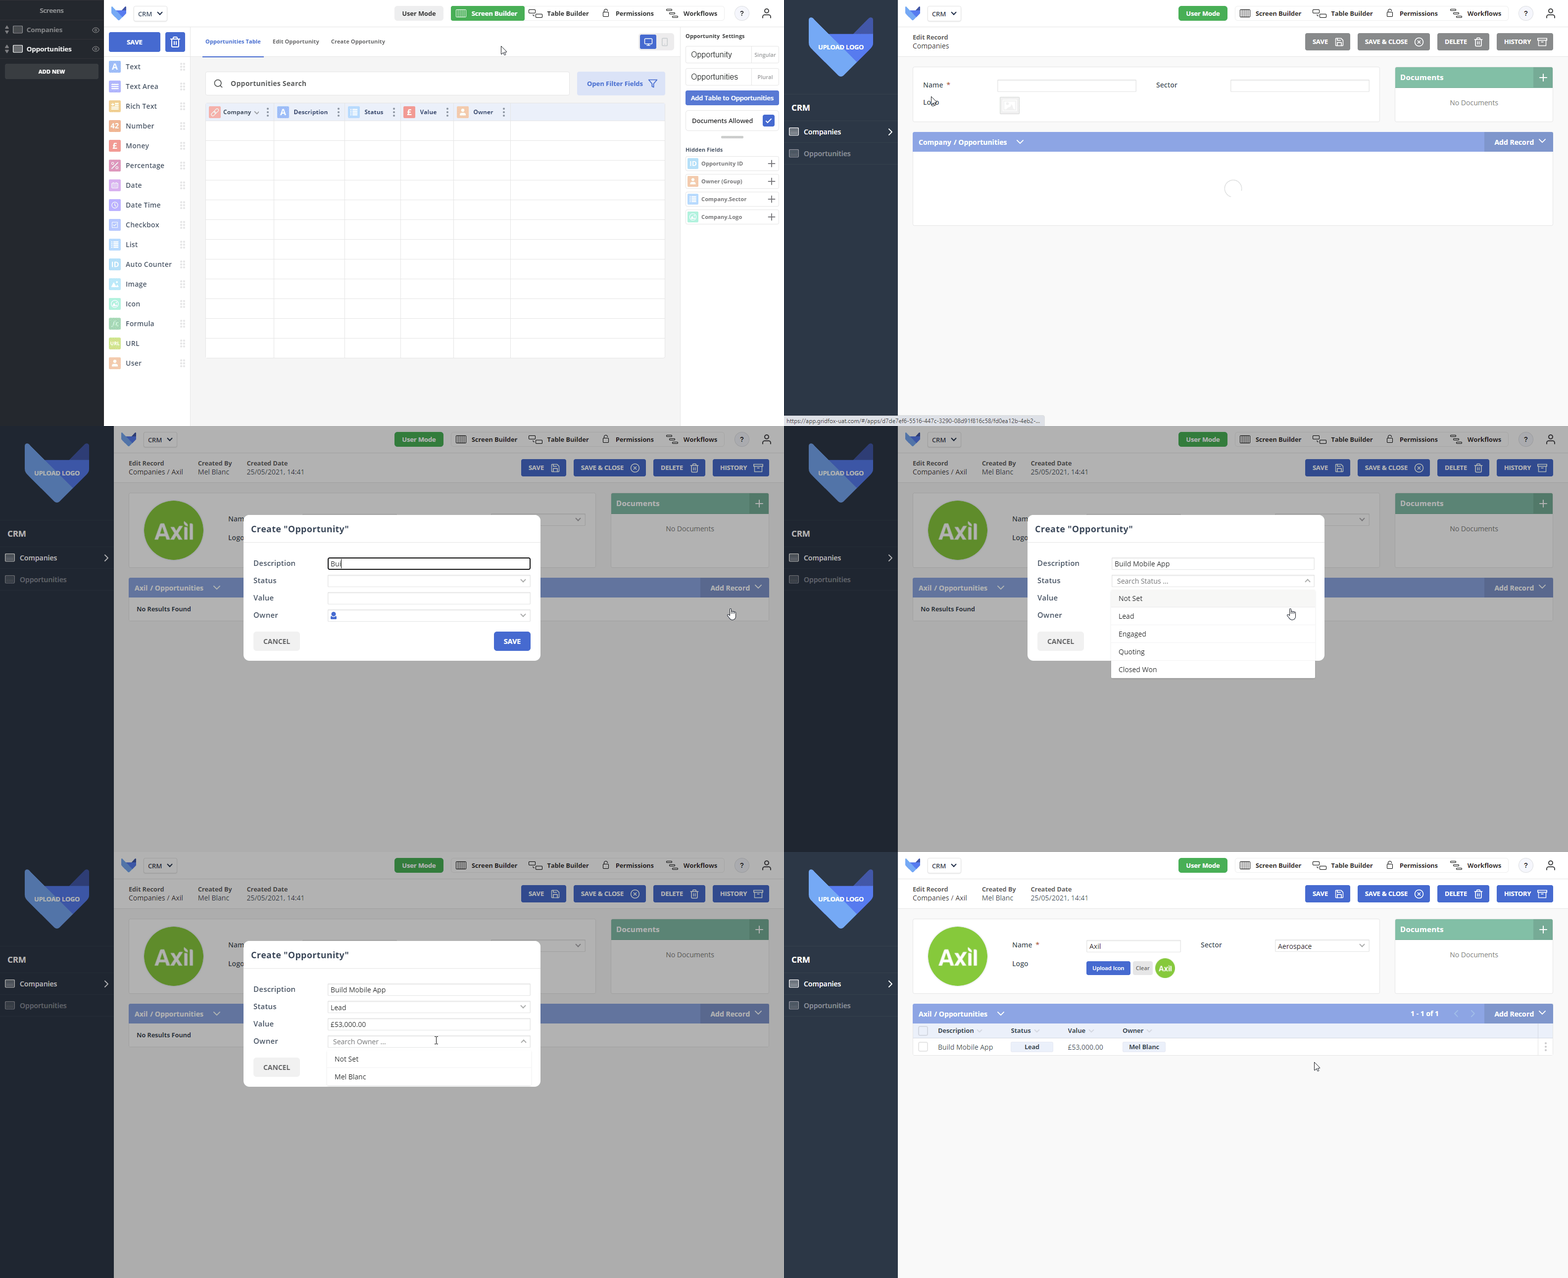
  1. Click User Mode
  2. Select the Companies page in the navigation menu
  3. Select an existing Company
  4. Click Add Record in the Opportunity grid, then New Opportunity
  5. Enter a Description, choose a Status, set a Value and assign yourself as the Owner
  6. Click Save

Creating Opportunity from Company

Now when we look at the list of Opportunities, we will see the Opportunity that was created from the selected Company. Select the Opportunities page in the navigation menu.
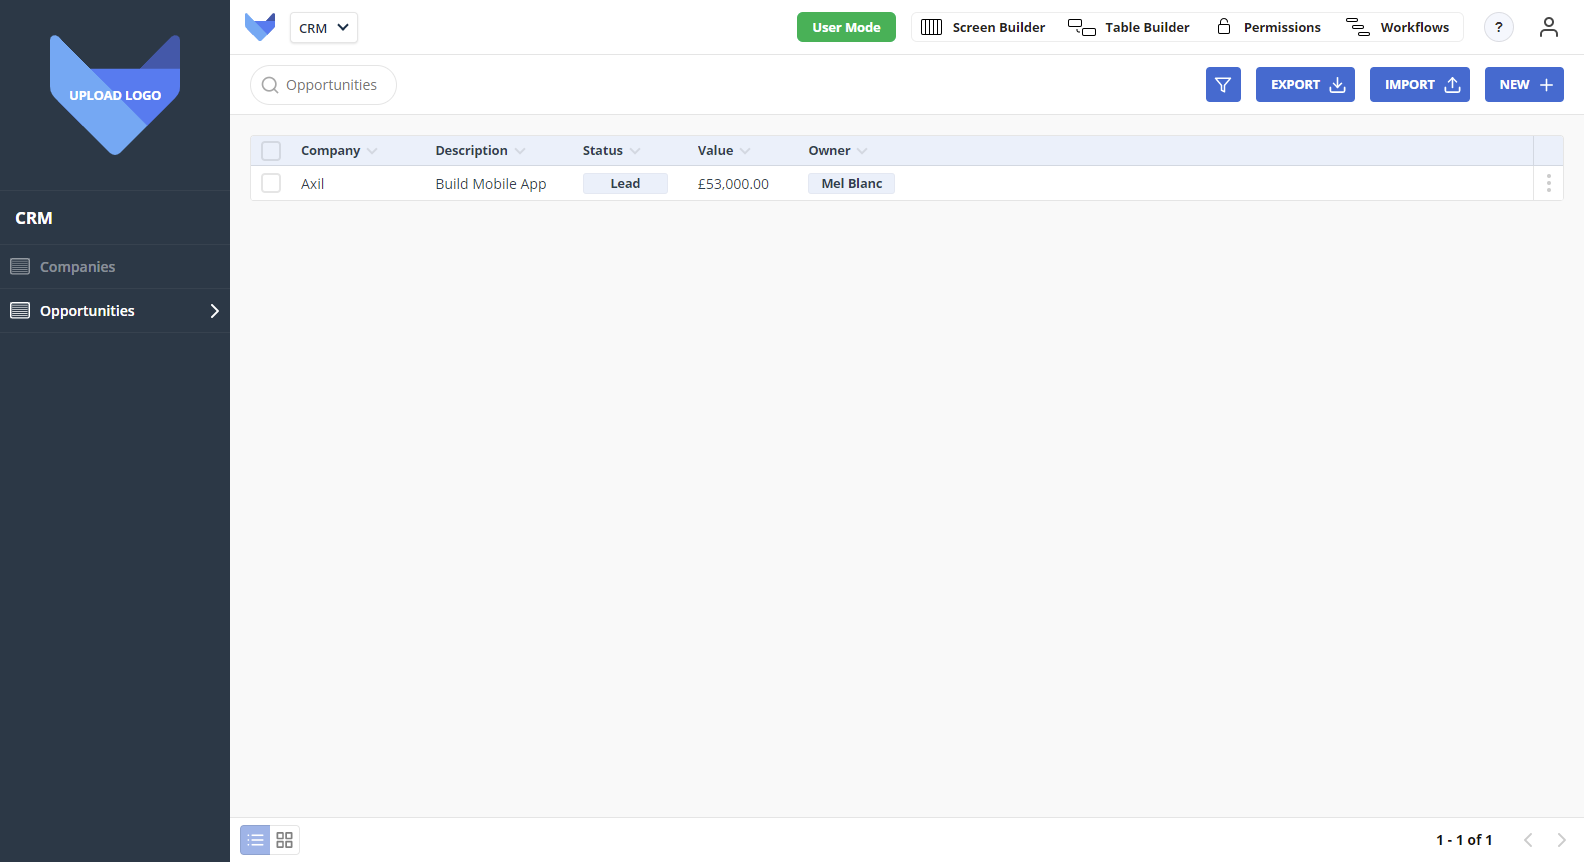
Opportunity Page

We can also create Opportunities directly from this page.
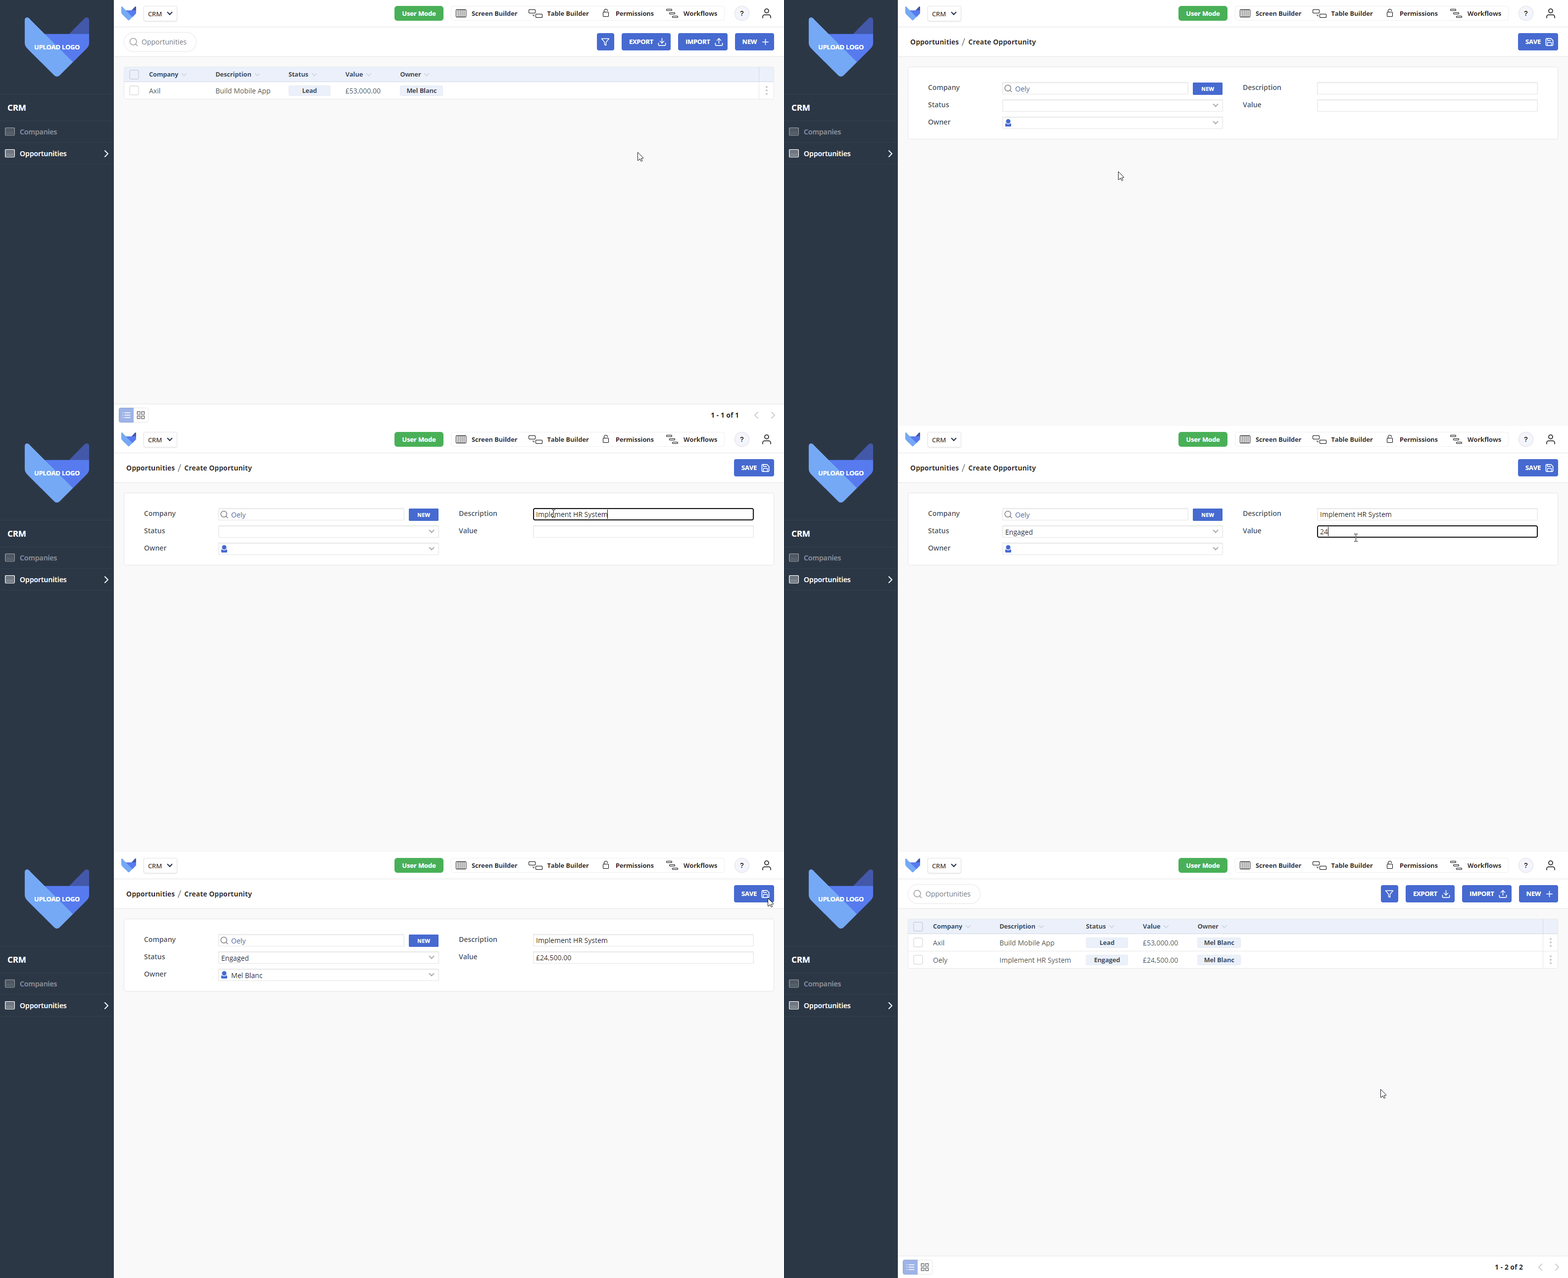
  1. Click New
  2. Choose a Company to assign the Opportunity to
  3. Enter a Description, choose a Status, set a Value and assign yourself as the Owner
  4. Click Save

Add Opportunity

When you now take a look at the Company that you created the Opportunity for, the Opportunity will display underneath the Company details.
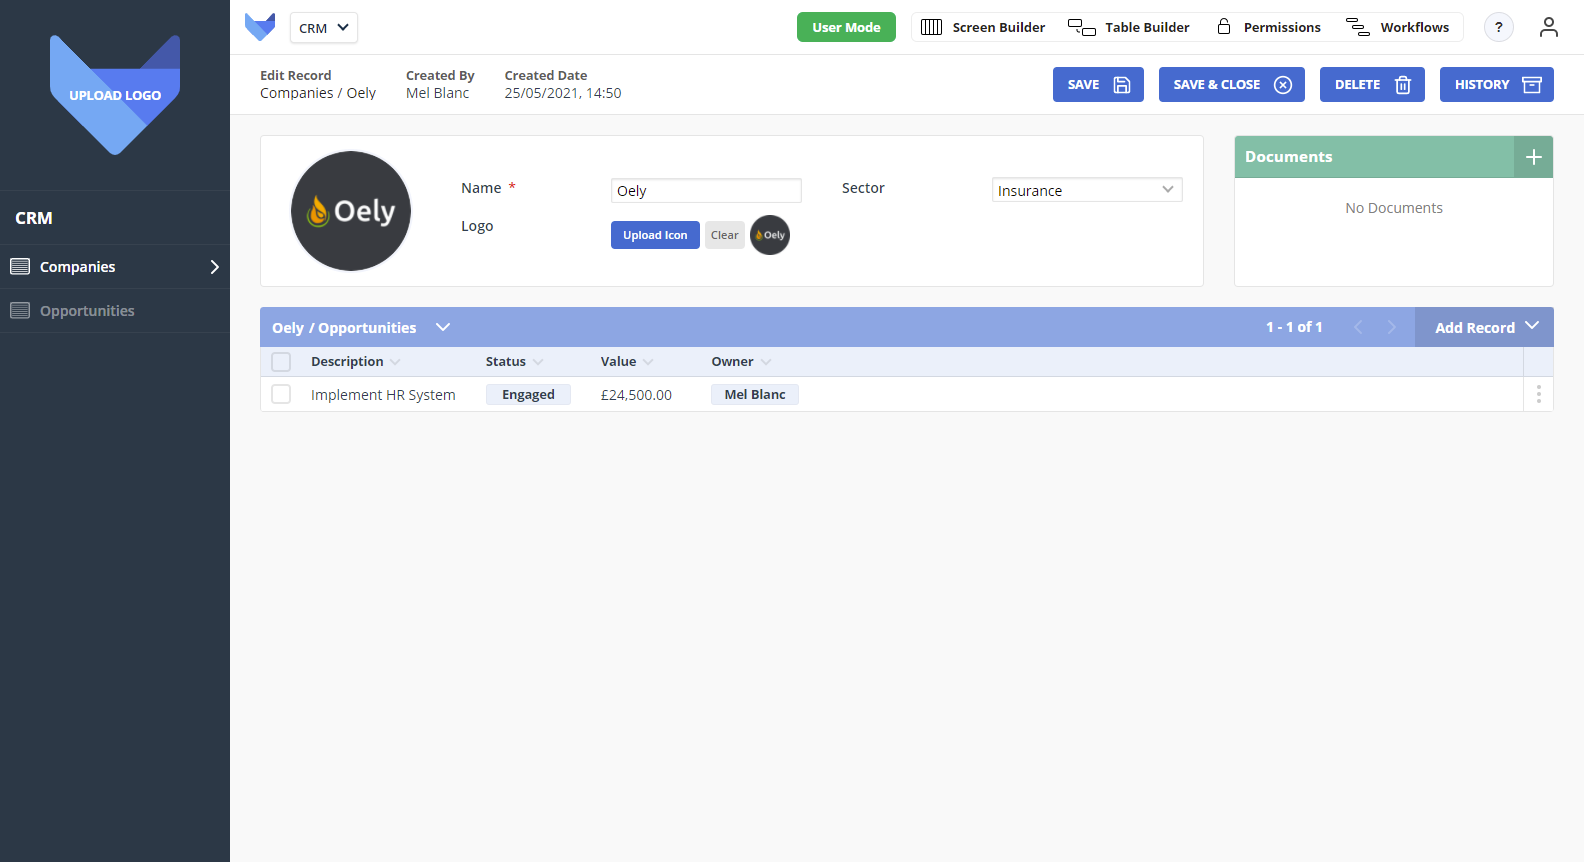
Opportunity on Company

Creating Formula Fields

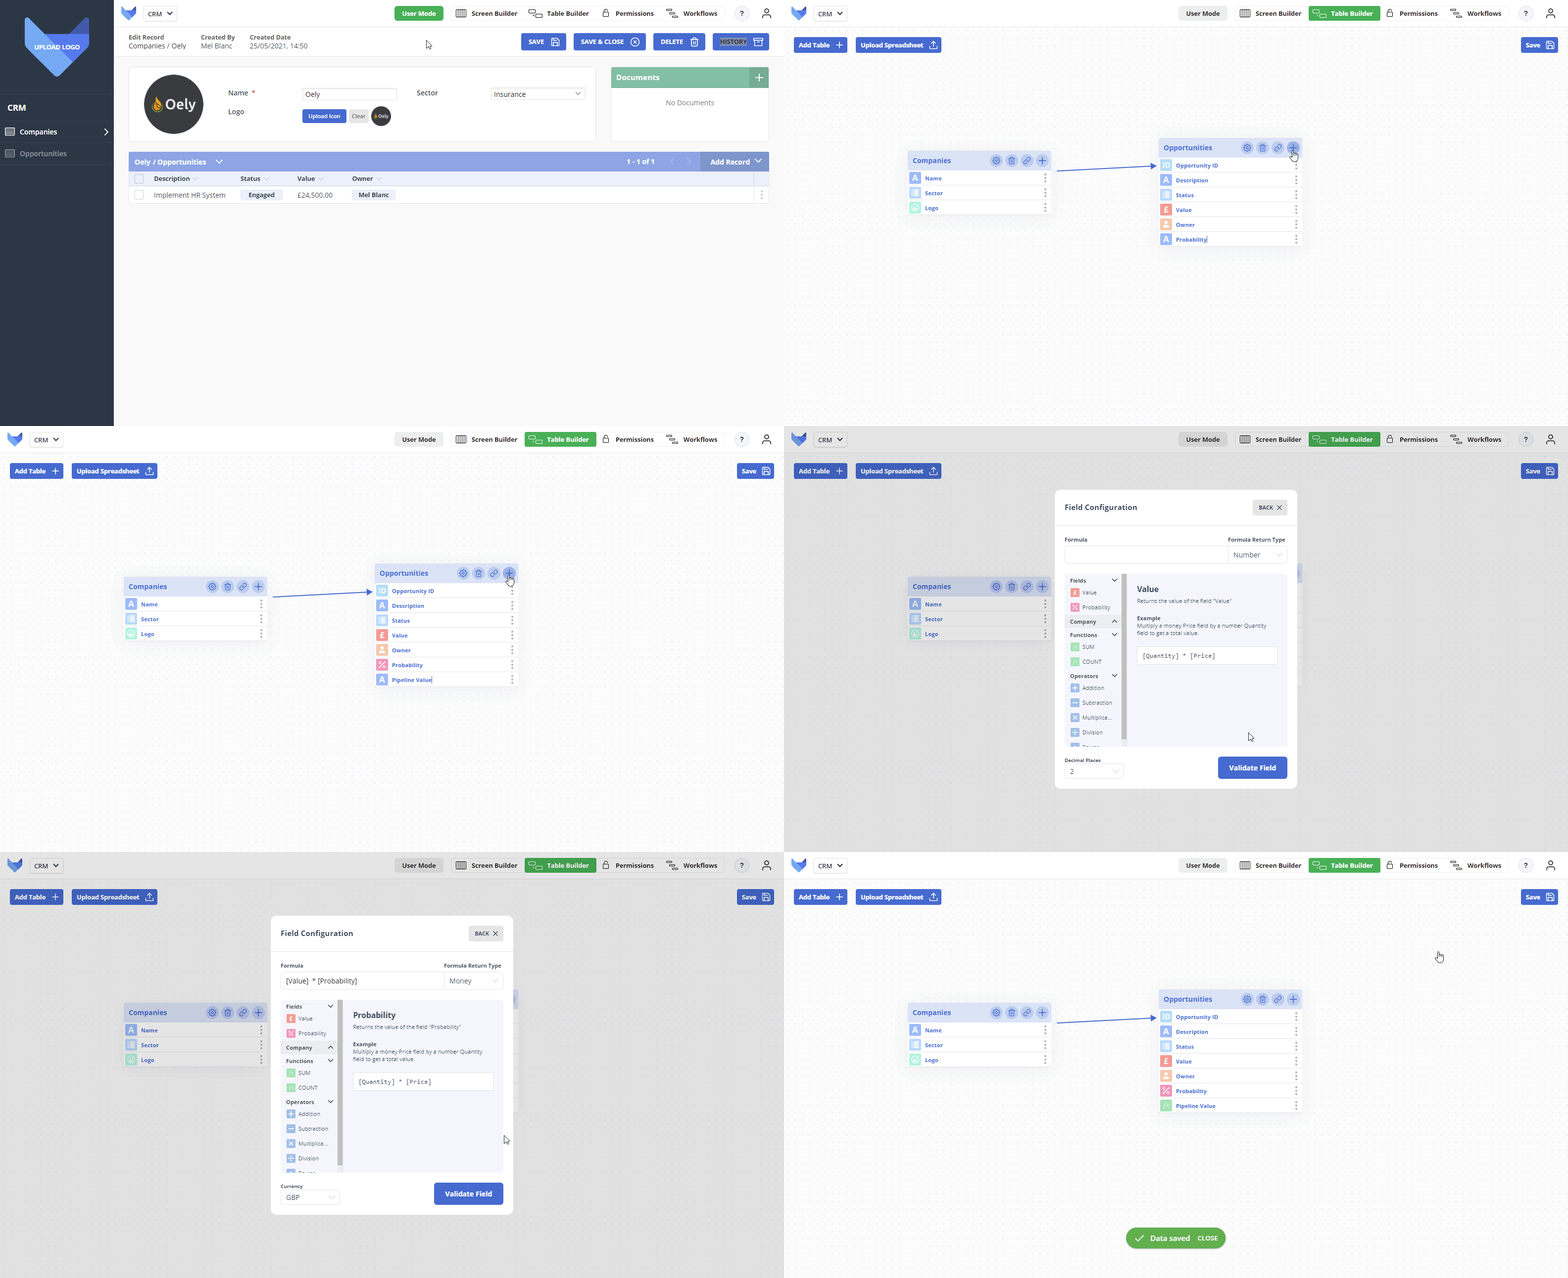
You can calculate the value of your sales pipeline by adding a probability Field to the Opportunity Table. A Formula Field can then be used to calculate the pipeline value using the probability and value Fields.

We are going to create these new Fields using the Table Builder.

  1. Select Table Builder
  2. Click the plus icon on the Opportunity Table to add a new Field
  3. Enter a Field Name of ‘Probability’
  4. Change the Field Type to Percentage
  5. Click the plus icon on the Opportunity Table to add a new Field
  6. Enter a Field Name of ‘Pipeline Value’
  7. Change the Field Type to Formula
  8. Open the Field Configuration for the Formula Field
  9. Click Configure your formula
  10. Enter the formula [Value] * [Probability]
  11. Change the Formula Return Type to Money
  12. Click Validate Field
  13. Click Back on the formula configuration
  14. Click Close on the field configuration
  15. Click Save to confirm the changes to your model

Formula Field on Table Builder

Using Formula Fields

Now that we have added the Pipeline Value Formula Field to the Opportunities Table, we can set the Probability on our Opportunity Records and the Pipeline Value will be calculated.

  1. Click User Mode
  2. Select Opportunities in the navigation bar
  3. Open one of your existing Opportunities
  4. Enter a Probability
  5. Click Save & Close

The Pipeline Value will be calculated for the Opportunity.
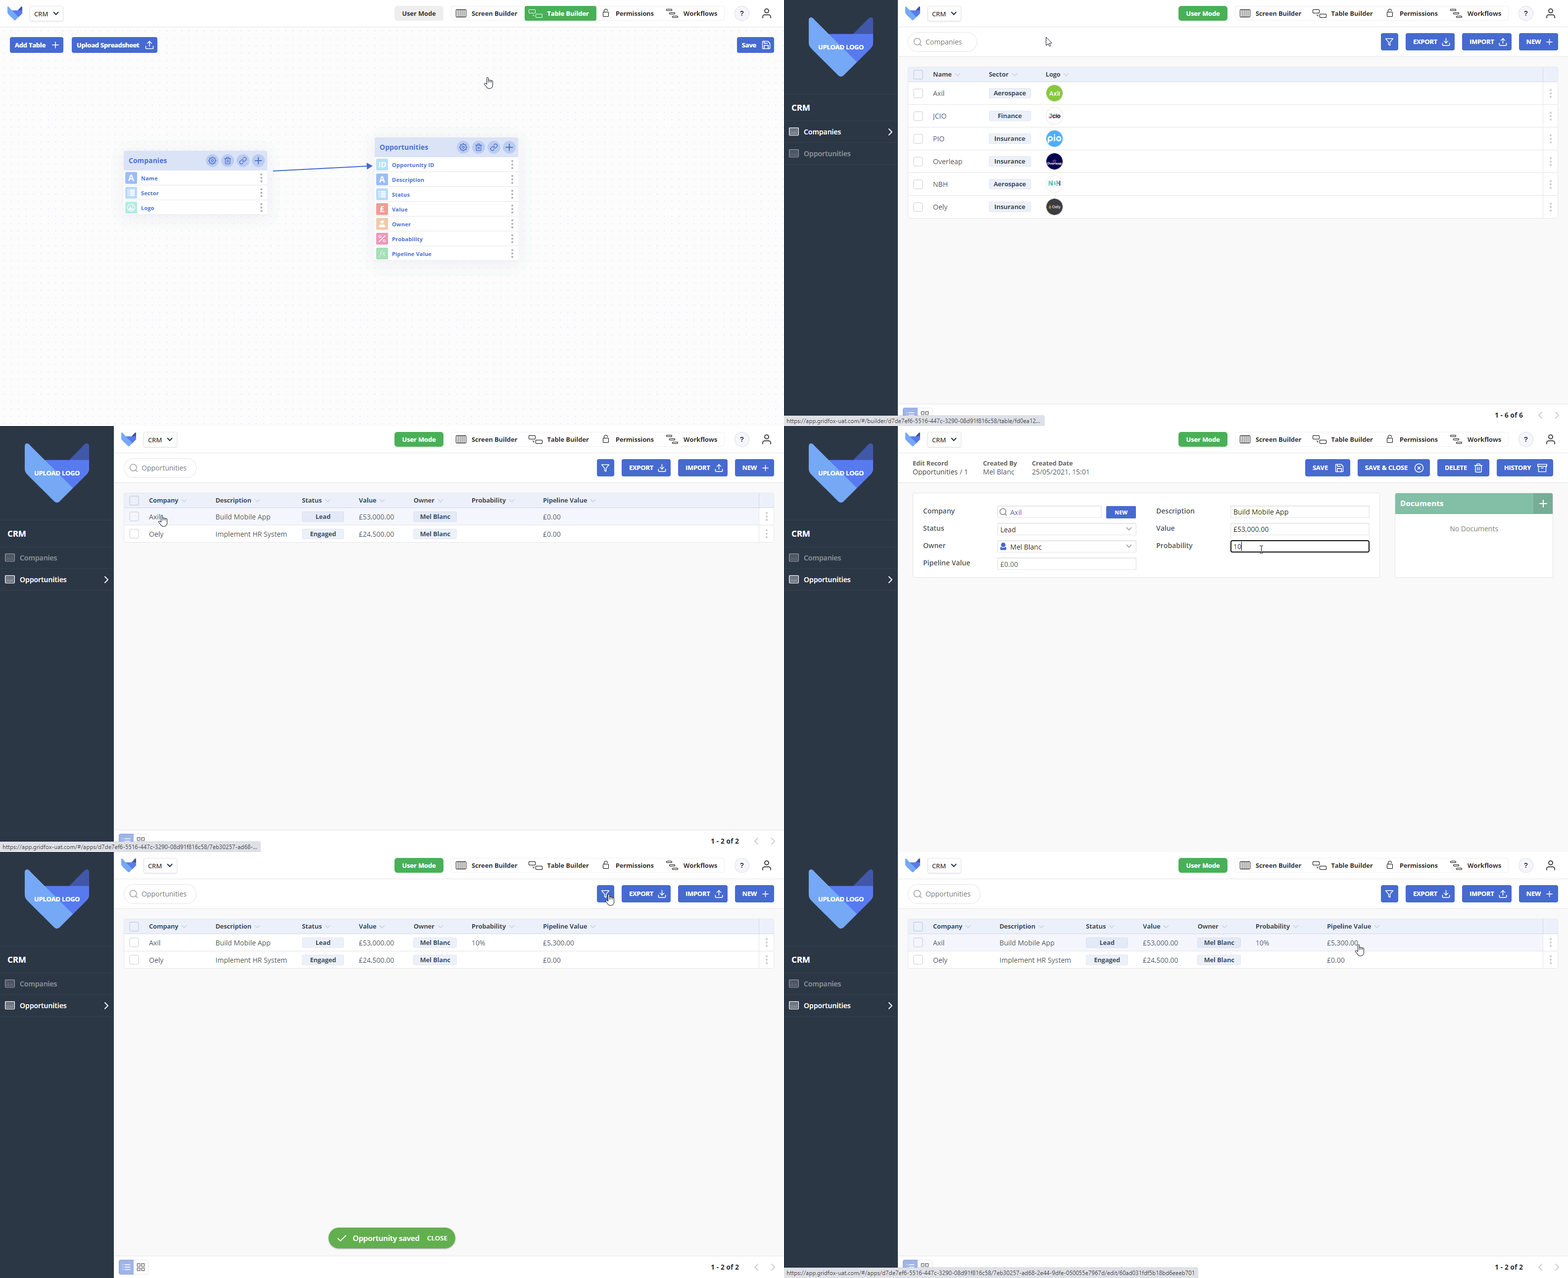
Setting Formula Field

Changing Screen Layout

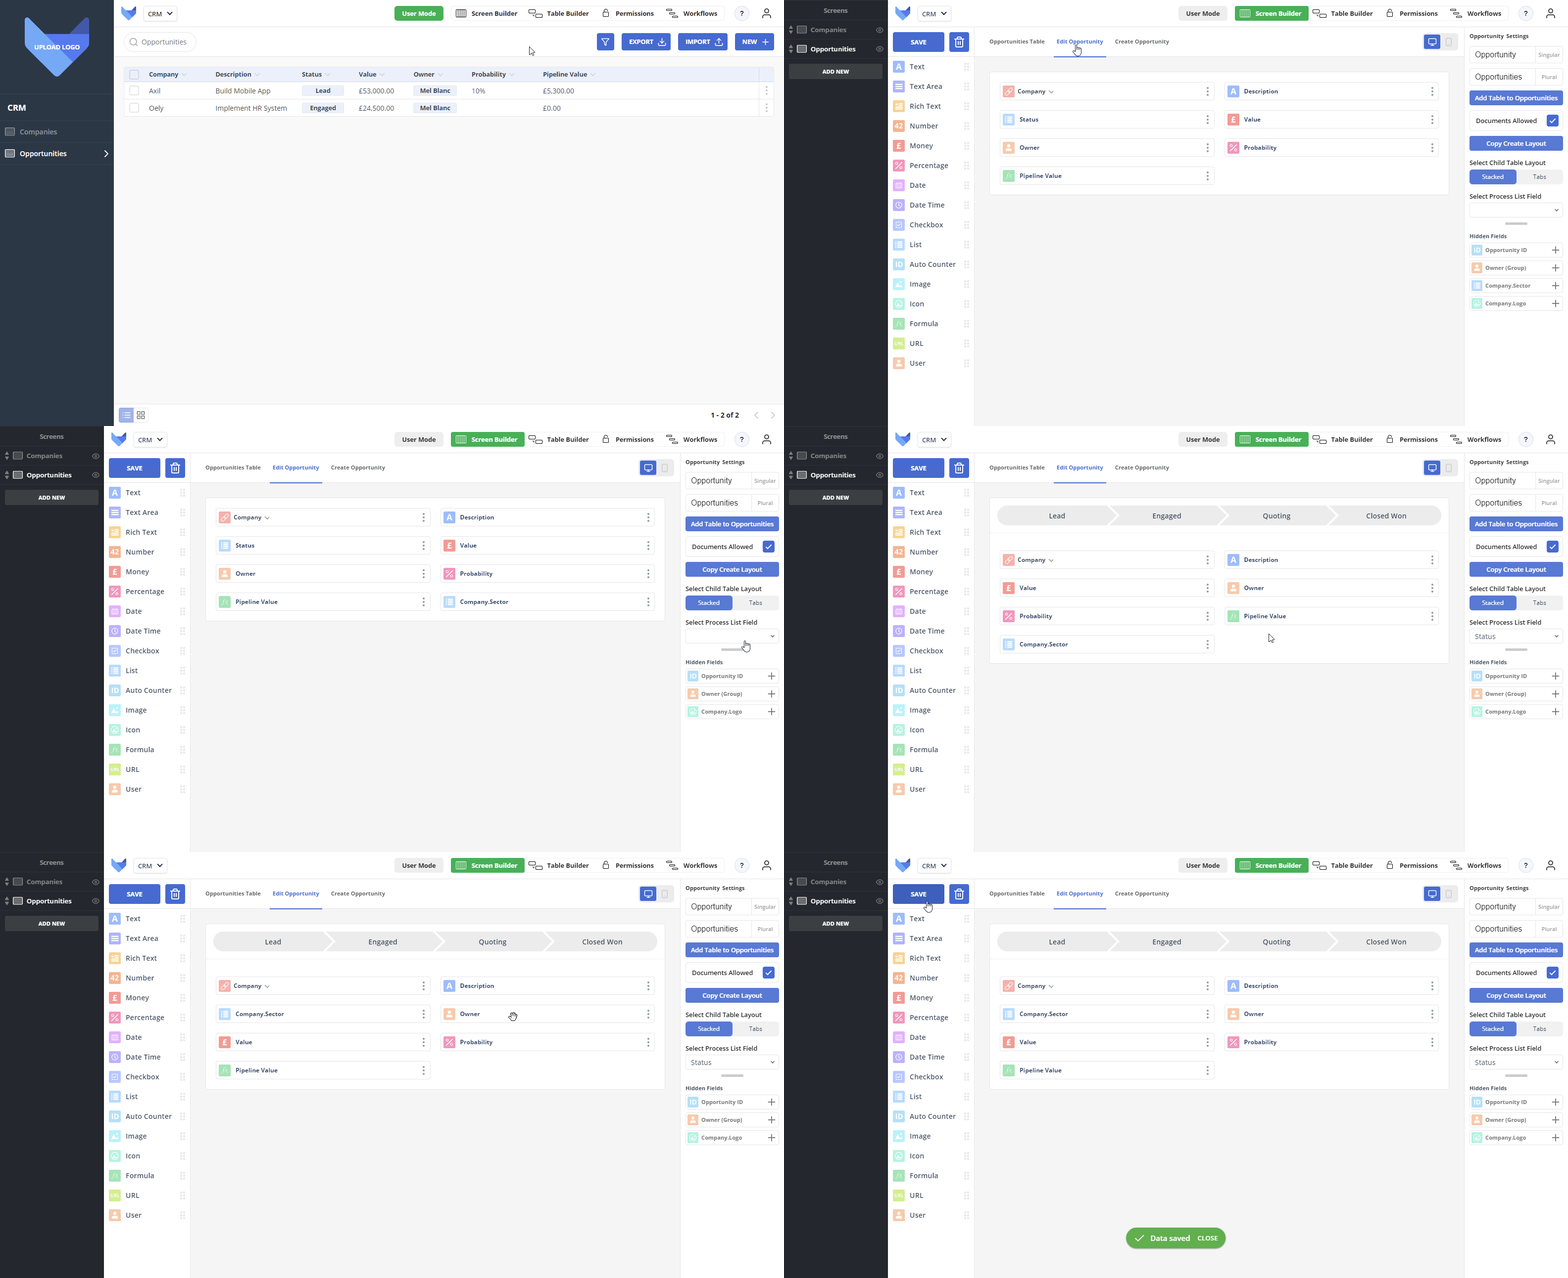
Now that you are starting to store more and more information about your opportunities, you may wish to change the Screen layout for the Opportunity Table so that all the Fields are in a logical order. Use the Screen Builder to do this.

  1. Click Screen Builder and select the Opportunities page
  2. Select the Edit Opportunity Screen

    • Note that this is the Screen that shows when a user is viewing or editing an existing Opportunity
  3. Add the Company.Sector Field onto the Screen
  4. Set the Status as the Process List Field
  5. Move the Fields around so that the Value and Probability Fields are next to one another
  6. Click Save

Change Screen Layout

You can view these changes by clicking User Mode and selecting one of your existing Opportunity Records.
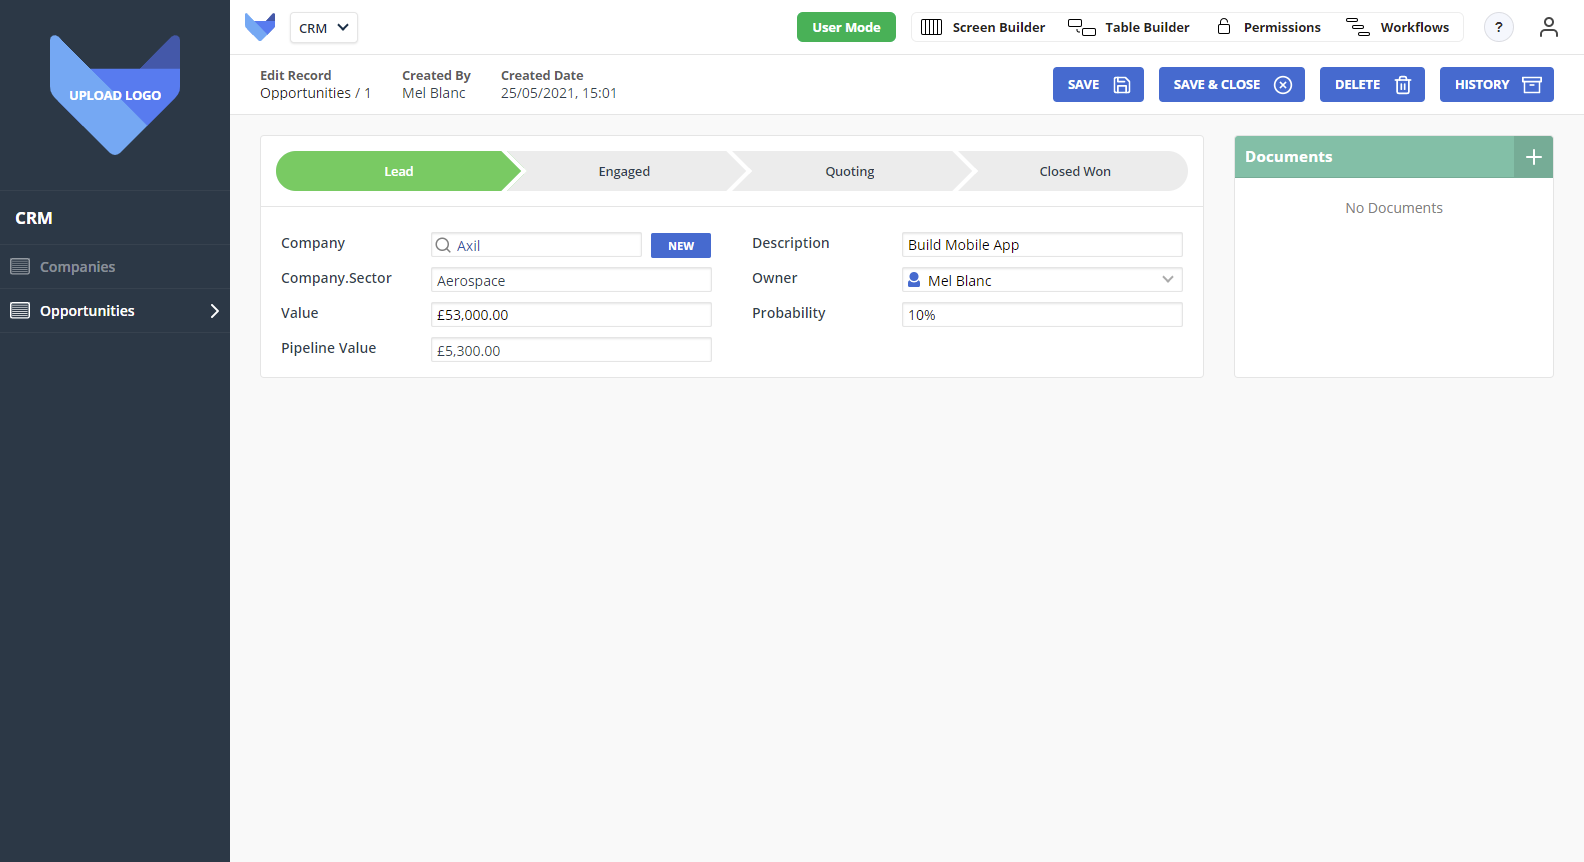
New Layout

Amending Field Configuration

Within Gridfox, you can set Fields on your Tables to be required and to mandate that all Records must contain unique values in that Field. This helps your team know which pieces are data are most important on a Record and ensure your sales process is followed.

We are going to set the Opportunity Status as required to ensure all Opportunities have a Status specified.

  1. Select Screen Builder
  2. Select Opportunities from the navigation bar
  3. Open the Field Configuration Menu for the Status Field
  4. Check Is Required
  5. Close the Field Configuration Menu
  6. Click Save

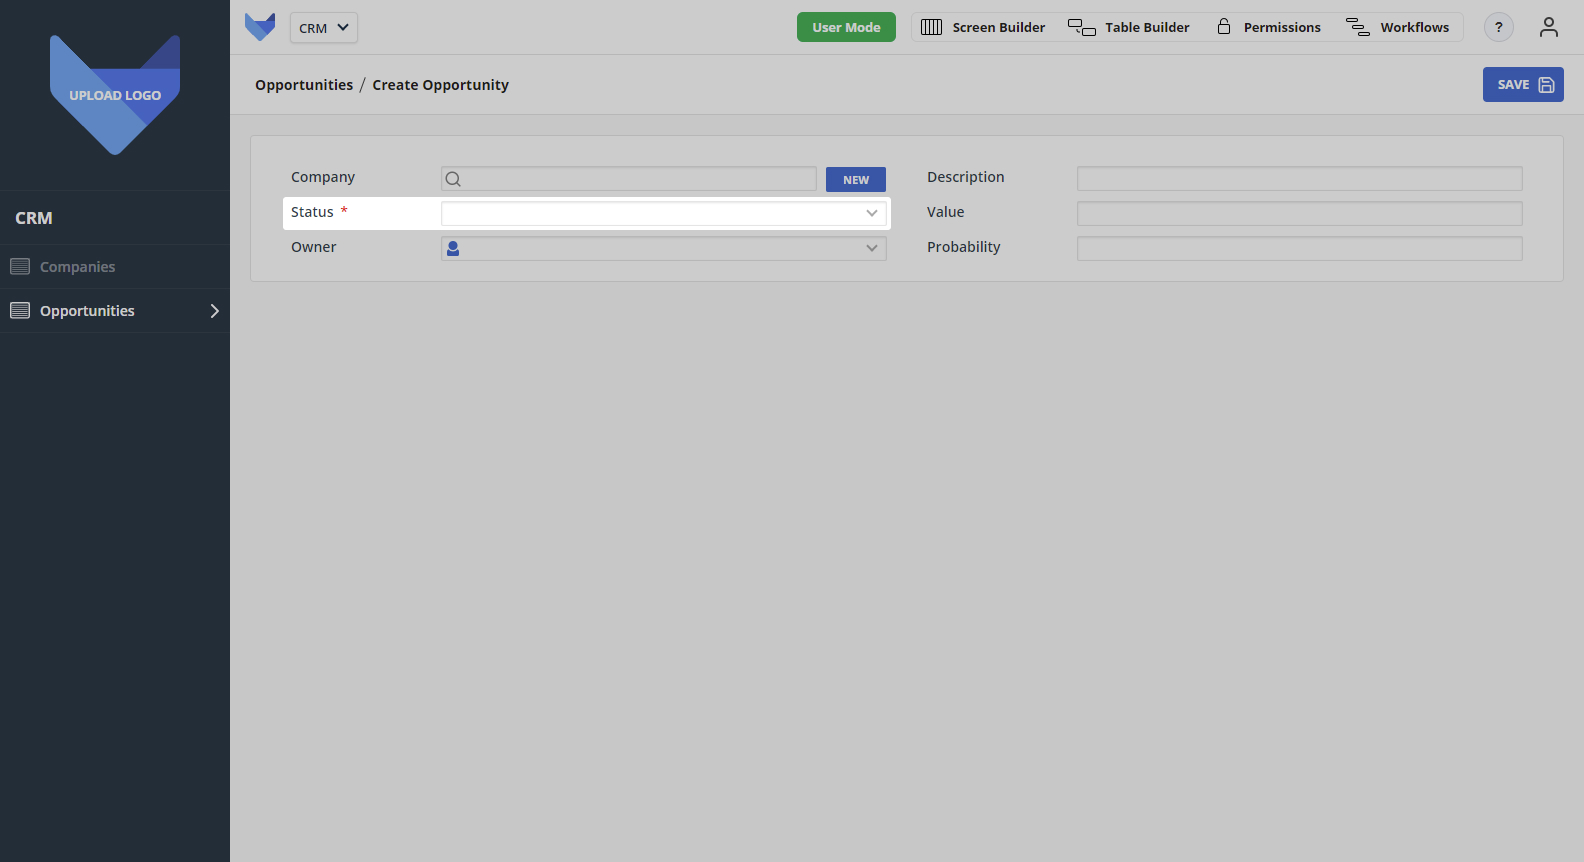
Now when a new Opportunity is created, it cannot be saved until a Status has been specified.
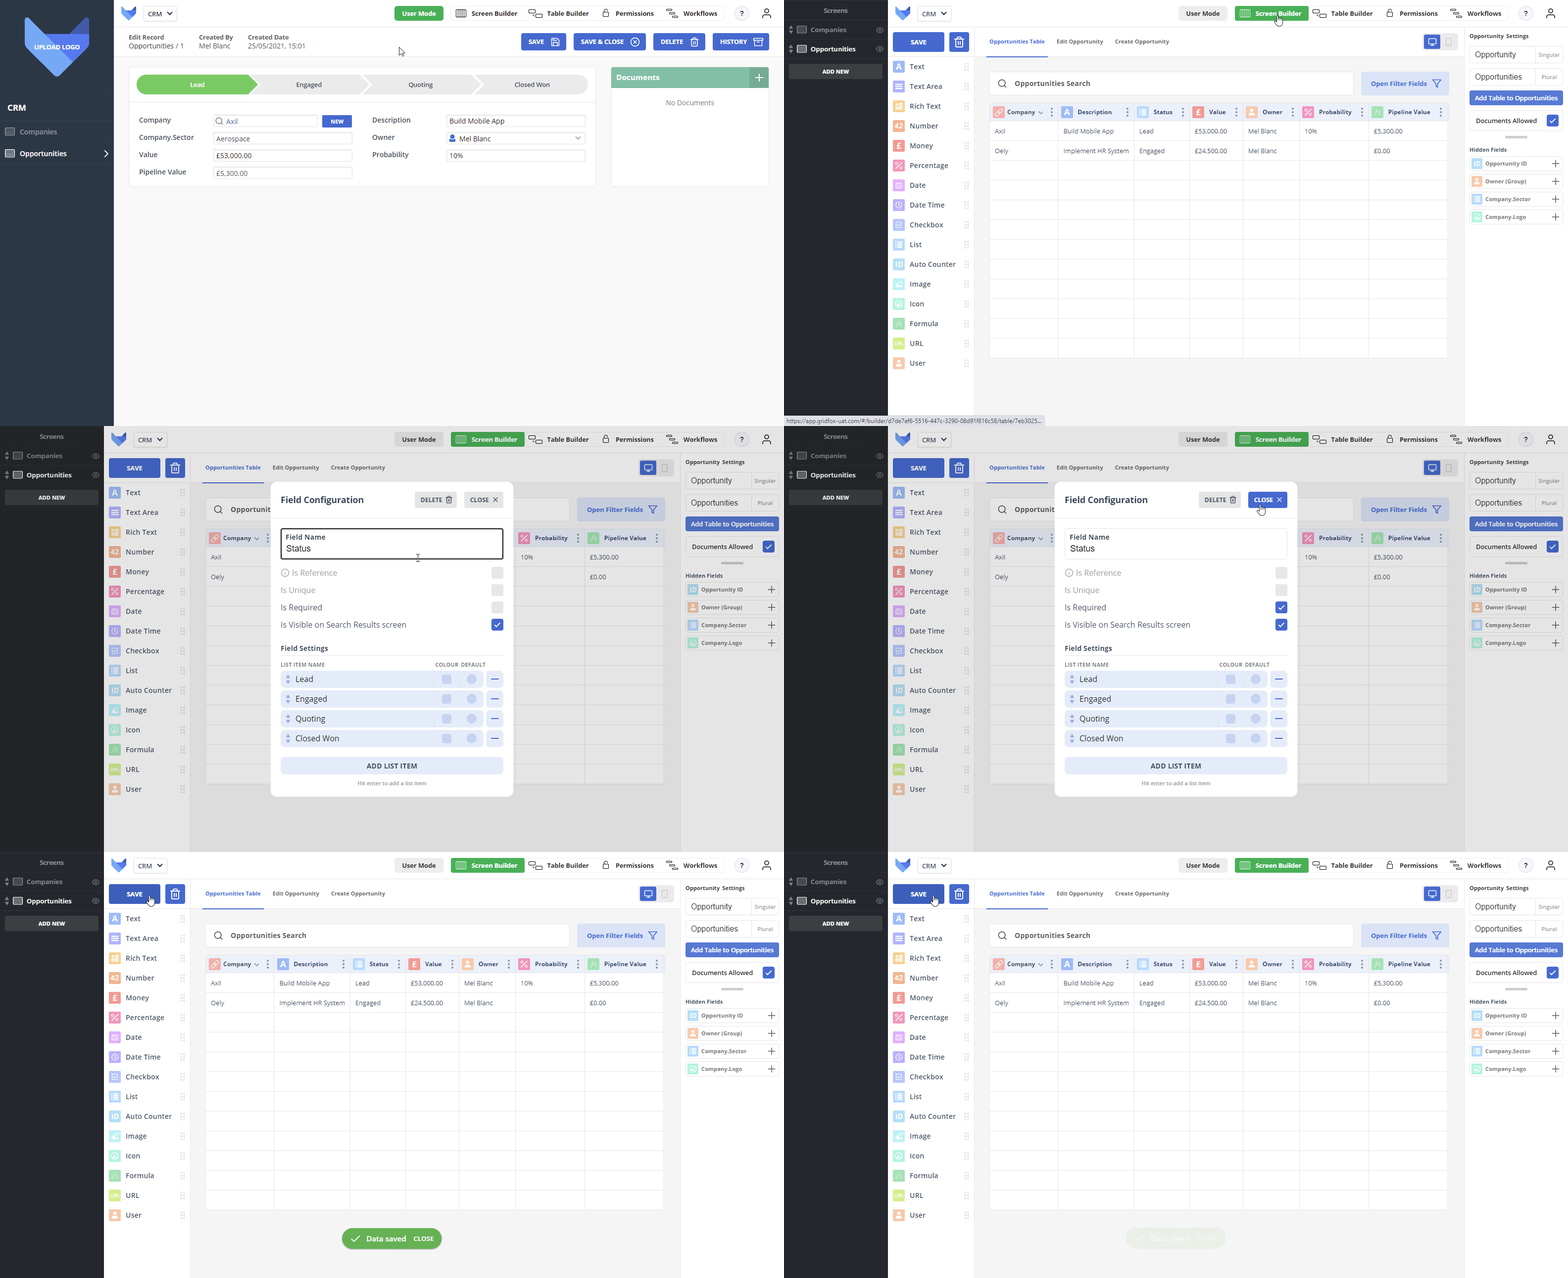
Setting Field as Required

To see this in action, close Builder Mode by clicking User Mode and create a new Opportunity. You will see a red star against the Status Field and you will be unable to save without specifying a Status.
Required Field

Creating a Board

To help your sales team get a picture of where their Opportunities are up to in the pipeline, you can create a Board which will show all Opportunities grouped by status. The team will be able to see at-a-glance what they have coming up and where they may need to take action.
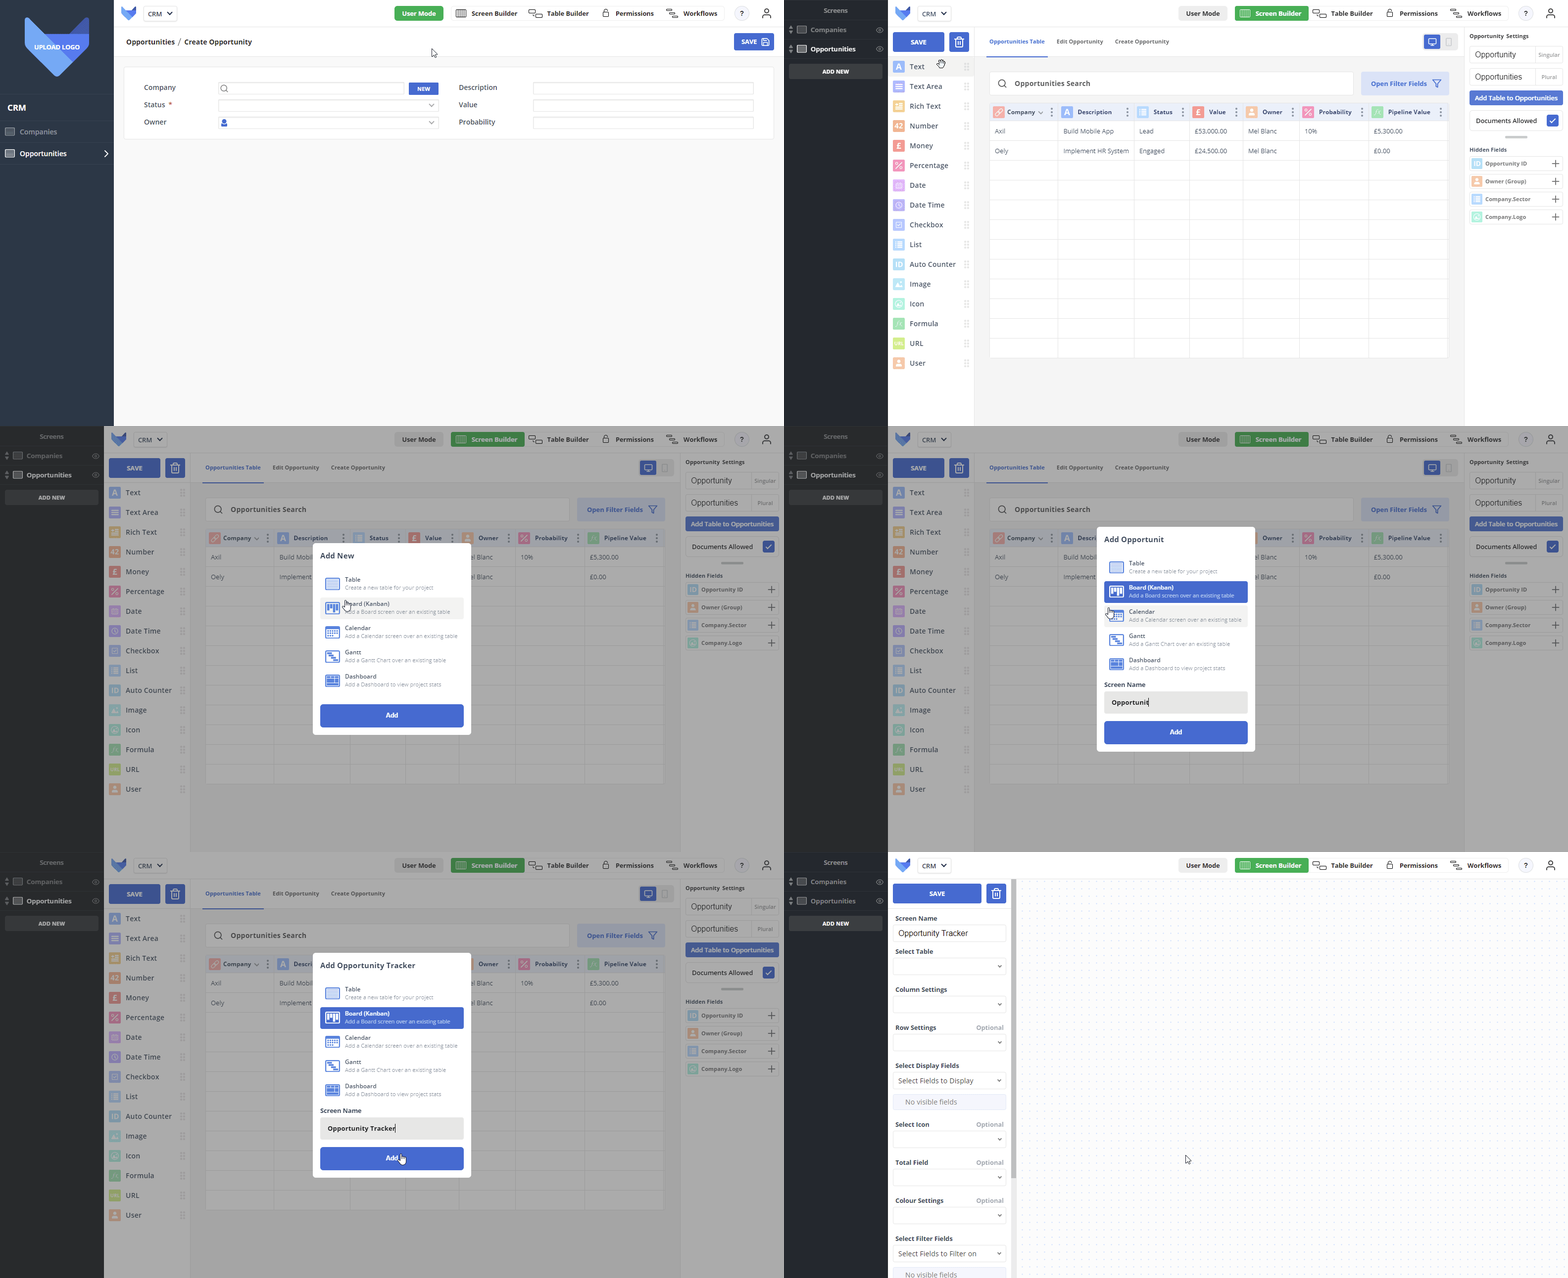
  1. Click Screen Builder
  2. Click Add New in the navigation bar
  3. Select Board (Kanban)
  4. Add a Screen Name - ‘Opportunity Tracker’
  5. Click Add

Add Board

Configuring a Board

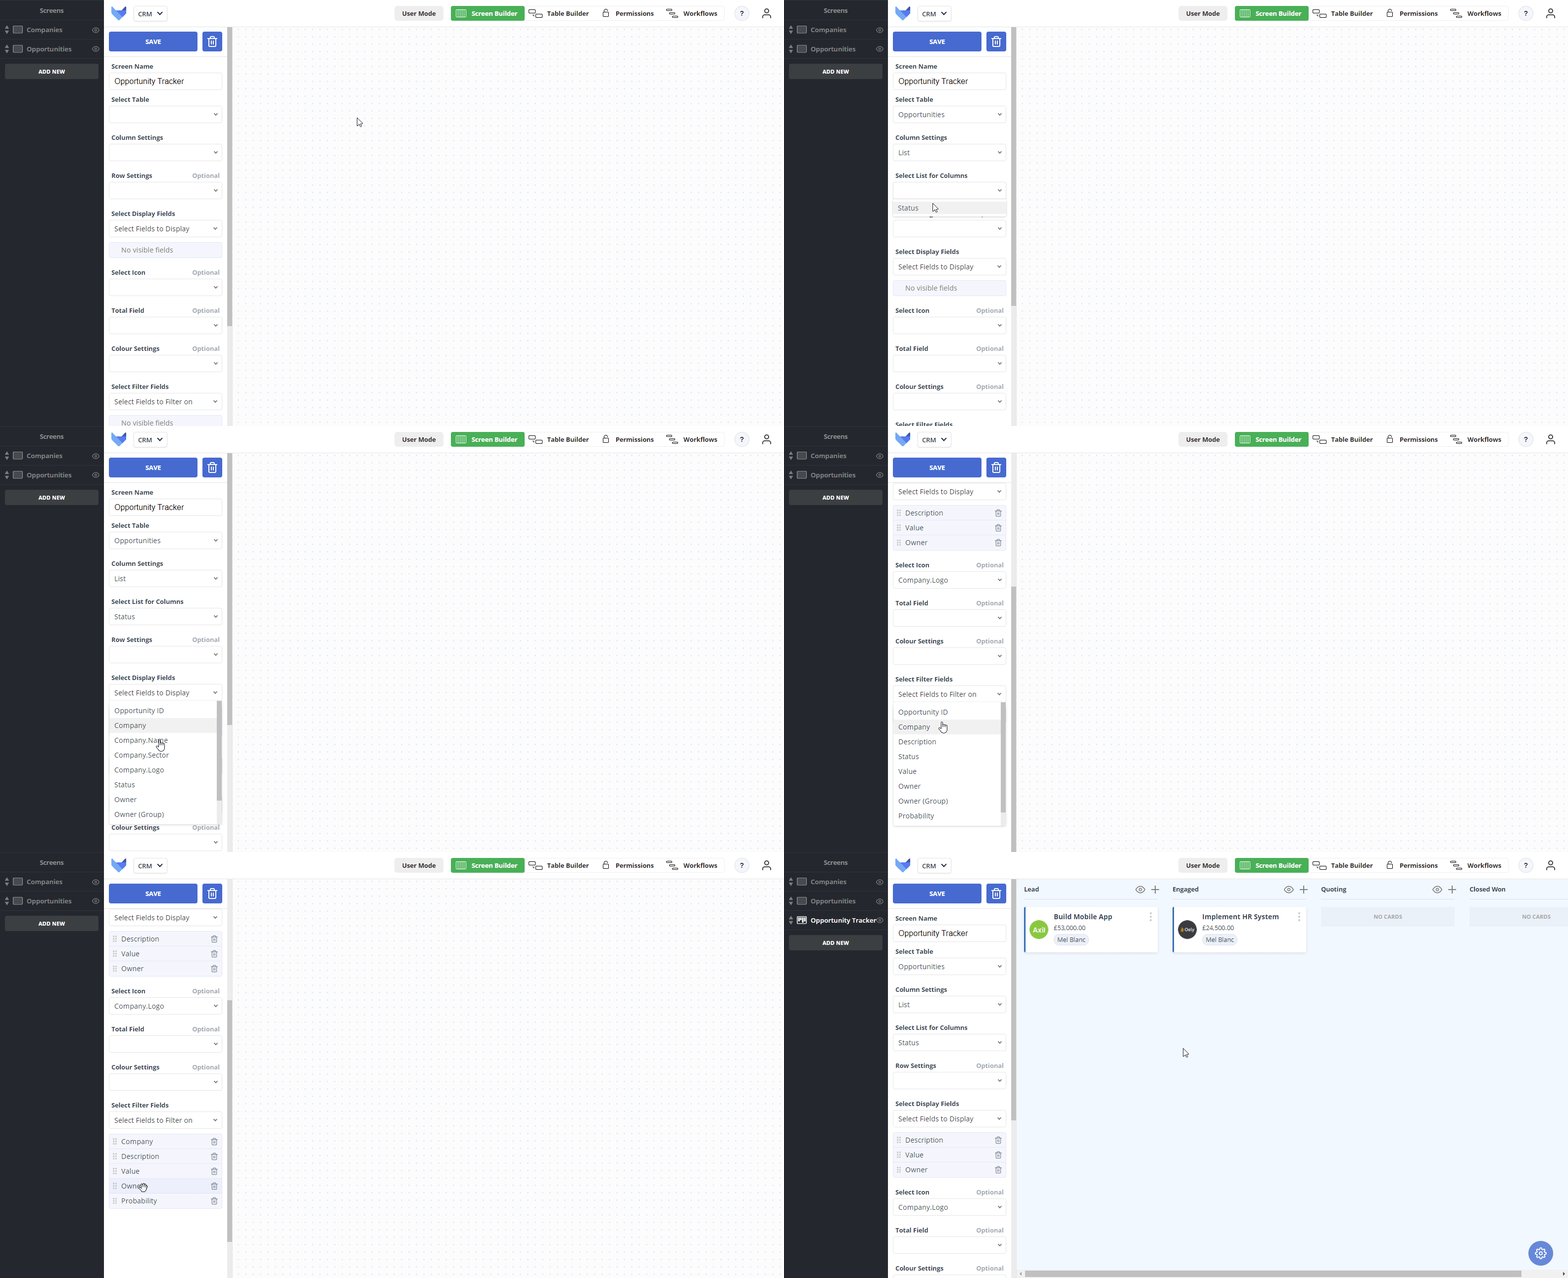
Now the Board has been added, we can configure it to show our Opportunity Records.

  1. In Select Table, choose Opportunities
  2. In Column Settings, choose List
  3. In Select List for Columns, choose Status
  4. In Select Display Fields, choose:

    • Description
    • Value
    • Owner
  5. In Select Icon, choose Company.Logo
  6. In Select Filter Fields, choose:

    • Company
    • Description
    • Value
    • Owner
    • Probability
  7. Click Save

Configure Board

Using a Board

From the Board, your team can quickly see the status of all their Opportunities. They can also quickly update the status by dragging cards between columns, and create new Opportunities.
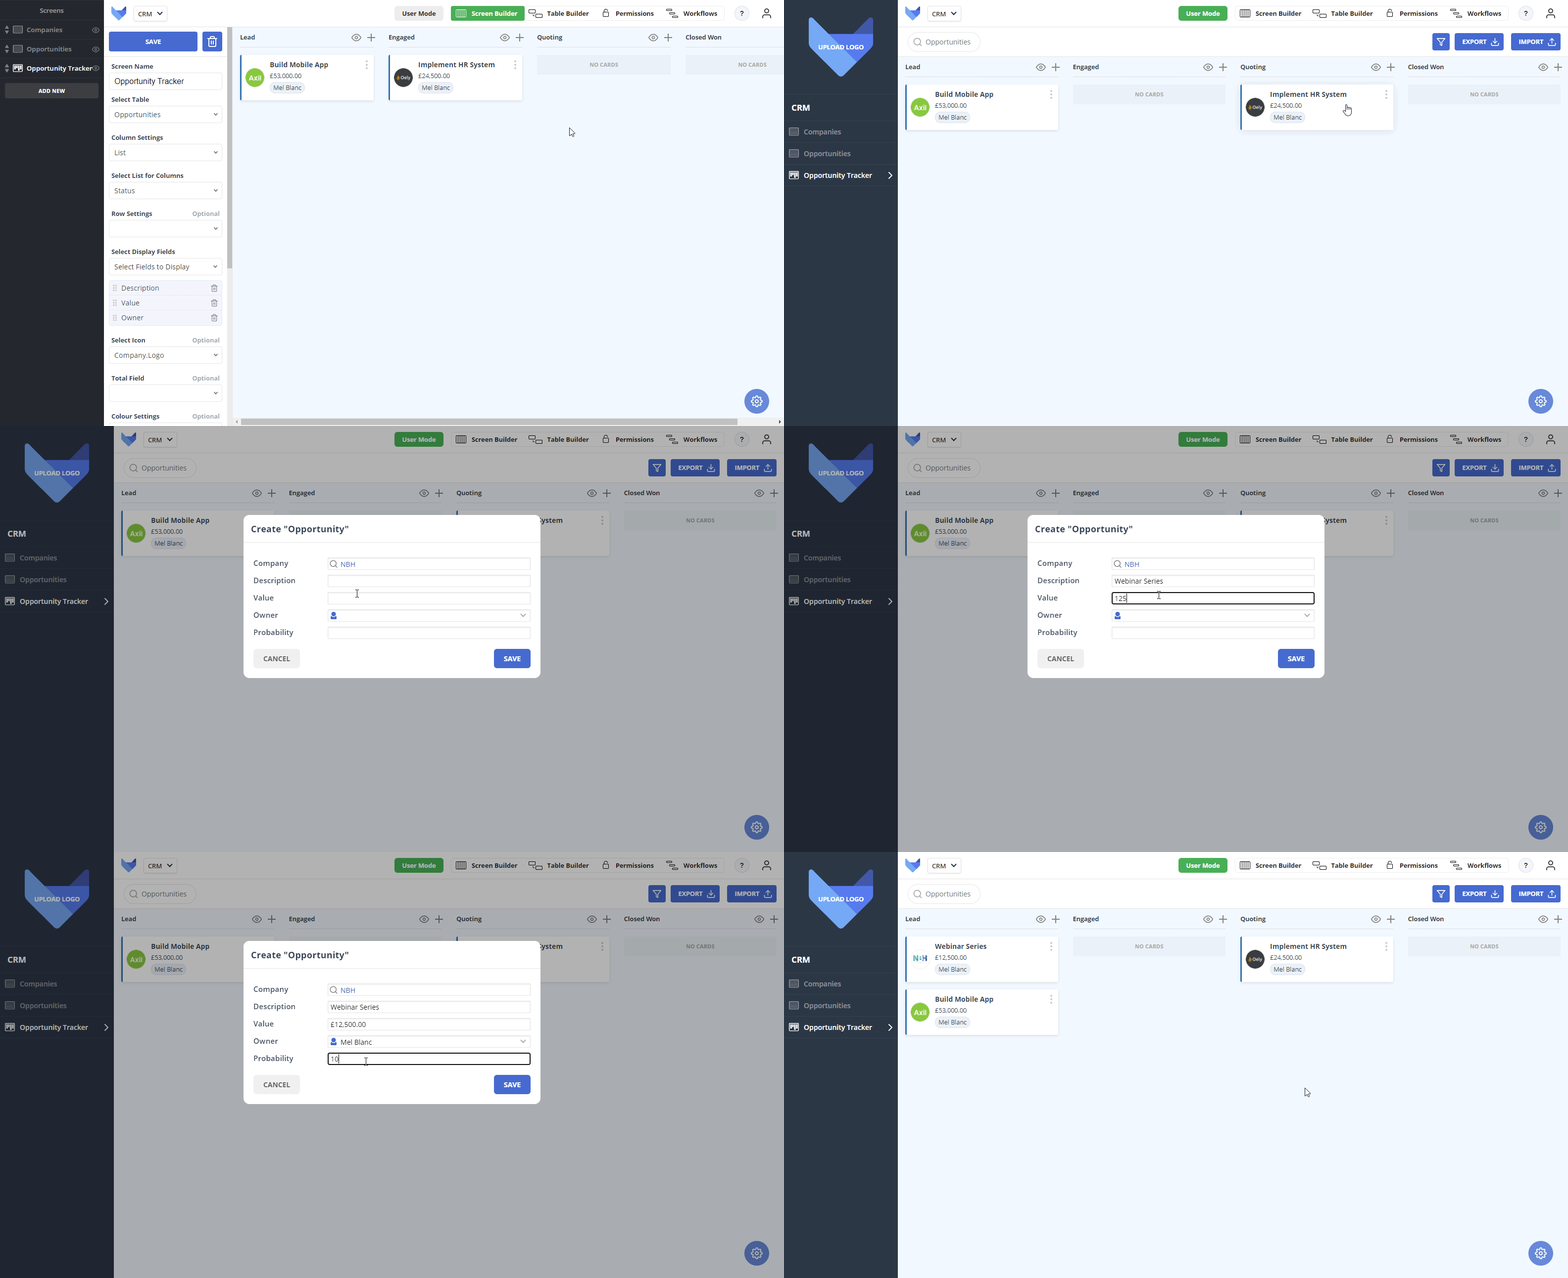
  1. Click User Mode to take a look at the Opportunity Tracker Board
  2. Update the status of an Opportunity by dragging it to a new column
  3. Click the plus icon in a column to add a new Opportunity
  4. Complete the Fields and click Save

Using Board

Your team can all use the Board to manage their workload, giving full visibility to everyone on the team.

Toggling Screen Visibility & Moving Screen Position

Now that we have created a Board for our Opportunities, it may be the standard list Screen for Opportunities becomes less useful. We can toggle the visibility of Screens to show and hide them for the Users.

We would also like to move the new Opportunity Tracker Board to the top of the Screen list so that it is the first thing the team see when they open the Project.
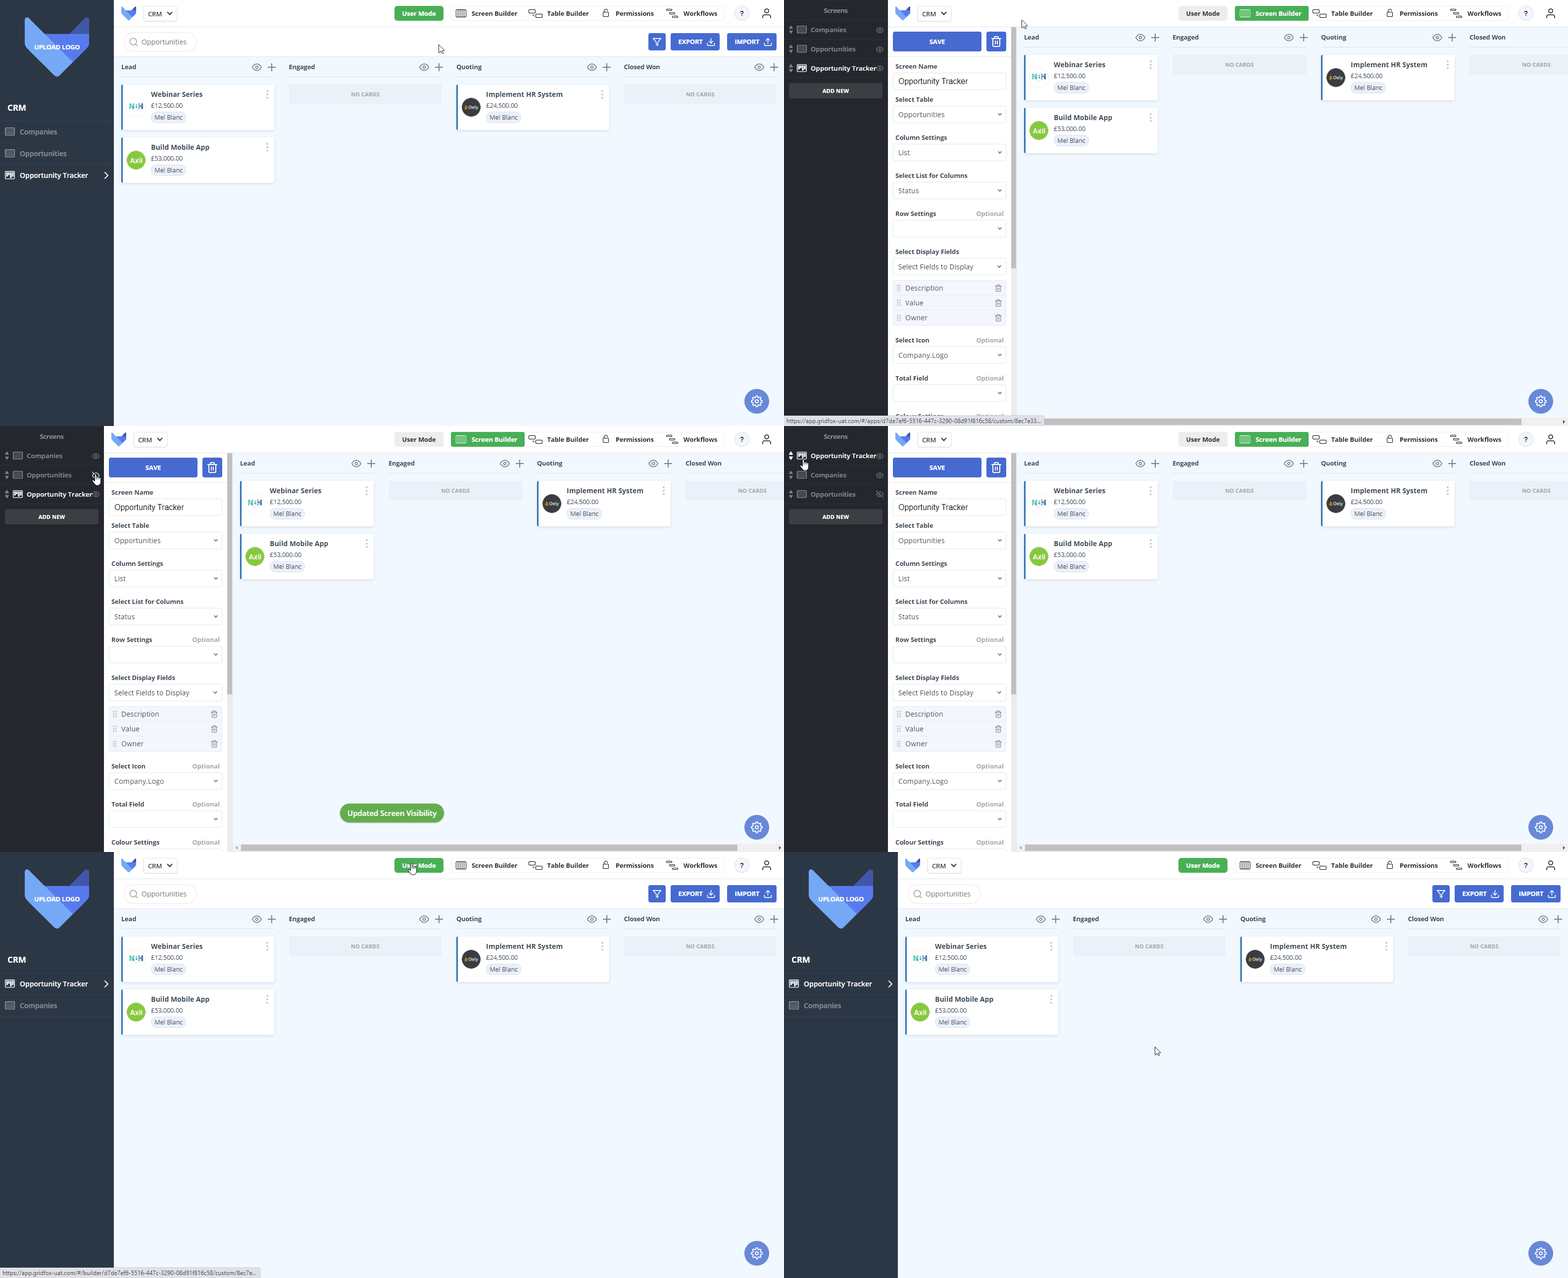
  1. Click Screen Builder
  2. Click the Eye icon next to the Opportunities Screen
  3. Drag the Opportunity Tracker Screen to the top of the navigation bar
  4. Click User Mode

Screen Visibility

Before you invite your Team to the Project, you can specify a Project Logo.
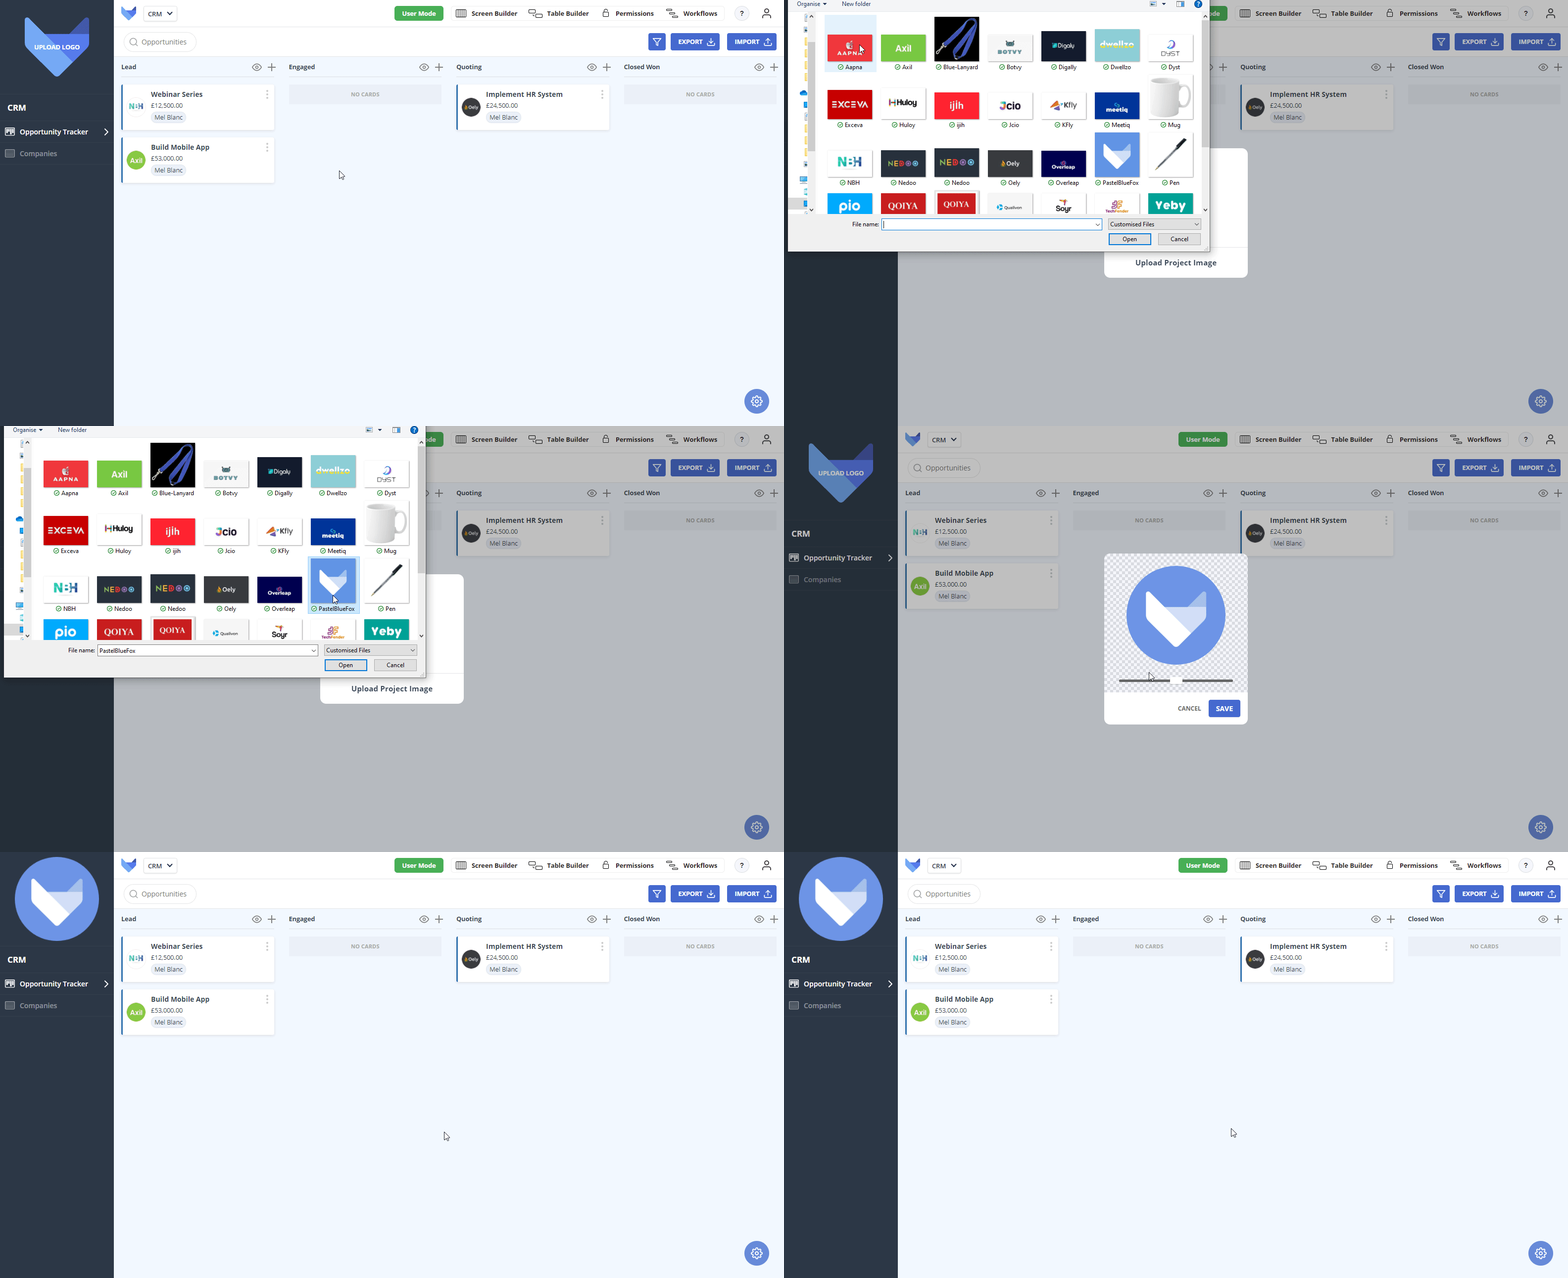
  1. Hover over the large fox in the top left hand corner
  2. Click Upload Logo
  3. Select a file
  4. Click Upload
  5. Adjust the scaling of the image as needed
  6. Click Apply

Upload Logo

Inviting Users

Now that you have configured your Project so that it is ready for your team, you can now invite your teammates. Firstly, we will configure the permissions that you team should be granted, and then send out the invites.

Creating a Group

Groups control the permissions that the users in your Project have. We are going to create a new Group for the permissions that you sales team should have.
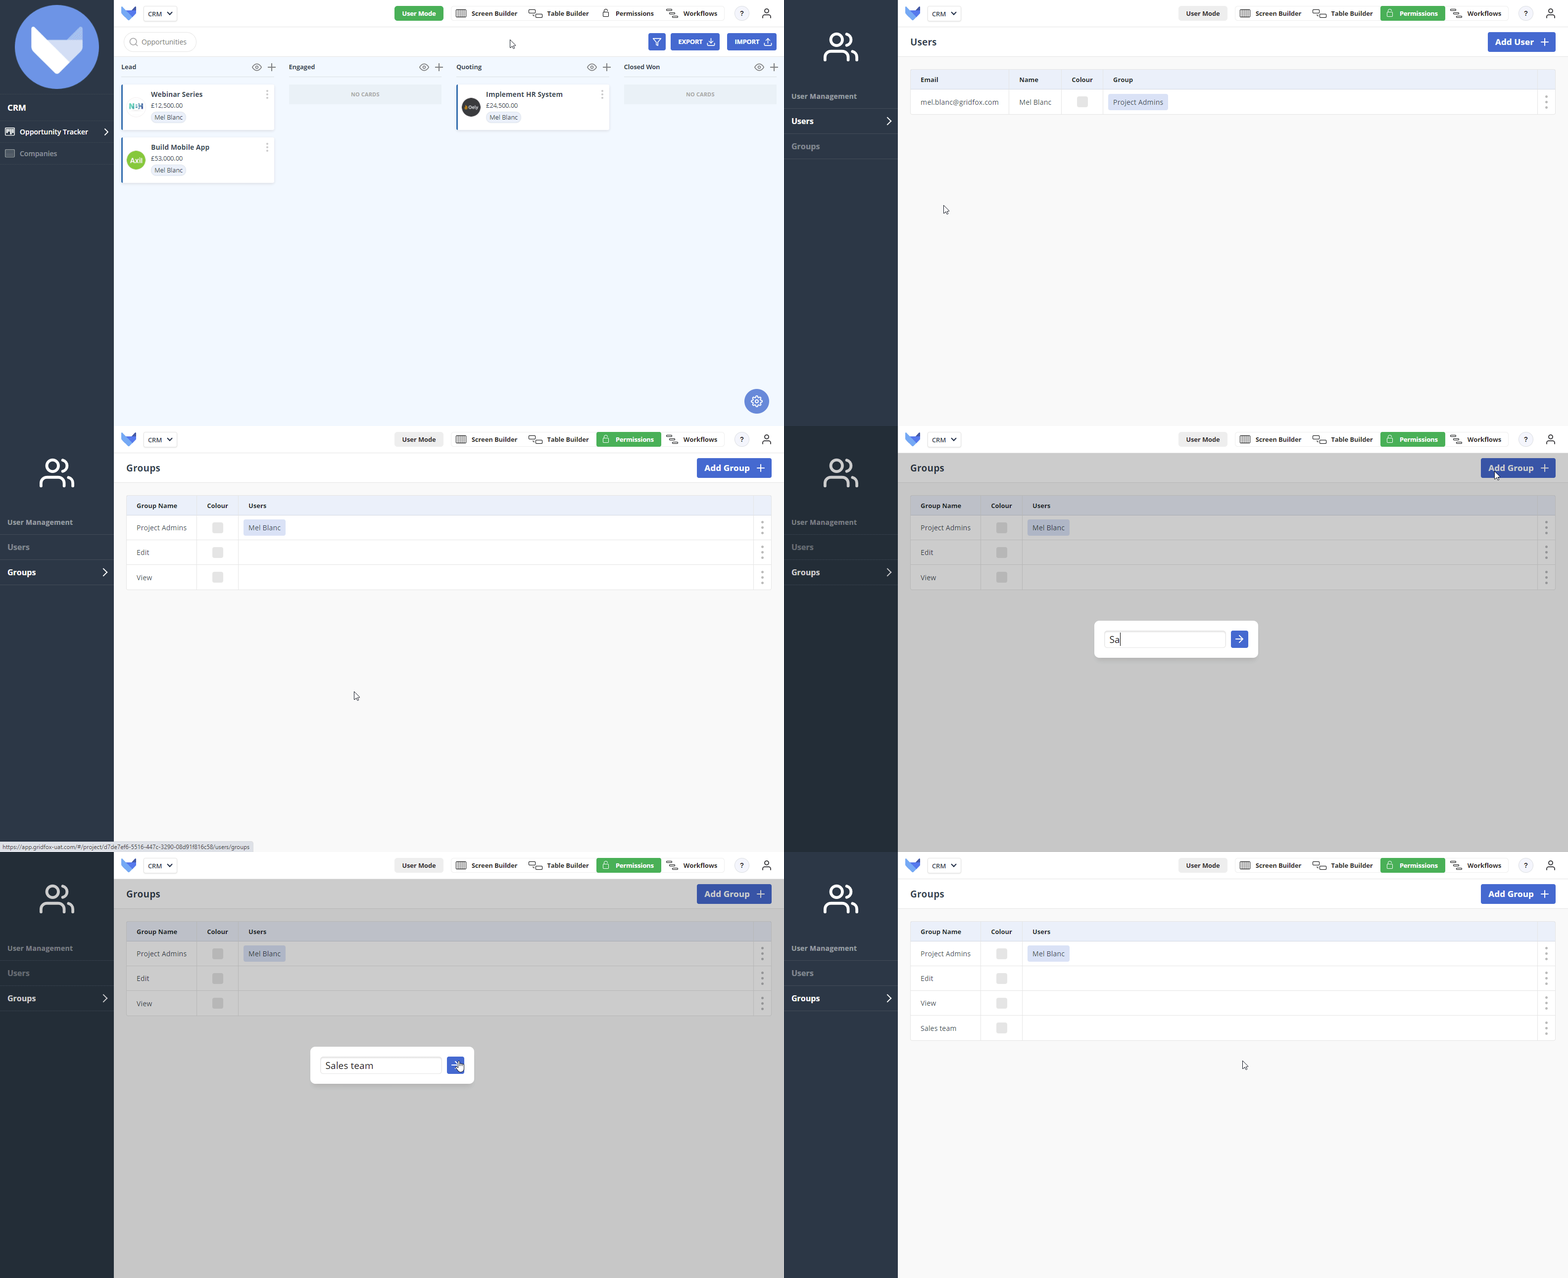
  1. Select Permissions
  2. Select Groups in the navigation bar
  3. Click Add Group
  4. Enter a name for the Group - ‘Sales team’
  5. Click the next arrow

Create Group

Configuring Group Permissions

Now that the Group has been created, we can specify the level of access that Users in this Group will have.
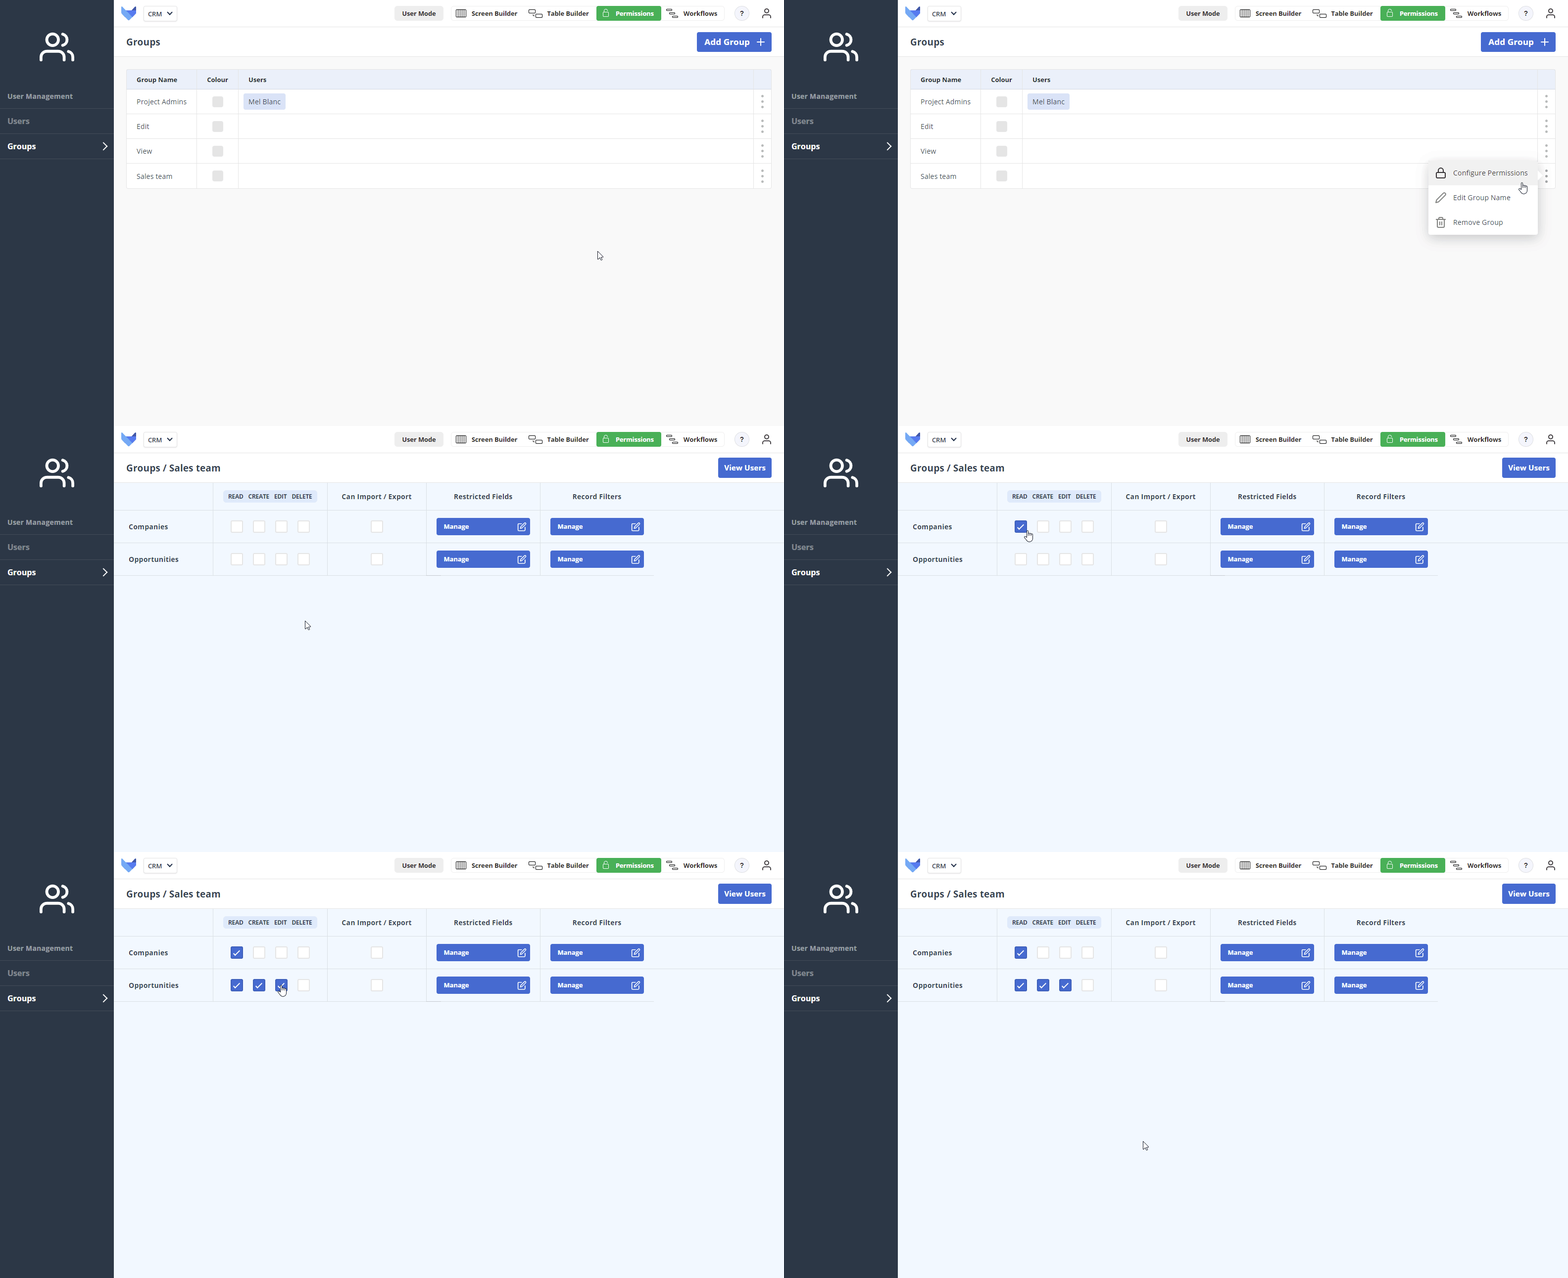
  1. Open the Group Configuration menu for the ‘Sales team’ group
  2. Click Configure Permissions
  3. Select Read for Companies
  4. Select Edit for Opportunities

Configuring Permissions

Users in this Group will be able to see the list of Companies, but not make any changes to existing Company Records. They will be able to create new Opportunities, and edit existing Opportunities.
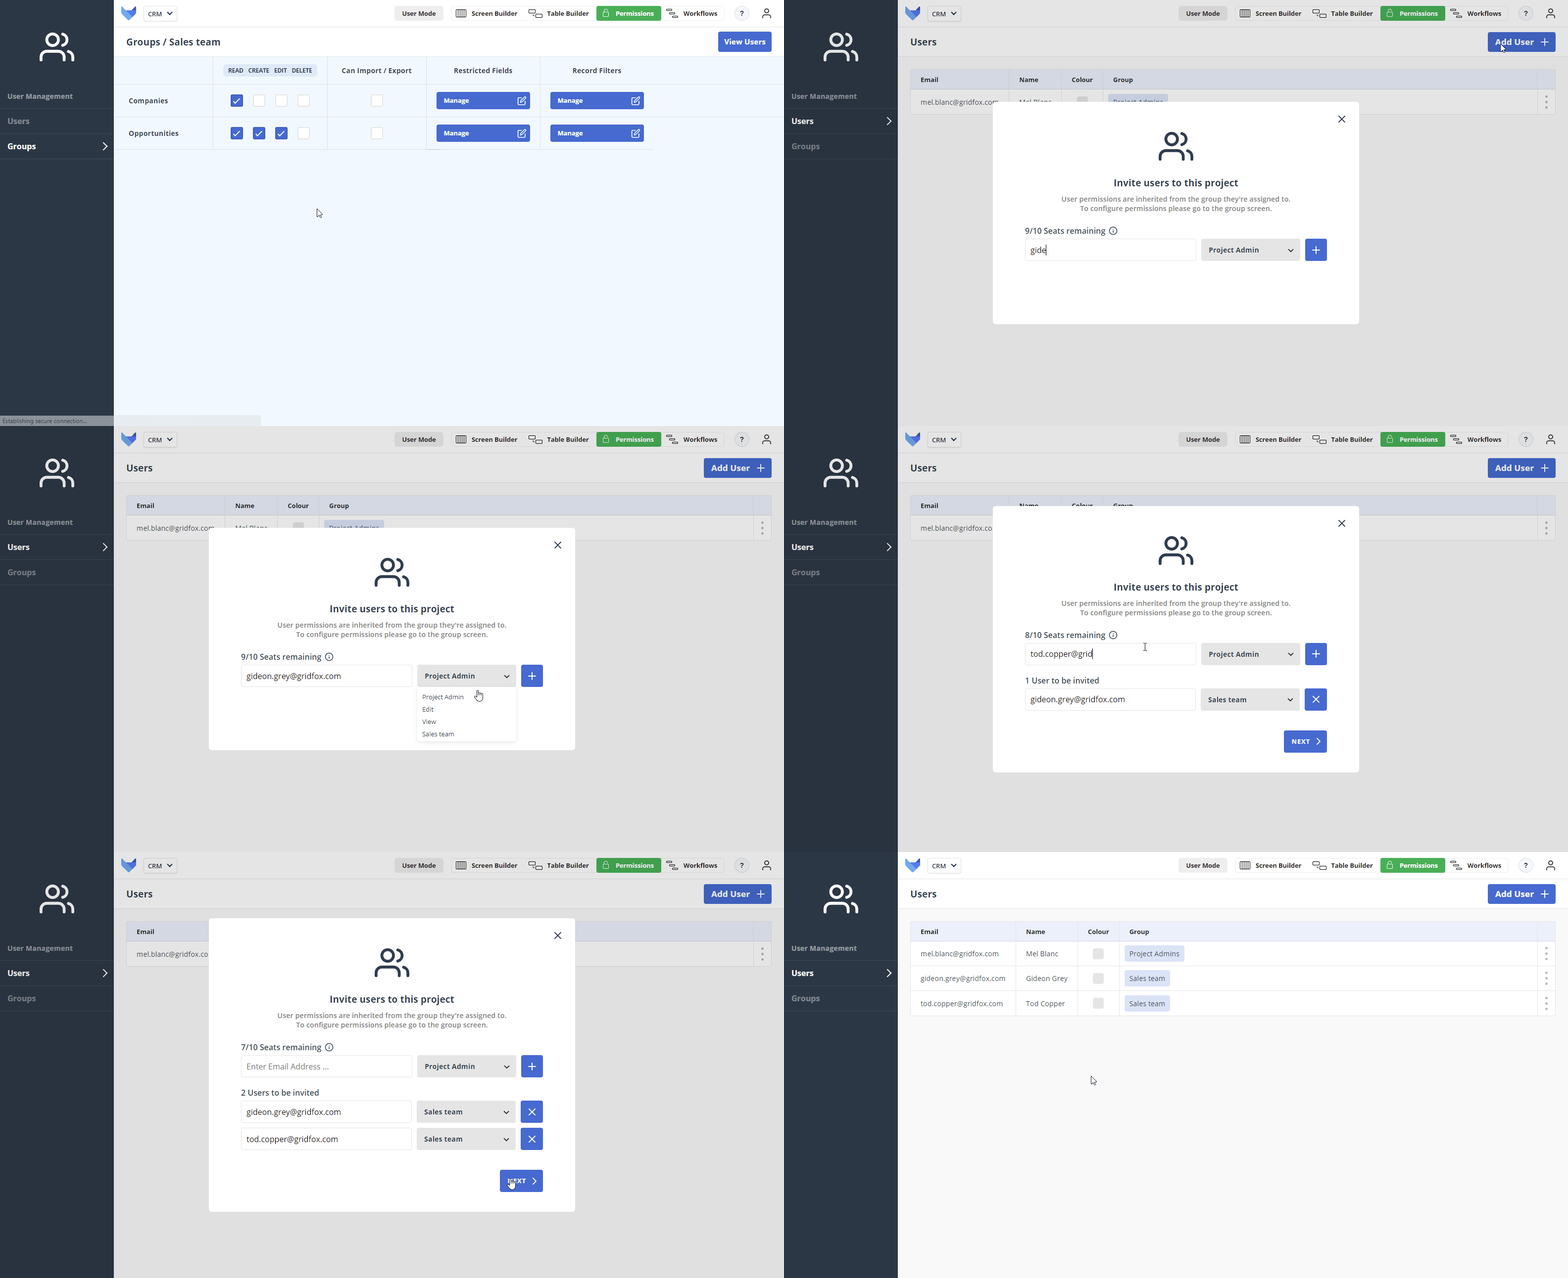
Sending User Invites

  1. Click Users in the navigation bar
  2. Click Add User
  3. Enter the email address of a team member
  4. Select the ‘Sales team’ Group
  5. Click the Plus icon
  6. Repeat steps 3 to 5 for all of your team members
  7. Click Next
  8. Click Send Invites

Invite User

Your teammates will all receive an invite link, inviting them to sign up to a Gridfox. Once they have completed signup, they will get immediate access to your new CRM Project.

Assigning Colours to Users

Now that you have invited your team, you can assign each of your teammates a colour so that they can quickly see which Records are assigned to them.

  1. Click the Colour box against one of the Users
  2. Select a colour from the preset list

    Alternatively, specify a custom colour by clicking one of the blank boxes underneath the preset options
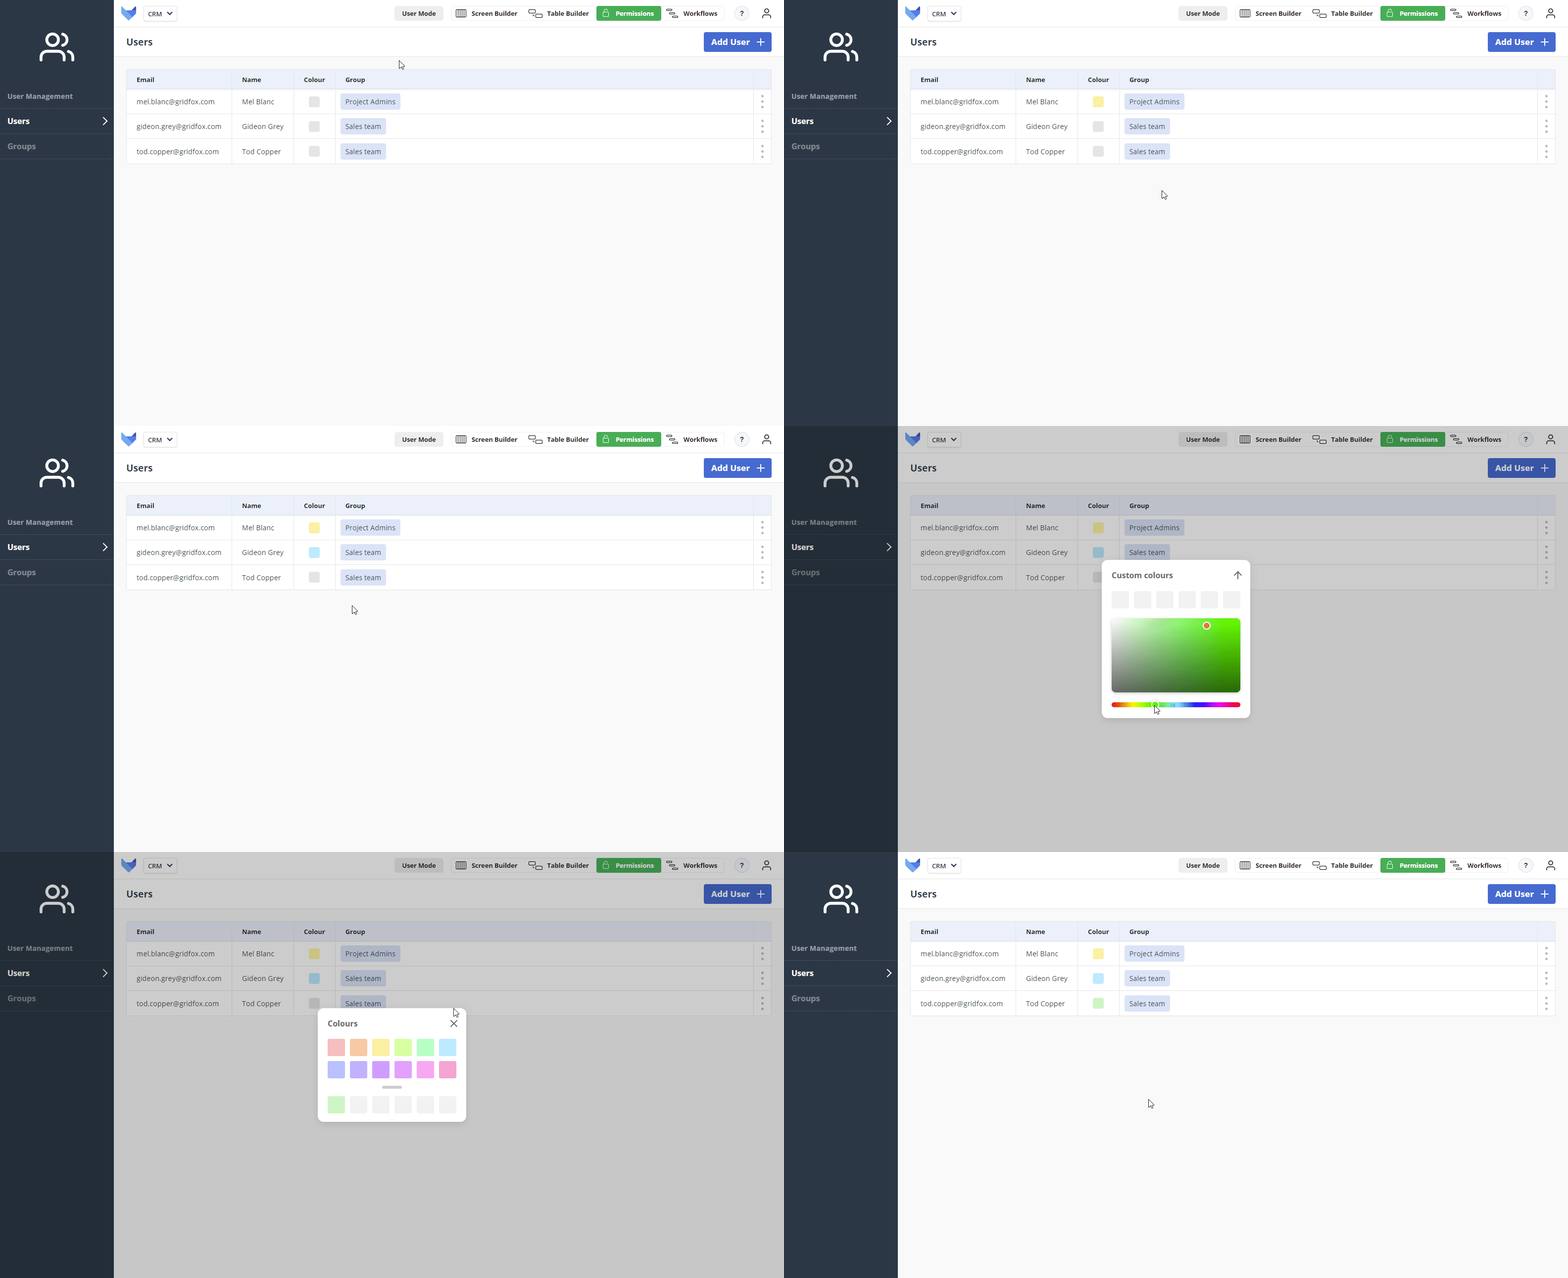
  3. Click Close on the modal
  4. Repeat steps 2 and 3 for all of your Project Users

Setting User Colour

Assigning Opportunities to Users

Now that your team are up and running with Gridfox, you can assign them to some of the existing Opportunities, as well as letting them create their own.

To amend the existing Opportunities, take the following steps:

  1. Click User Mode
  2. Click on one of the Opportunities on the Opportunity Tracker Board
  3. Amend the Owner Field to another User
  4. Click Save & Close

You will see on the Board that the Opportunity has been updated, and the colour that was assigned to each user is displayed.
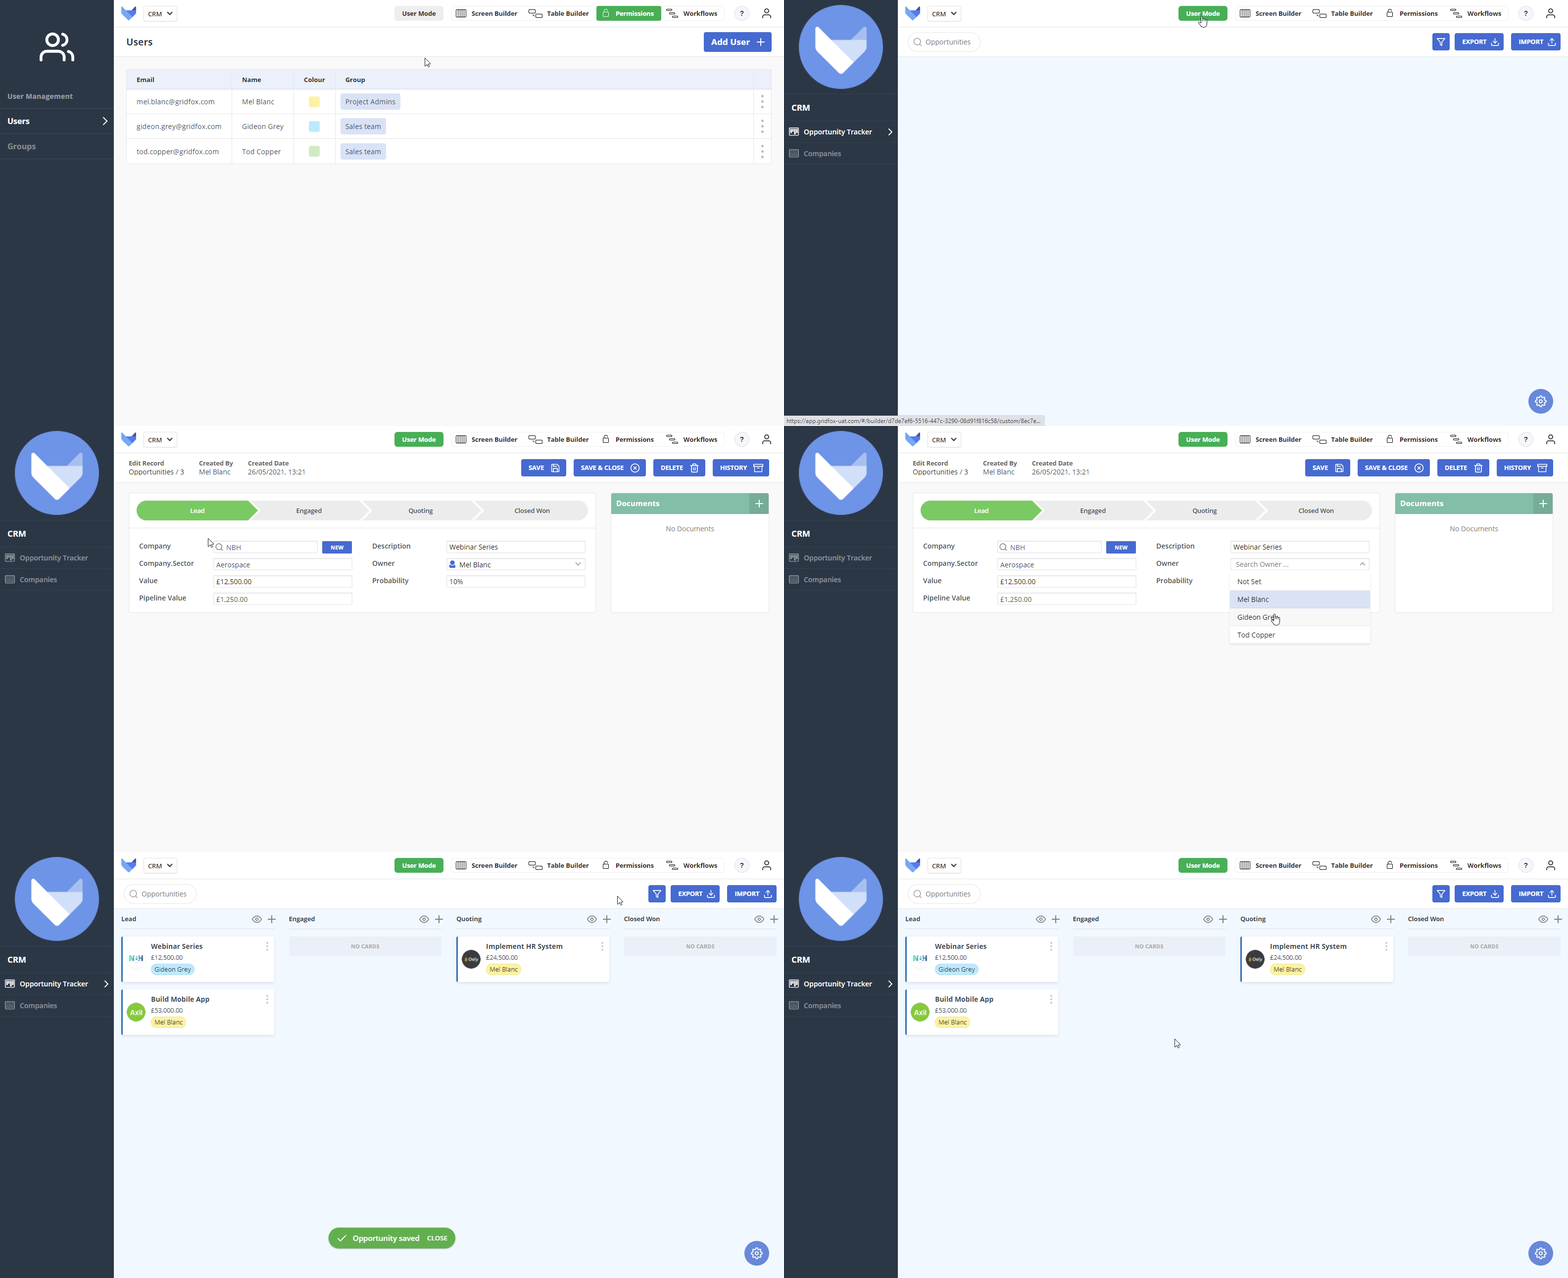
Update Opportunity

Colour Coding List Items

In the same way we assigned a colour to each of the users so that it was quick to see who was assigned to what, we can also assign colours to List Items in List Fields. We can set a colour for each of the Opportunity Statuses.

  1. Click Table Builder
  2. Open the Field Configuration for the Opportunity Status Field
  3. Click the Colour box against one of the List Items
  4. Select a colour from the preset list

    Alternatively, specify a custom colour by clicking one of the blank boxes underneath the preset options
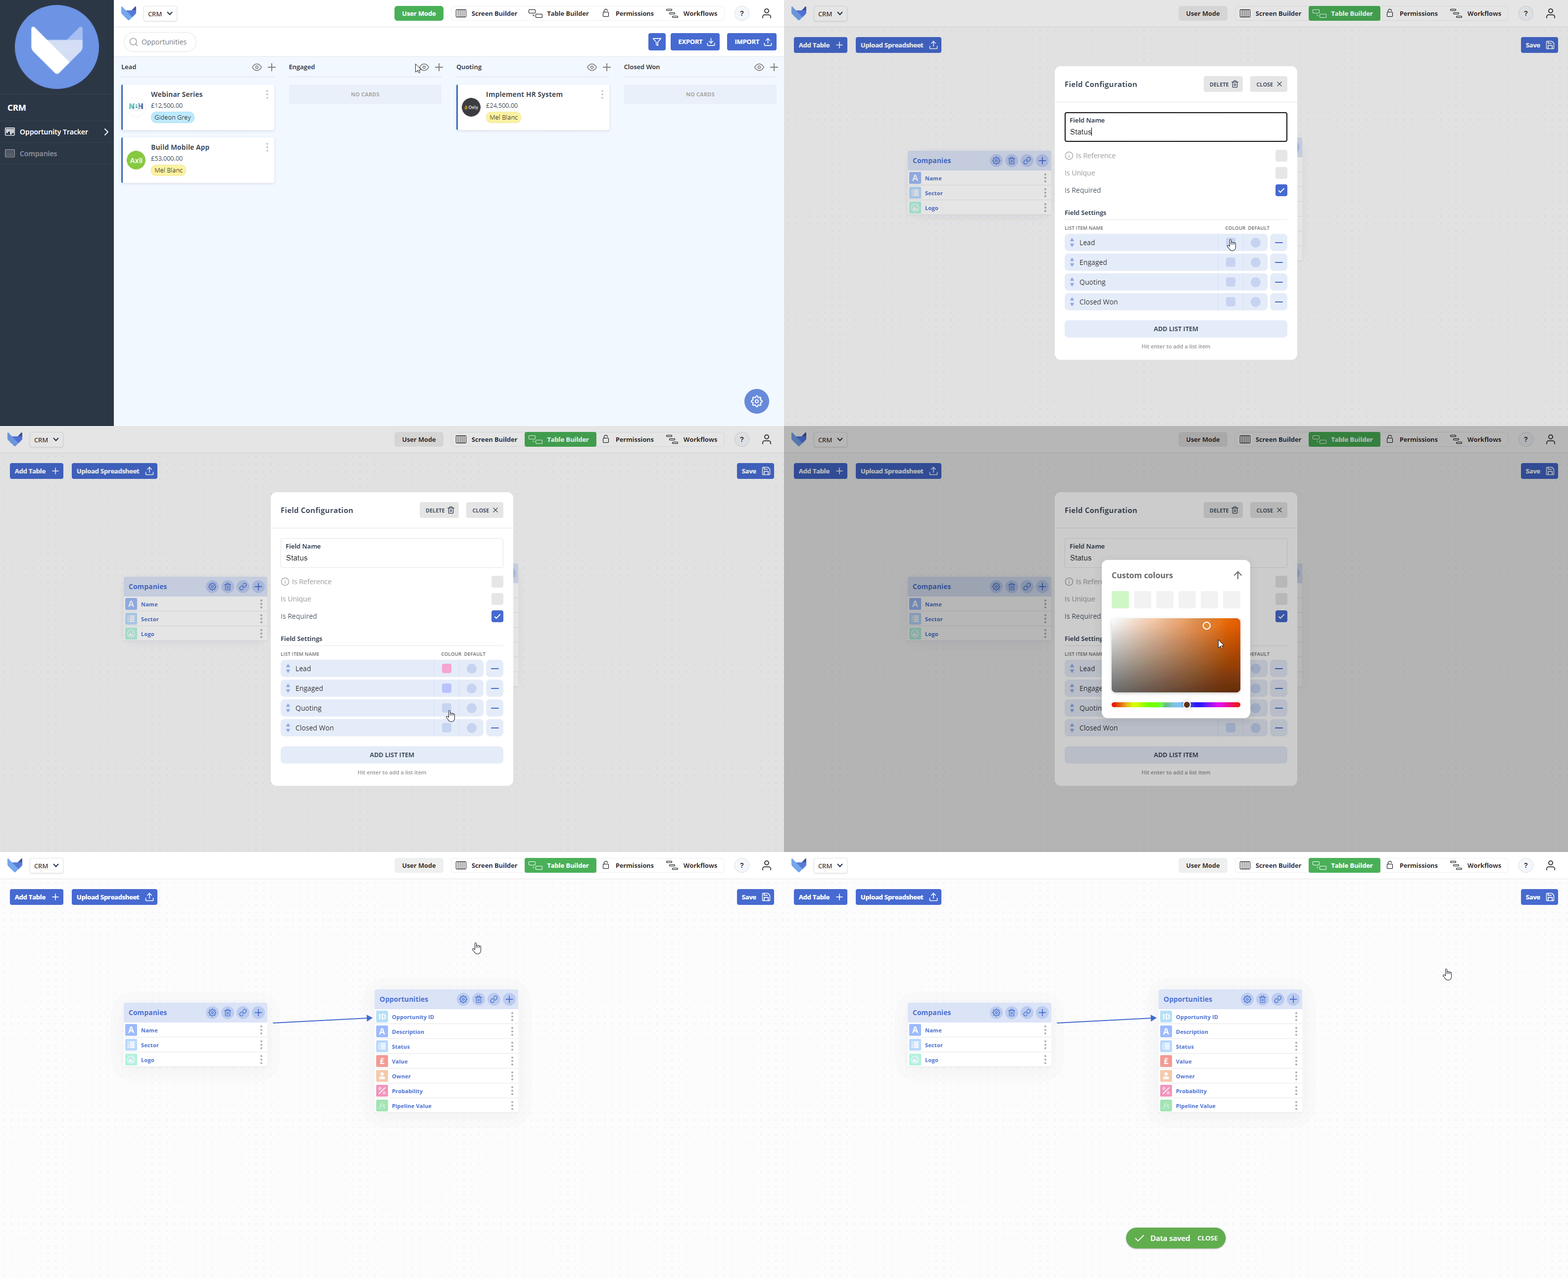
  5. Repeat steps 3 and 4 for each List Item
  6. Click Close on the Field Configuration modal
  7. Click Save

Colour Code List Items

Creating Saved Filters

Whilst your team will benefit from full visibility of everything going on within the team, to help them focus on their own work you can create a filter for the Opportunity Tracker Board which will allow them to just see their own Opportunities.
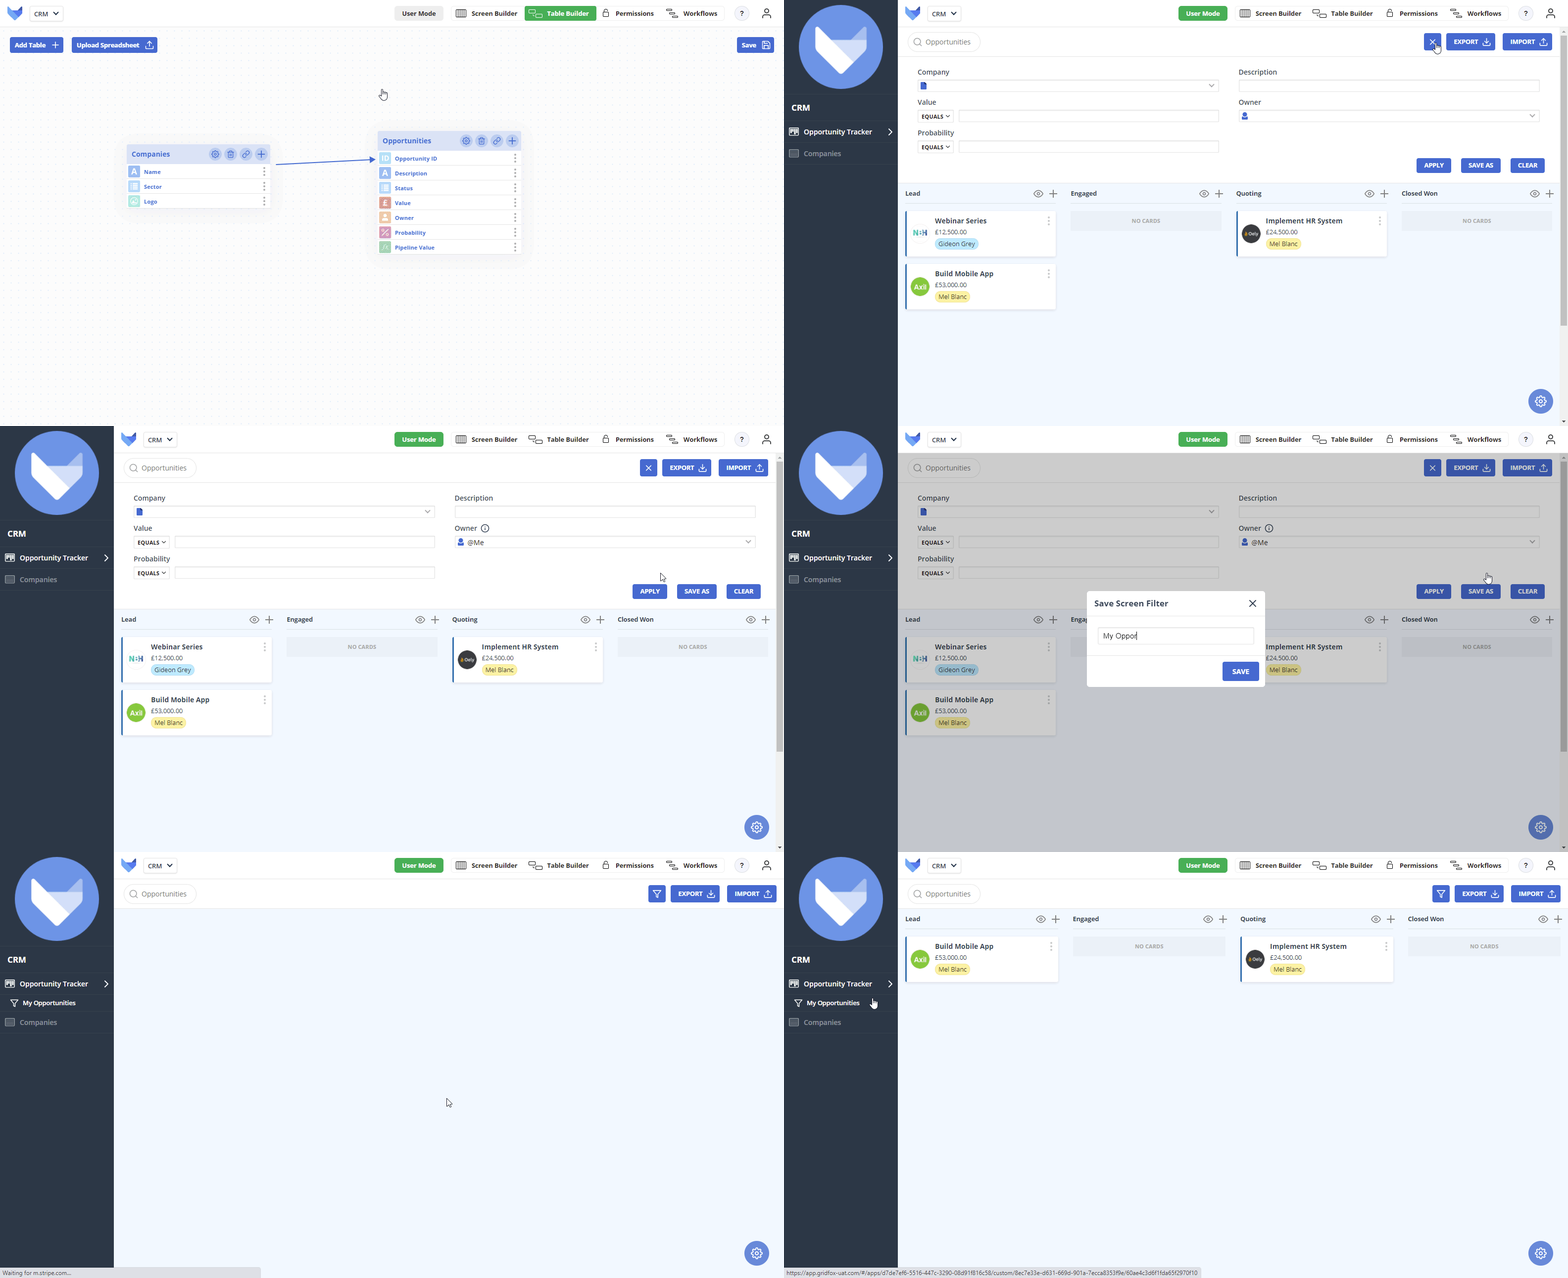
  1. Click User Mode
  2. Open the Filter menu on the Opportunity Tracker Board
  3. In Owner, select ‘@me’
  4. Click Save As
  5. Name the filter ‘My Opportunities’
  6. Click Save

Saved Board Filter

Now when your team is using the CRM Project, they will have quick access to view their own Opportunities by selecting this filter from the navigation menu.

Creating a Tasks Table

To help your team keep on top of their workload, you can add in a related Tasks Table to help them keep track of everything they need to do for a given Opportunity.

  1. Select Table Builder
  2. Click Add Table
  3. Name the Table ‘Tasks’ and click the Next arrow
  4. Add the following Fields to the Tasks Table:
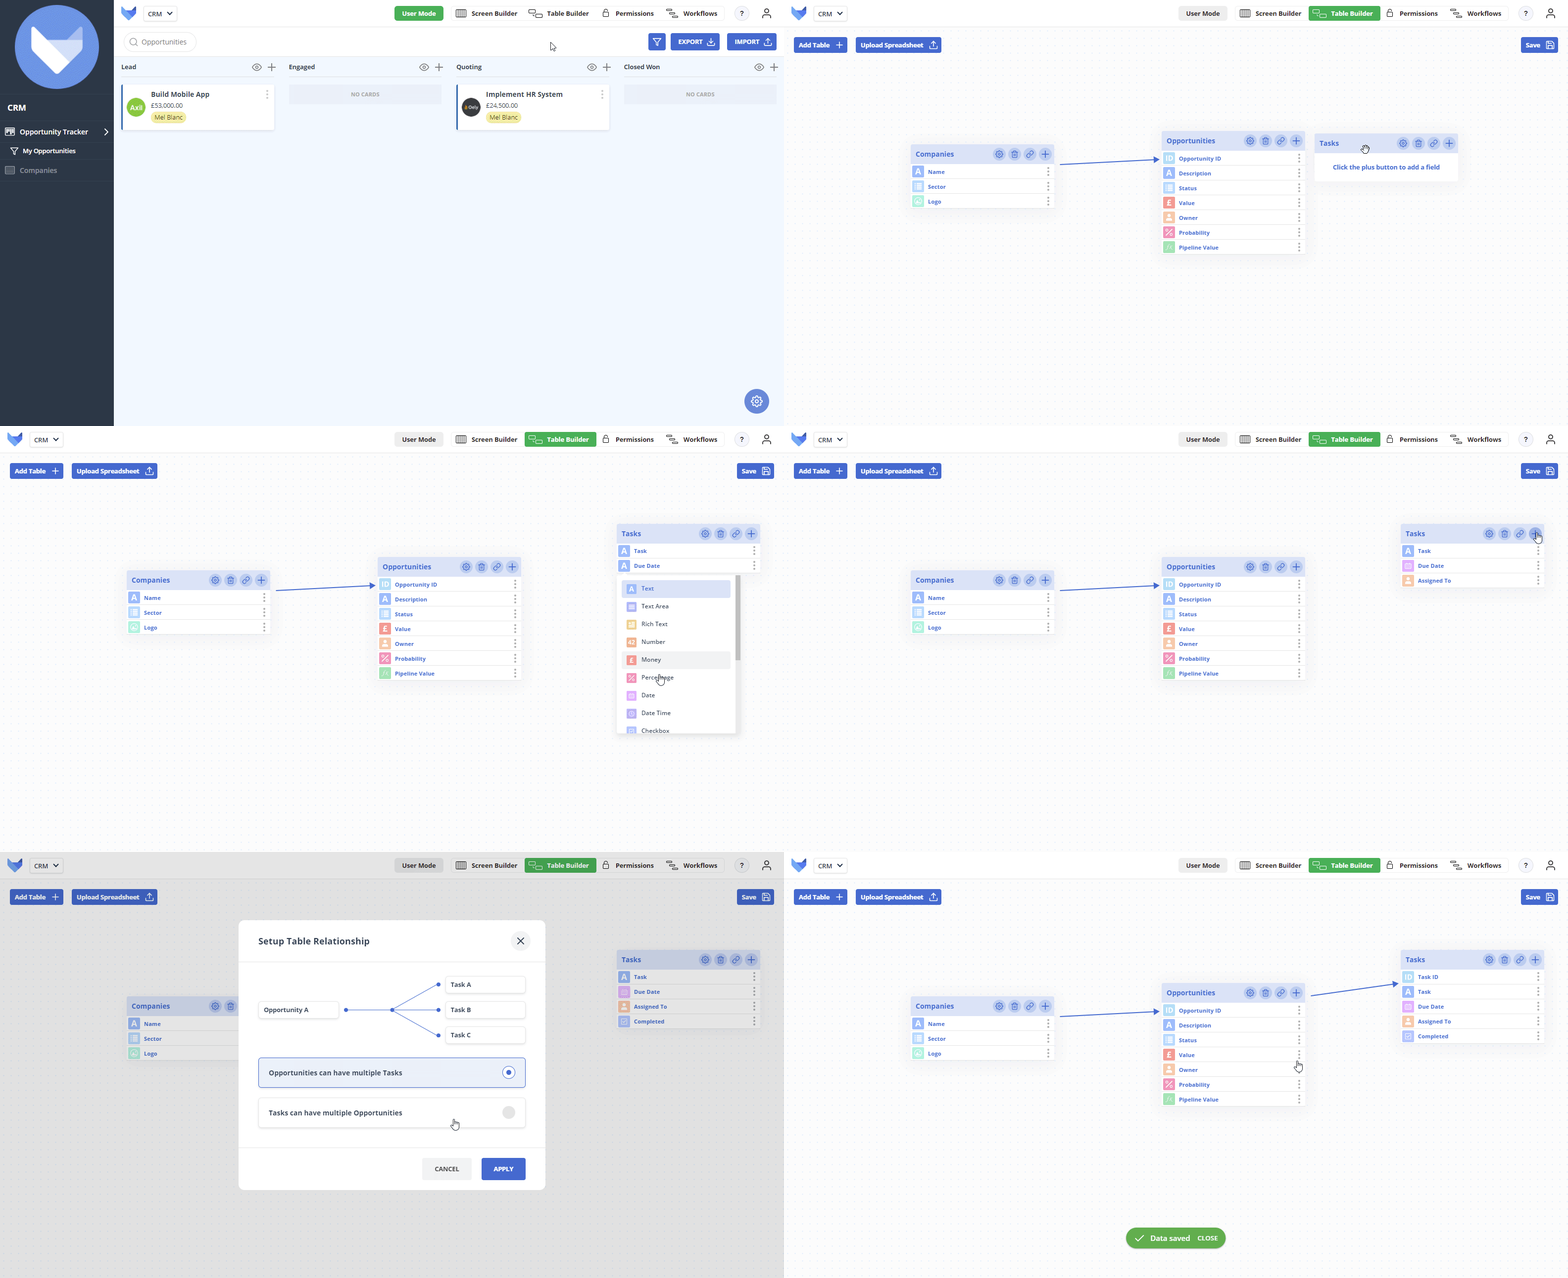
    • Text Field called Task
    • Date Field called Due Date
    • User Field called Assigned To
    • Checkbox Field called Completed
  5. Link the Tasks Table to the Opportunities Table, ensuring the direction is set as ‘Opportunities can have multiple Tasks’
  6. Click Save
  7. Select Add new Auto Counter Field
  8. Click Save

Tasks Table via Table Builder

Creating Task Records

The Tasks Table has been created and so Task Records can now be added to help your team keep track of their work.
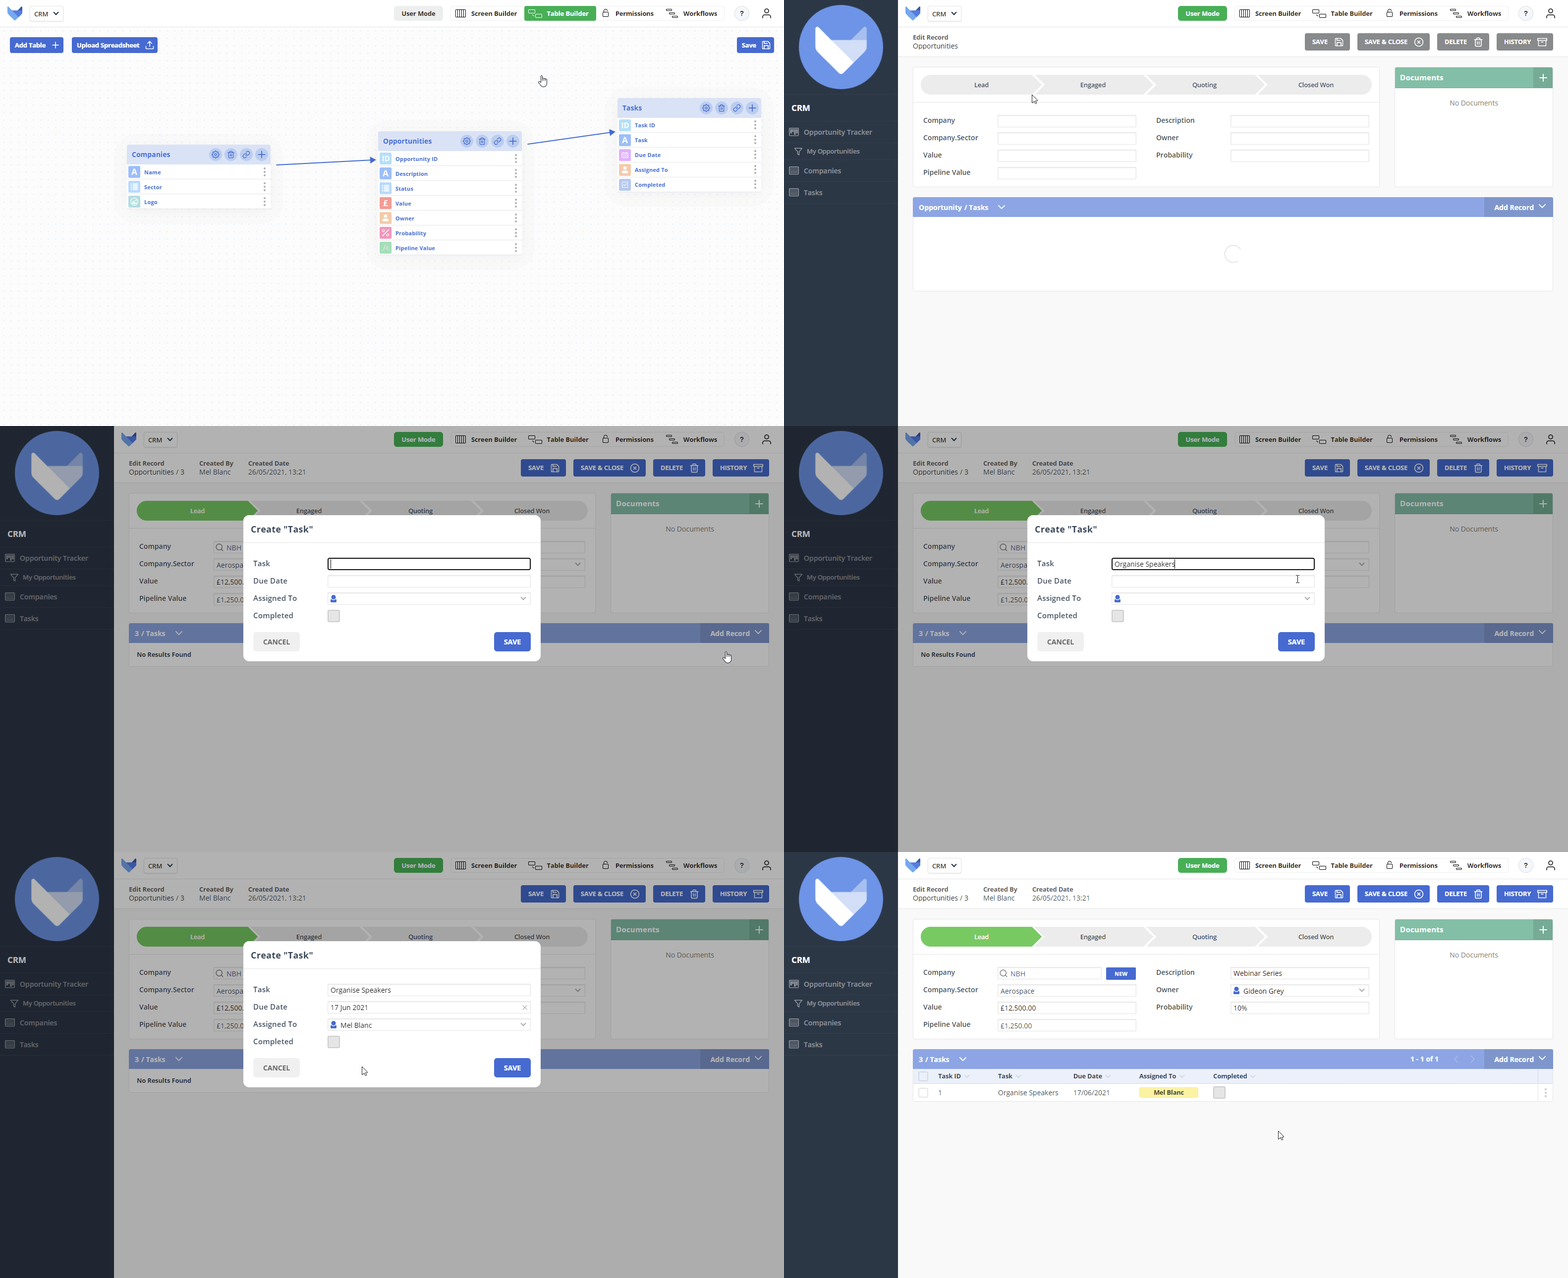
  1. Click User Mode
  2. Select an Opportunity
  3. Click Add Record and select New Task in the Tasks Table
  4. Complete the Fields
  5. Click Save
  6. Repeat steps 3 to 5 so that you have a set of Tasks for some Opportunities

Creating Tasks

Configuring ID Masks

When we created the Opportunities Table, the Reference Field was set as an auto counter. If you take a look at the list of Tasks (by selecting Tasks from the navigation bar), you will see that the linked Opportunity shows as ‘1’, ‘2’, ‘3’, etc.
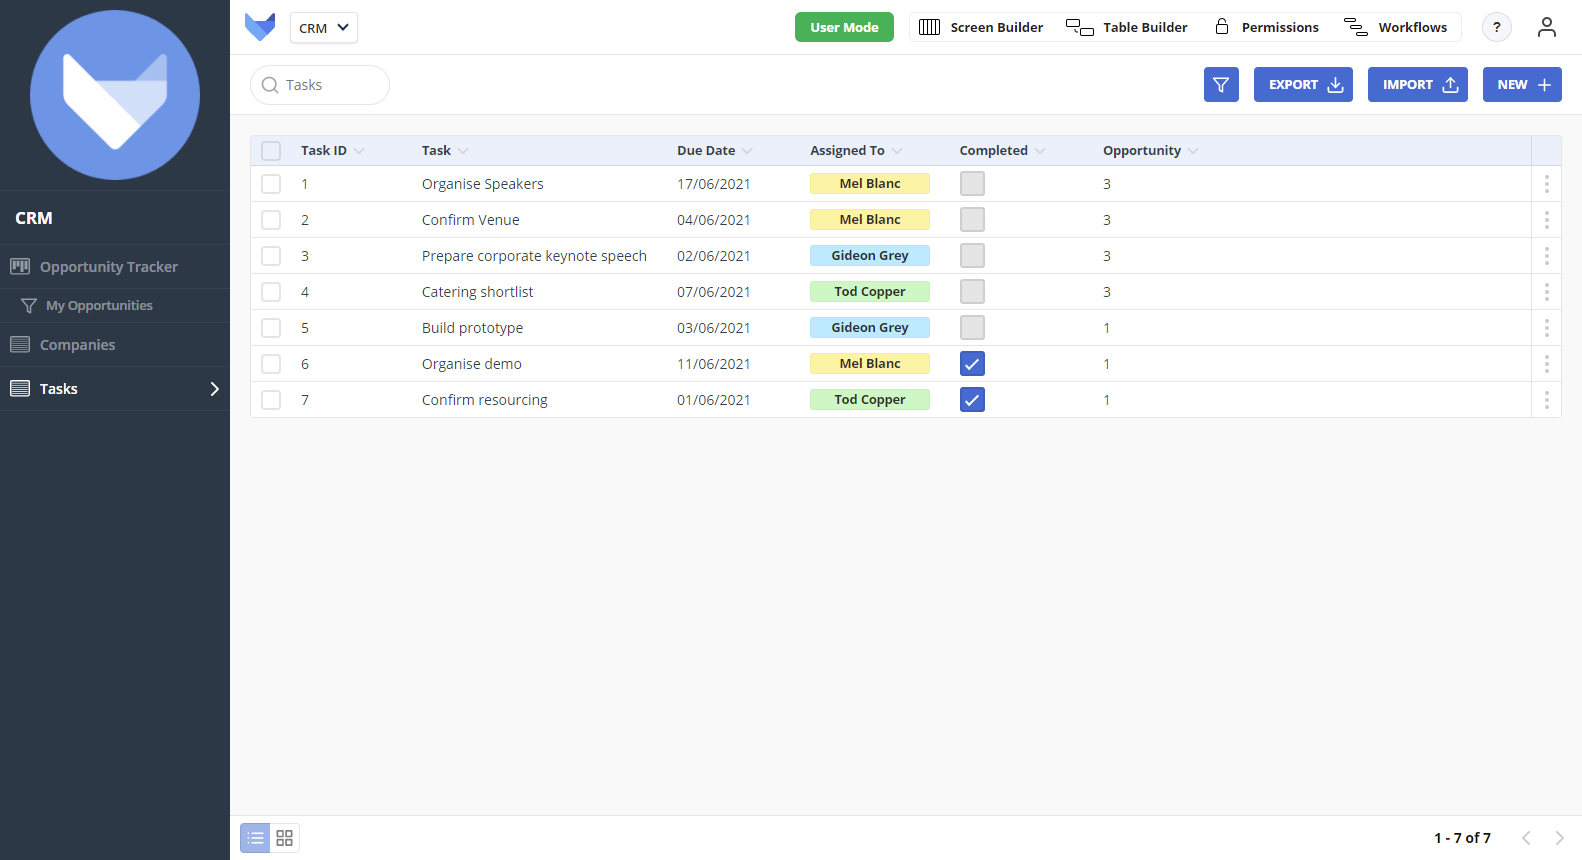
List of Tasks

We can add an ID Mask to the Reference Field so that the Opportunity link can display additional information, such as the description.

  1. Select Table Builder
  2. Open the Field Configuration for the Opportunity ID Field
  3. In the ID Mask, enter [Description] - [Status] ([Opportunity ID])
  4. Click Validate ID Mask
  5. Click Close on the Field Configuration modal
  6. Click Save
  7. Select User Mode and click Tasks in the navigation bar

Now when you return to the list of Tasks, additional information about the linked Opportunity will show.
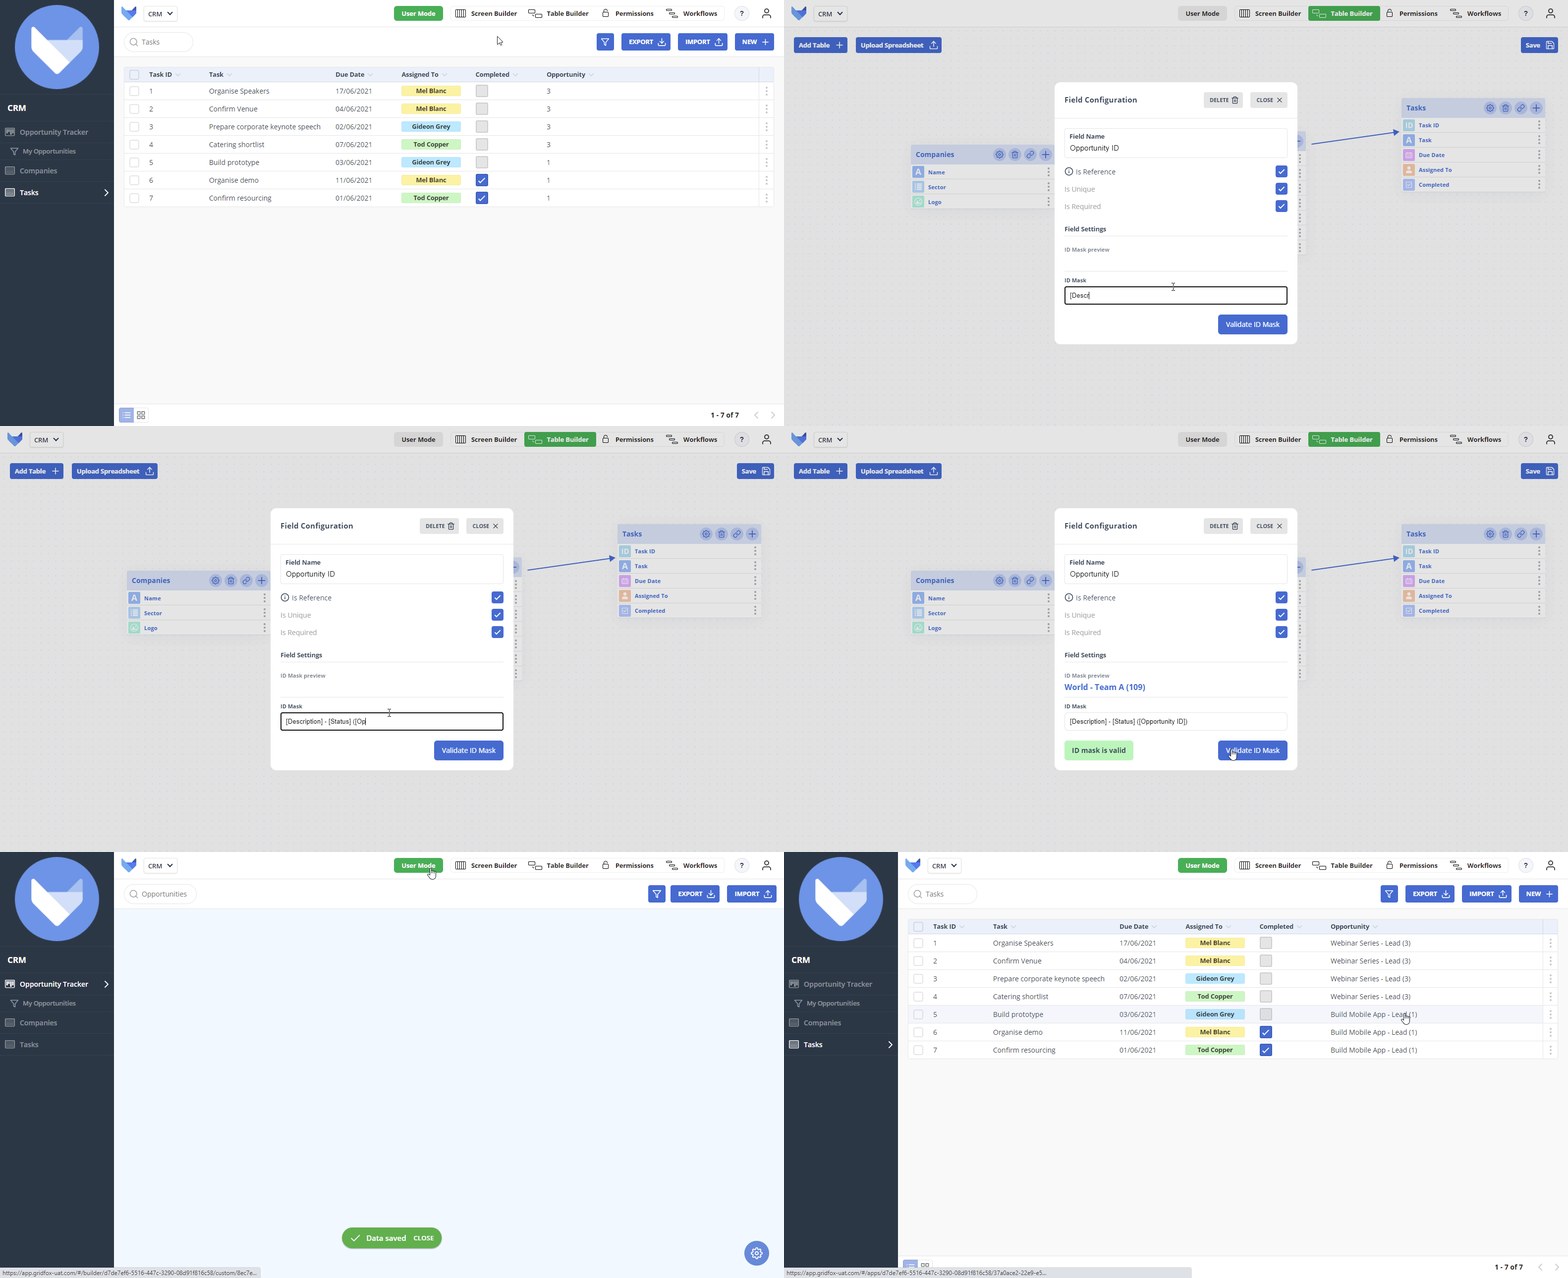
Set ID Masks

For more information about ID Masks, see the help documentation.

Creating a Saved Filter for Tasks

To help your team focus on what is most important, you can create a saved filter for tasks which will show them everything due in the next 7 days as well as everything overdue.
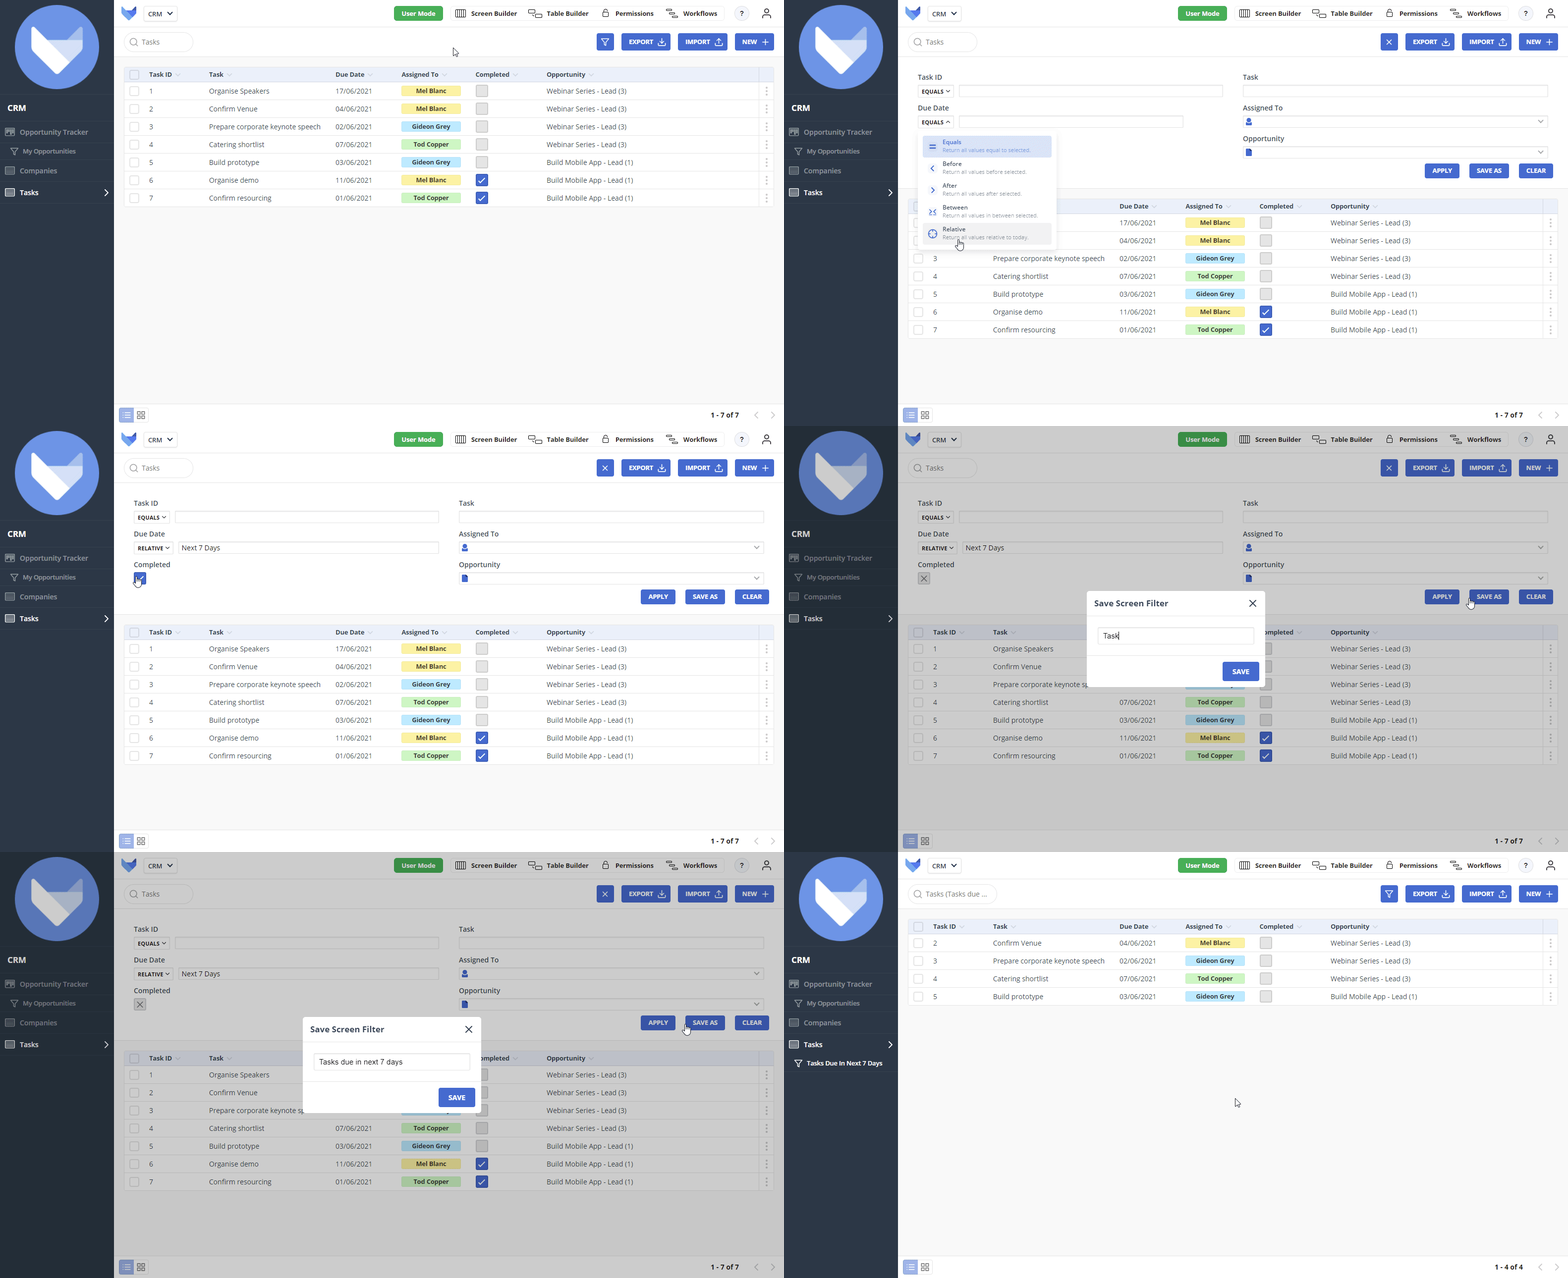
  1. Open the Filter for the Tasks list
  2. In Due Date, select Relative and Next 7 Days
  3. In Completed, amend the checkbox to a cross
  4. Click Save As
  5. Name the filter ‘Tasks due in next 7 days’
  6. Click Save

Tasks Filter

Creating a Calendar Screen

Gridfox supports a variety of Screen Types to help visualise your data. To help your team spot bottlenecks or busy periods, you can add a calendar for their Tasks.

Just as the Board Screen was created for Opportunities, we can create a Calendar Screen for Tasks.
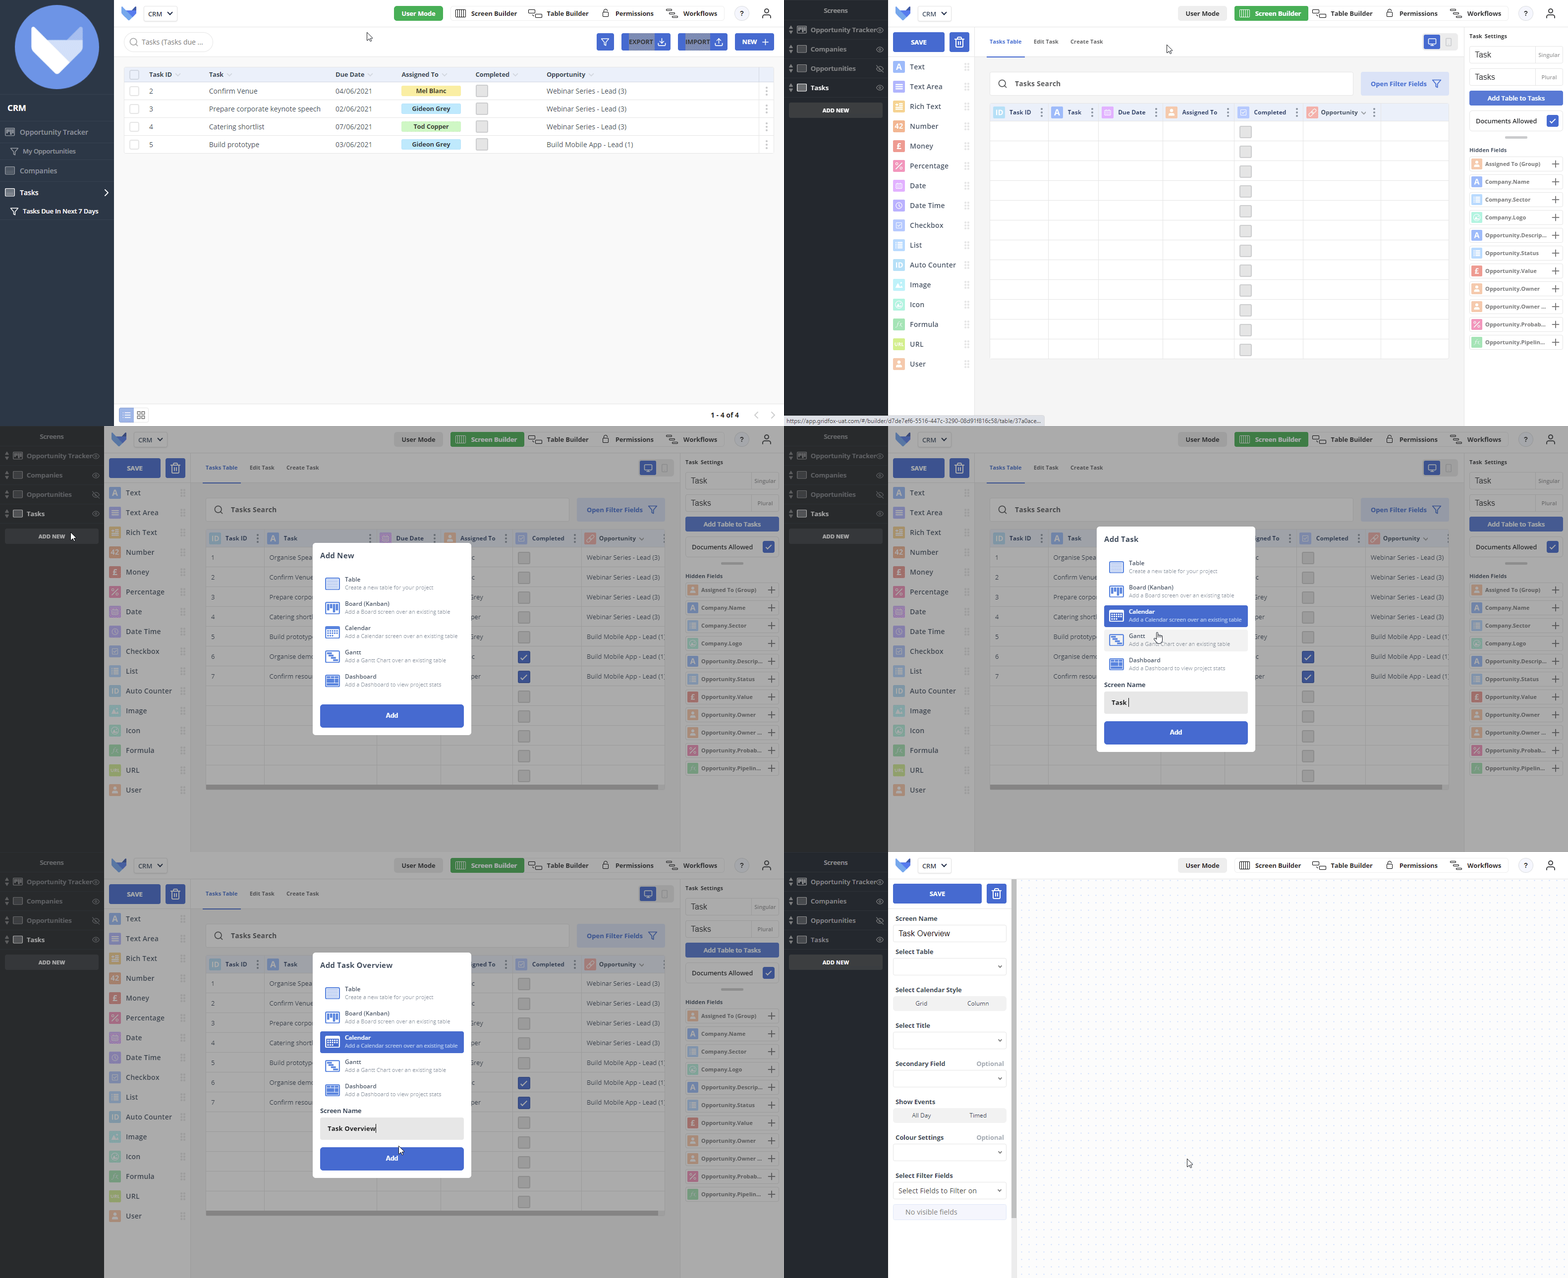
  1. Select Screen Builder
  2. Click Add New
  3. Choose Calendar
  4. Call the Screen ‘Task Overview’
  5. Click Add

Adding Calendar

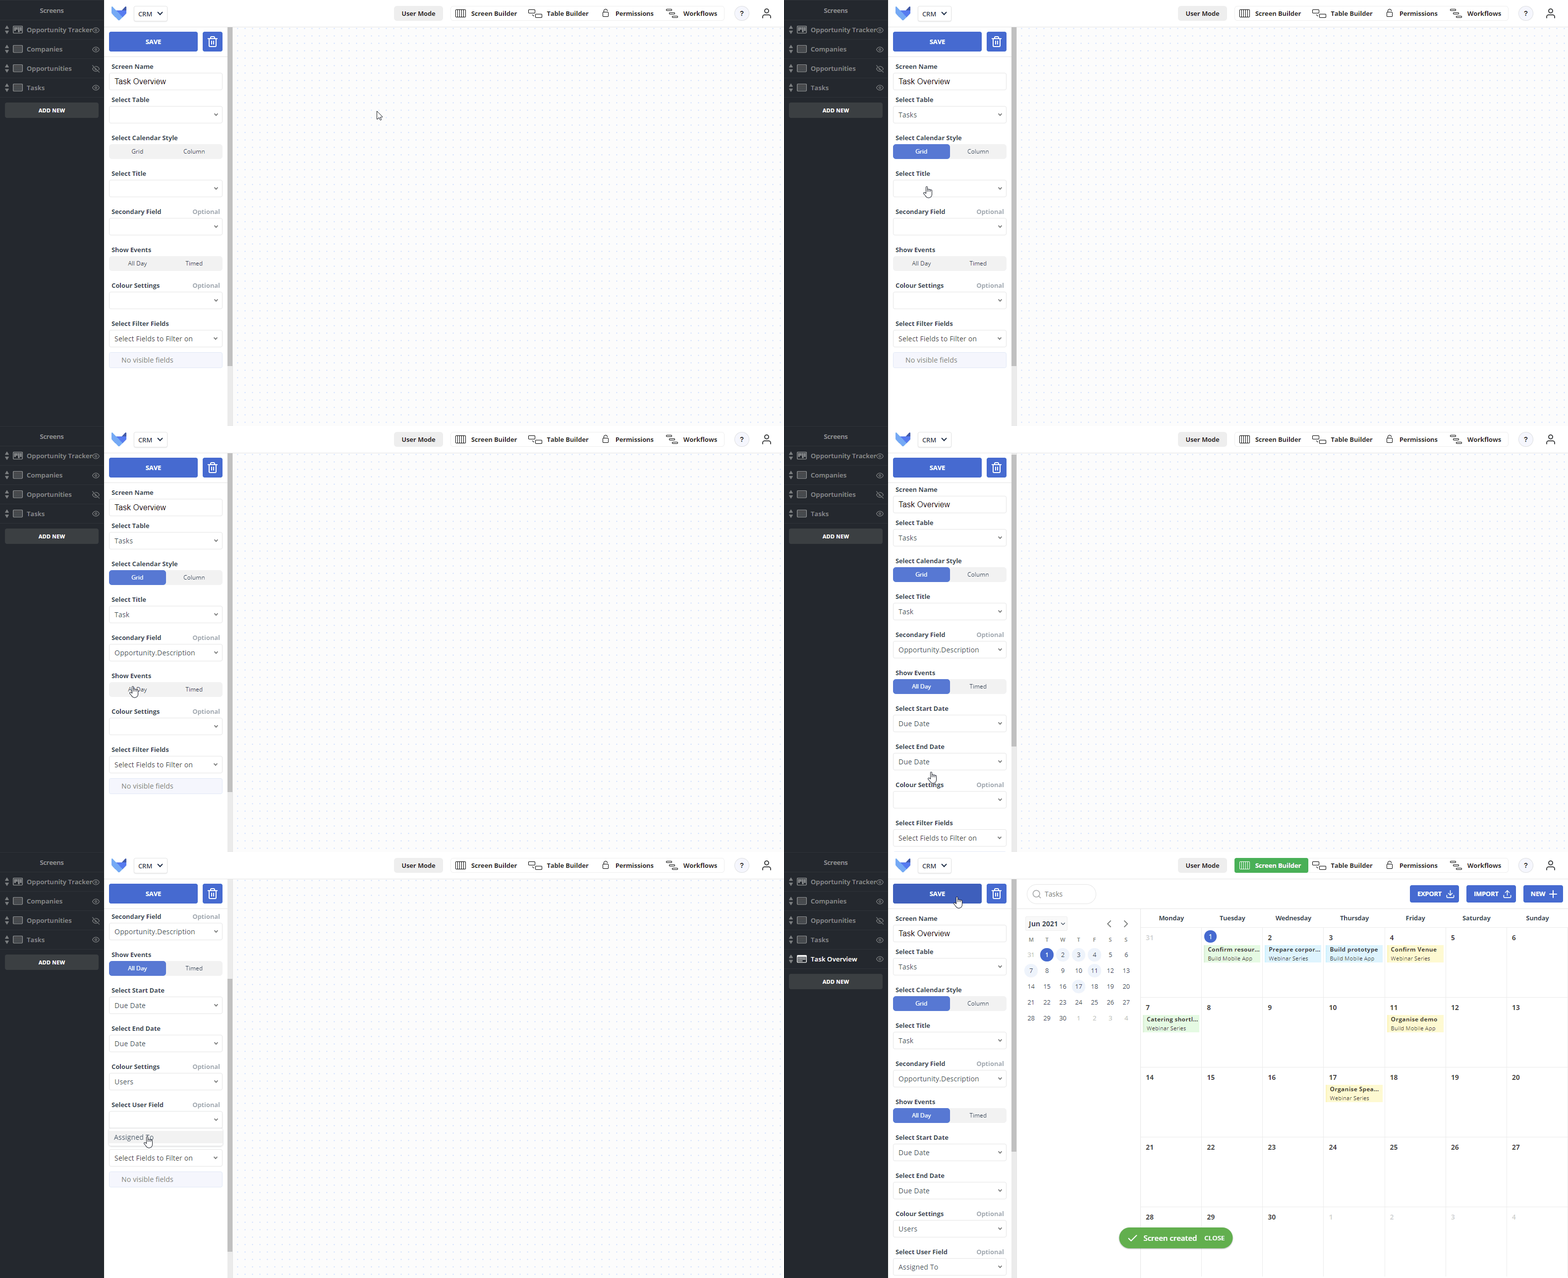
Configuring a Calendar

  1. In Select Table, choose Tasks
  2. In Select Calendar Style, choose Grid
  3. In Select Title, choose Task
  4. In Secondary Field, choose Opportunity.Description
  5. Select All Day for the Show Events option
  6. In Start Date, choose Due Date
  7. In End Date, choose Due Date
  8. In Colour Settings, choose User
  9. In Select User Field, choose Assigned To
  10. Click Save

Configure Calendar

Now the team can quickly see when their deadlines are for their Tasks.

Configuring Workflows

Workflows can be used in Gridfox to automate actions relating to your Records. For example, we can send a weekly reminder to the sales team about all their upcoming tasks.

  1. Select Workflows
  2. Select ‘Task’ as the Workflow Table
  3. Give the Workflow a Name
  4. Drag the Schedule Trigger onto the canvas
  5. Click the Schedule Trigger block and configure the Workflow to run weekly on Mondays at 7am then click Apply
  6. Drag the Filter Records Condition onto the canvas
  7. Click the Condition block and select the ‘Tasks due in next 7 days’ filter then click Apply
  8. Drag the Send Email Workflow Action onto the canvas
  9. Click the Send Email block to configure the email as follows:

    • Select the User or Group Field tab and select the ‘Task.Assigned To’ Field in the Recipients section
    • Enter a subject
    • Enter the email body
    • Click to include a table containing the workflow records
    • Click Apply
  10. Click Save

This workflow will send each team member a list of their outstanding tasks.
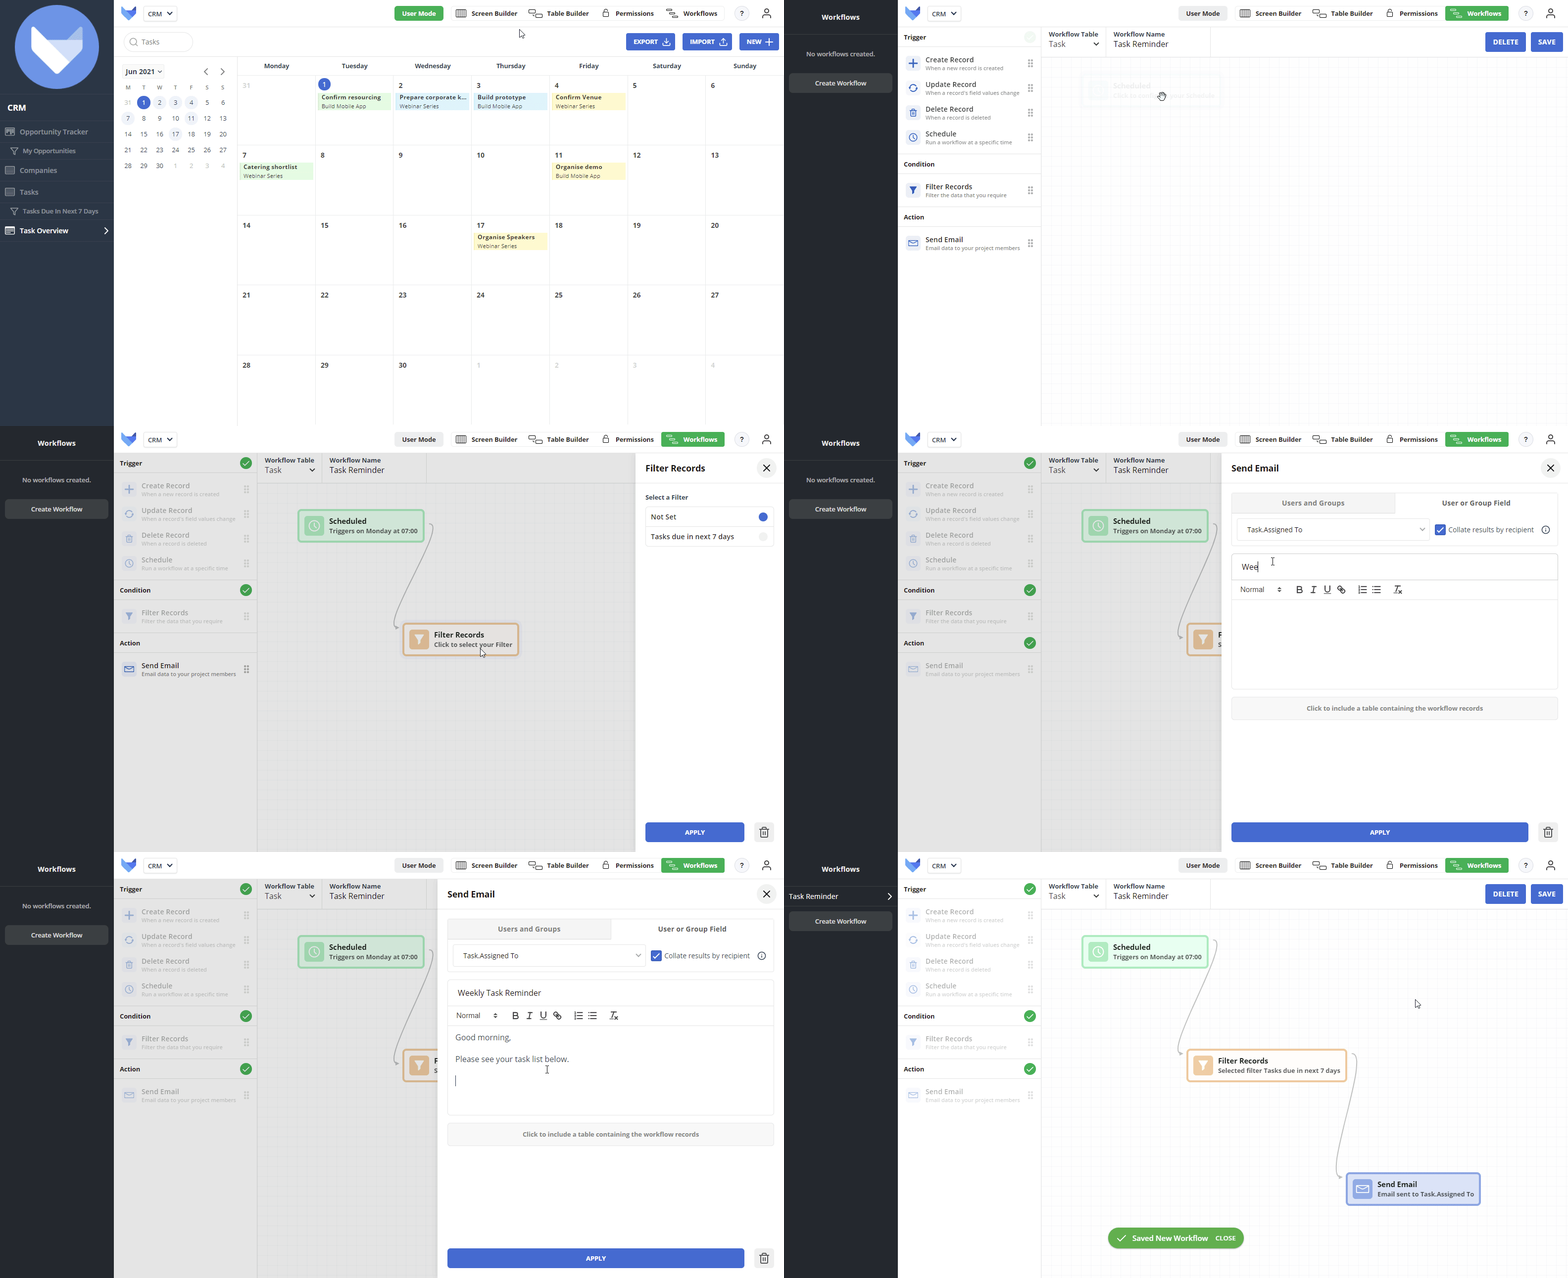
Workflow

Creating a Dashboard

Once your team start adding in all their Opportunities and Tasks, you can use Dashboards to get an overall picture of the sales activities.
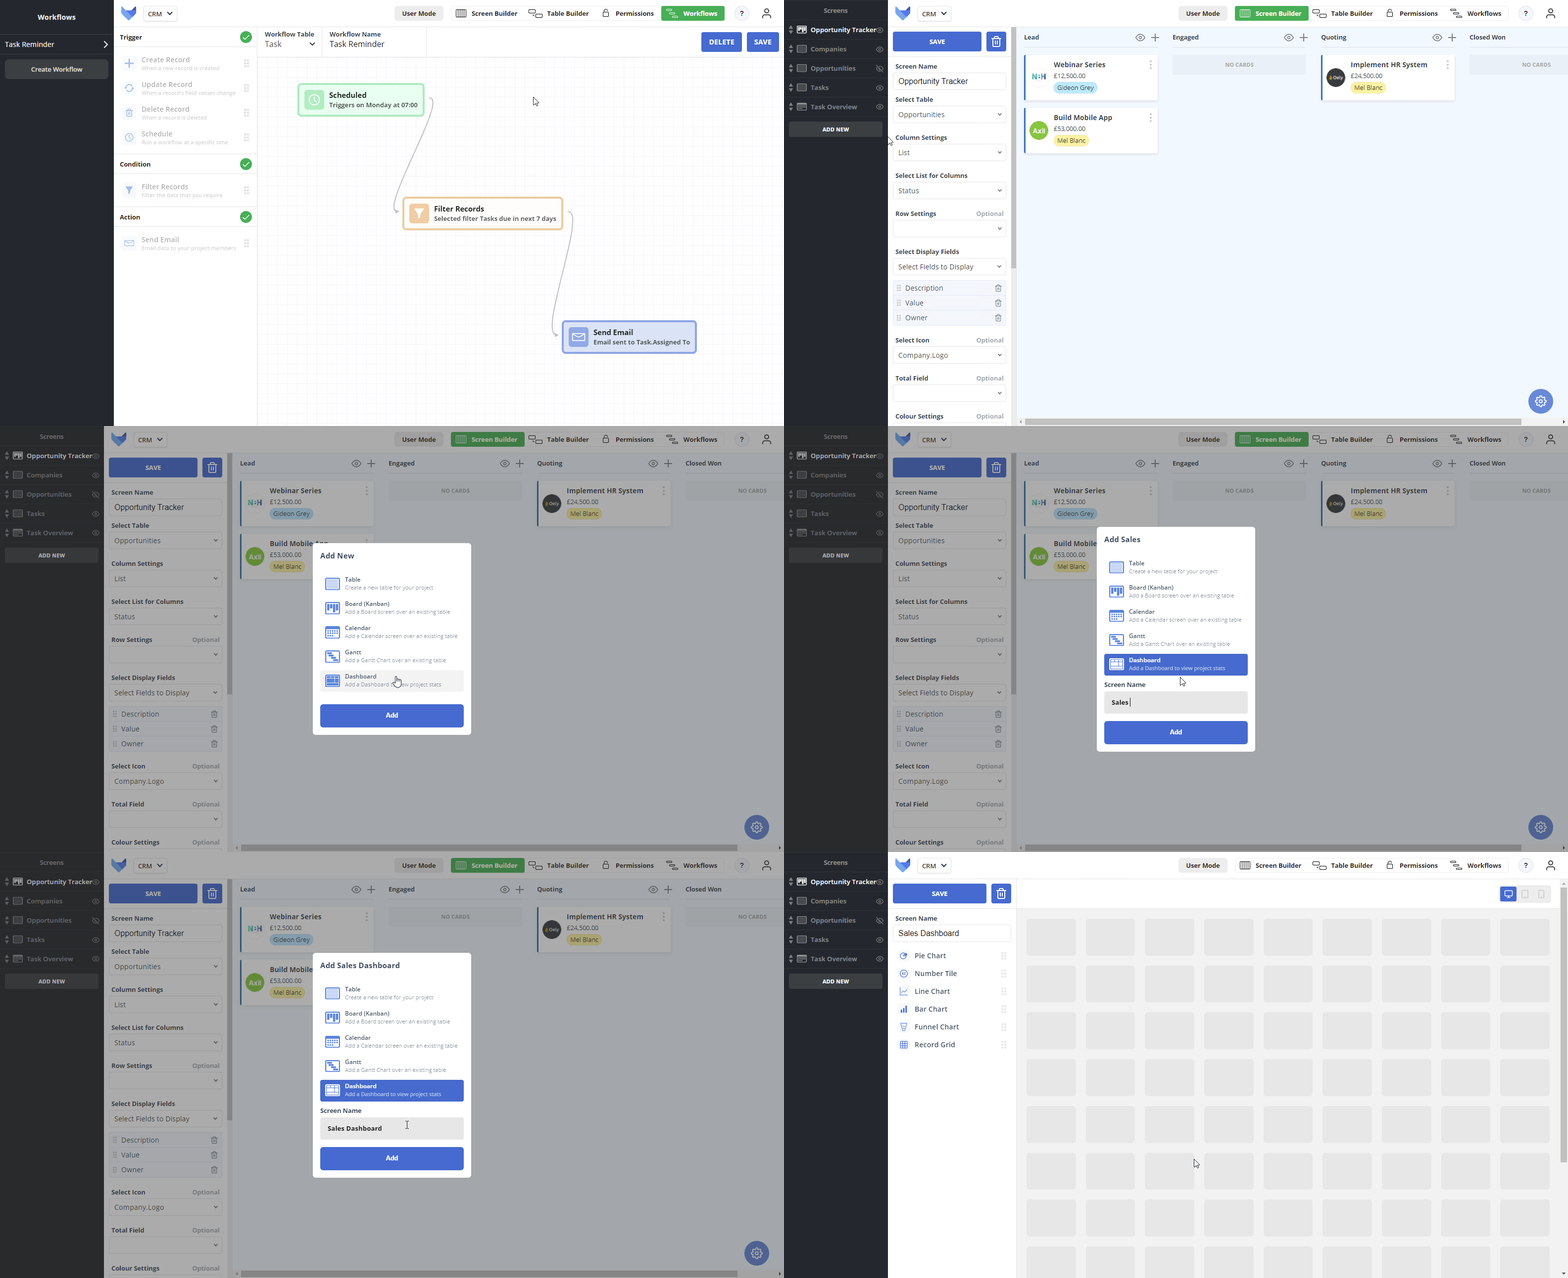
  1. Select Screen Builder
  2. Click Add New
  3. Select Dashboard
  4. Name the Screen ‘Sales Dashboard’
  5. Click Add

Add Dashboard

Adding a Funnel Chart

We can use Funnel Charts to illustrate the sales pipeline.
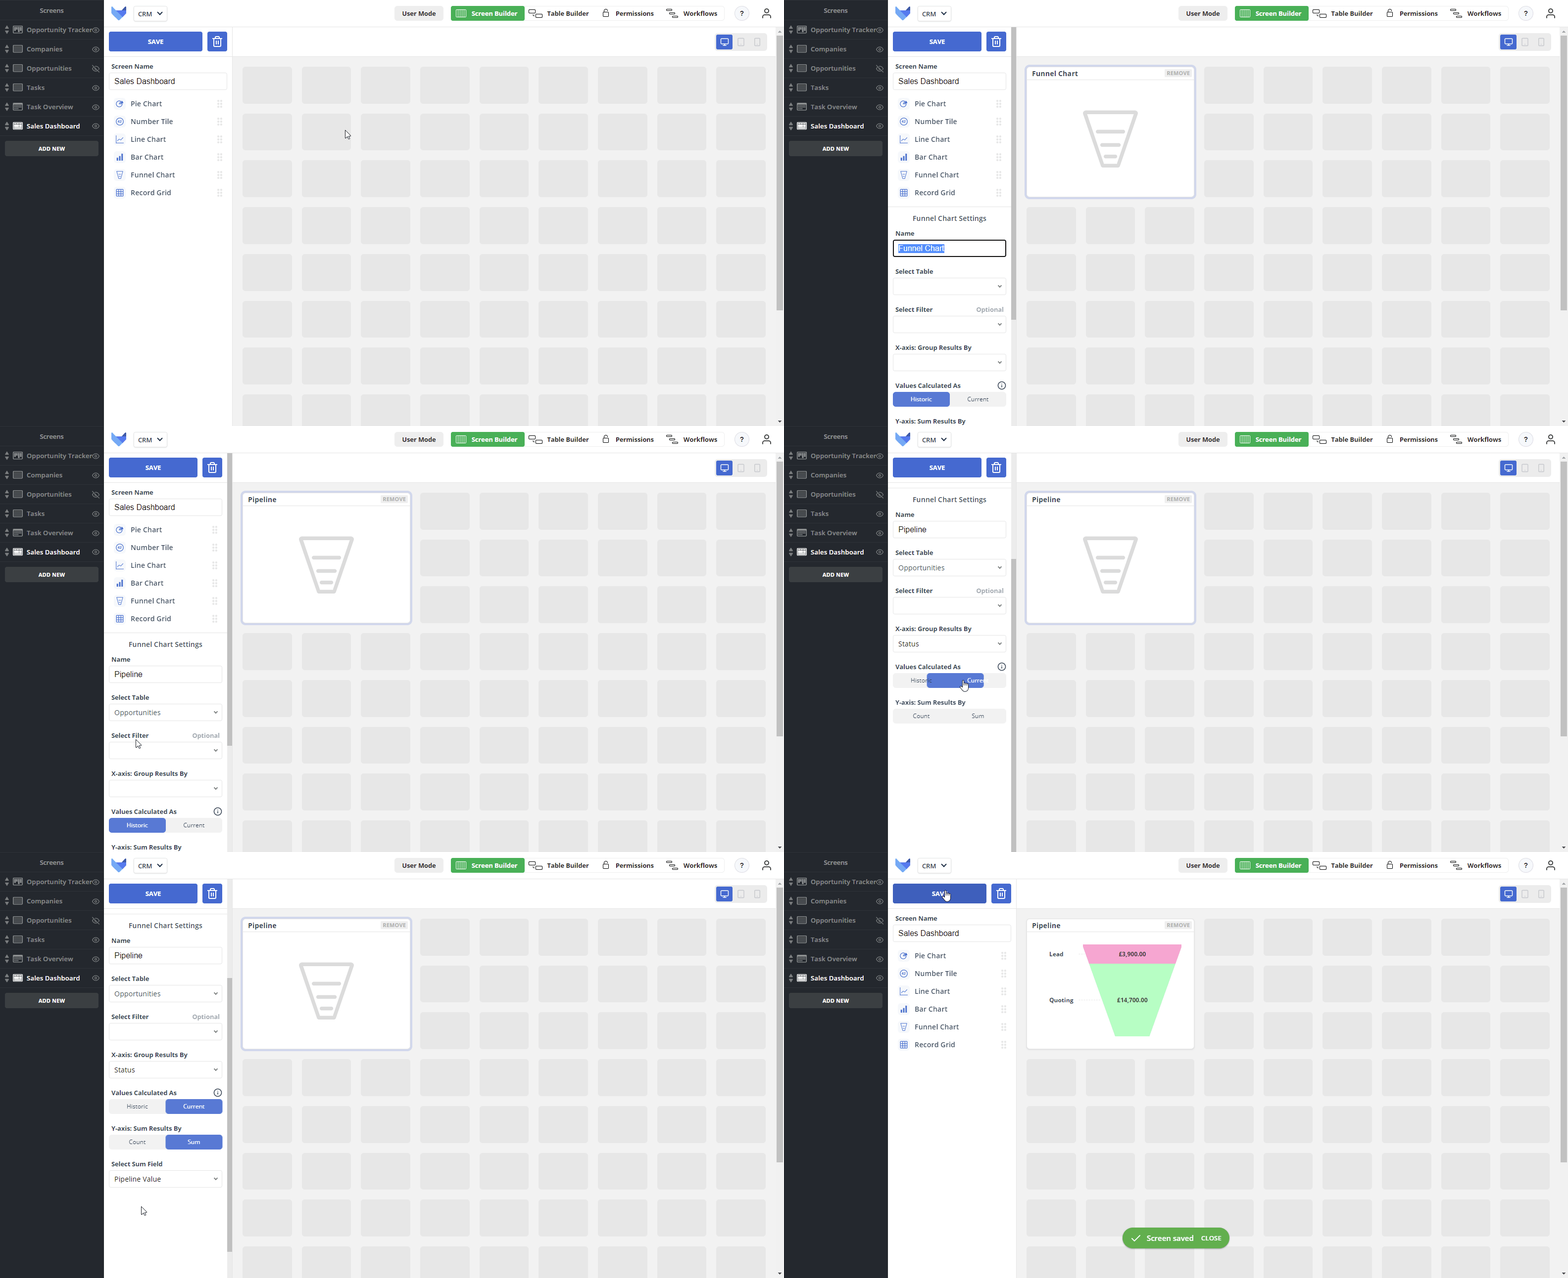
  1. Drag a Funnel Chart onto the canvas
  2. Name the Chart ‘Pipeline’
  3. In Select Table, choose Opportunities
  4. In Group Results By, choose Status
  5. In Values Calculated As, select Current
  6. In Sum Results By, choose Sum
  7. In Select Sum Field, choose Pipeline Value
  8. Click Save

Adding a Funnel Chart

Adding a Pie Chart

To see the distribution of Companies across sectors, add in a Pie Chart.
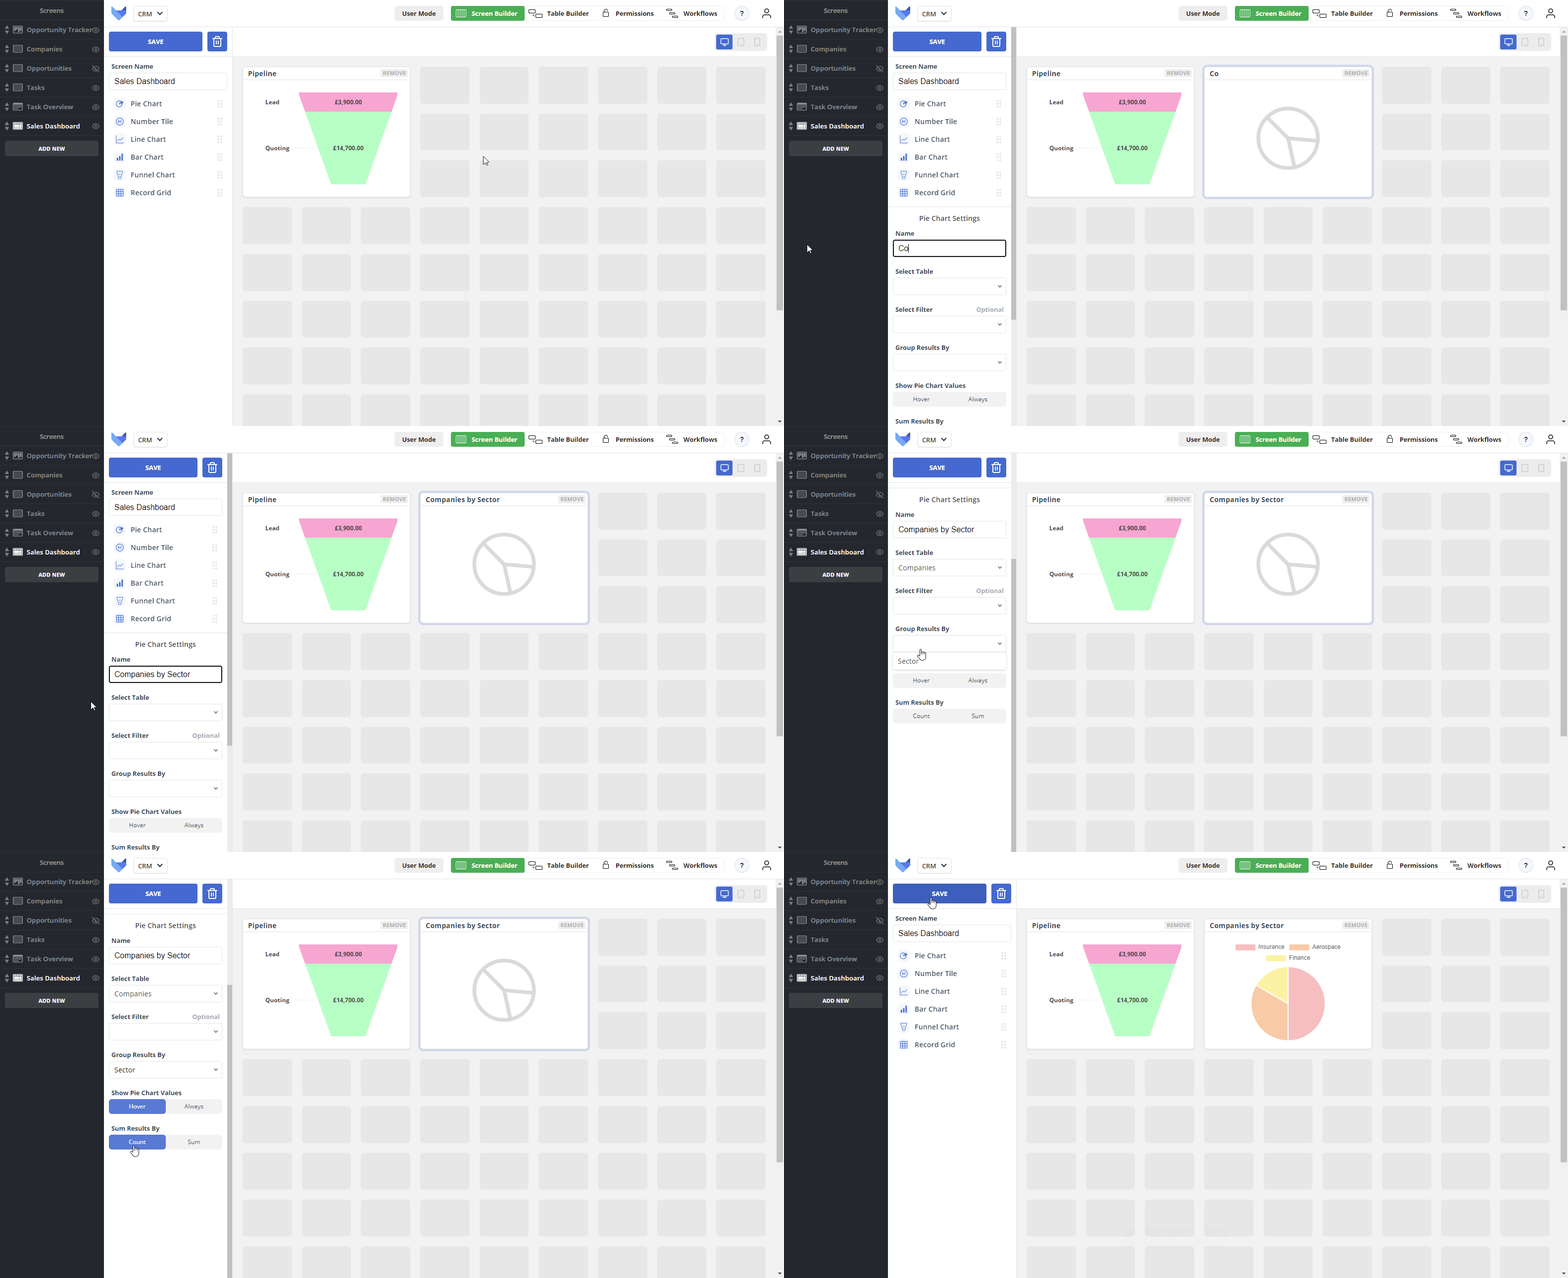
  1. Drag a Pie Chart onto the canvas
  2. Name the Chart ‘Companies by Sector’
  3. In Select Table, choose Companies
  4. In Group Results by, choose Sector
  5. In Show Pie Chart Values, choose Hover
  6. In Sum Results By, choose Count
  7. Click Save

Pie Chart

Adding a Bar Chart

To see the distribution of opportunities across the team, a bar chart can be used.
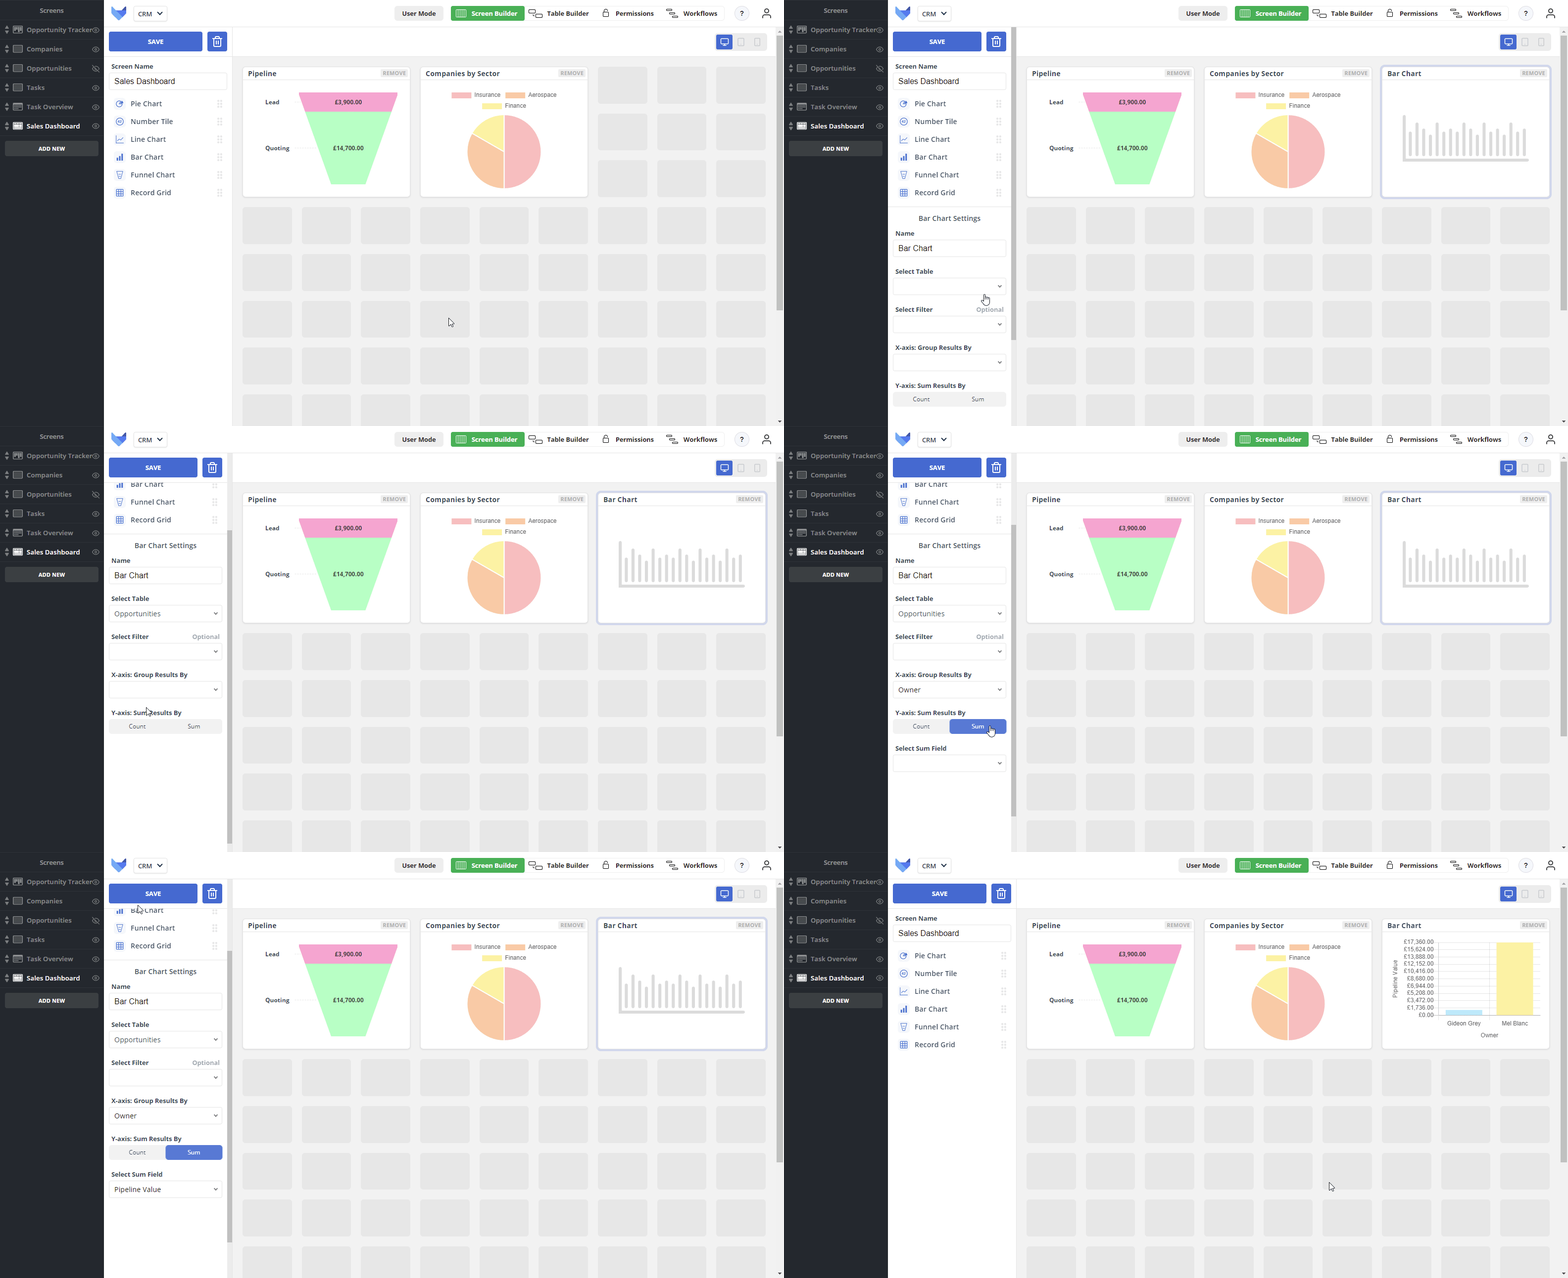
  1. Drag a Bar Chart onto the canvas
  2. Name the Chart ‘Opportunities by team member’
  3. In Select Table, choose Opportunities
  4. In Group Results By, choose Owner
  5. In Sum Results By, choose Sum
  6. In Select Sum Field, choose Pipeline Value

Bar Chart

Reordering the Screen

By moving the Dashboard to be the first Screen in the Project, it will be the Screen that your team is taken to once they select the Project from the homepage.
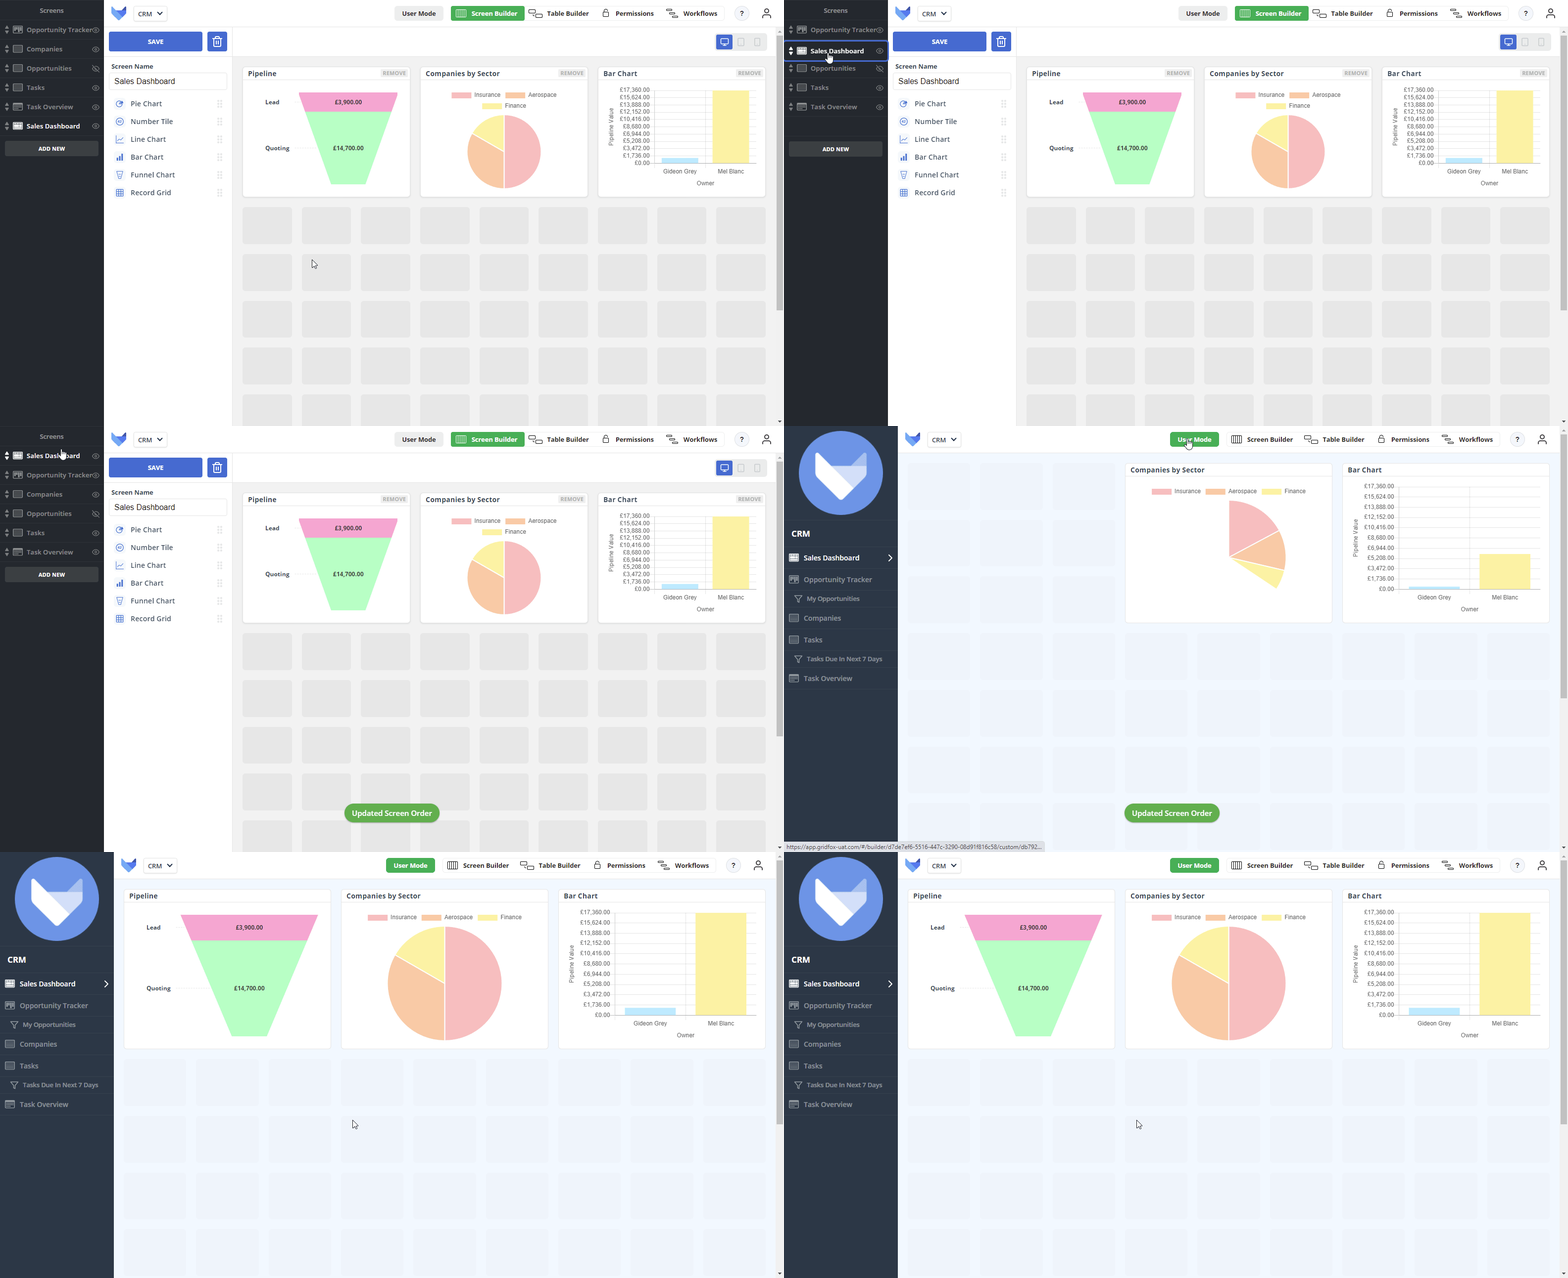
  1. Drag the Sales Dashboard to the top of the navigation bar
  2. Click User Mode

Reorder dashboard

Summary

Your custom CRM is set up and ready for you and your team to use. Over time, you can customise and adjust the system. You could:

  • Add in a new Table for meetings or events, then add a Calendar Screen to display these and a Workflow to remind the organiser of their upcoming events
  • Create a Contacts Table which is linked to Companies to start building relationships directly with people
  • Plan in the implementation of these Opportunities by creating a linked Projects Table, where the project timeline can be plotted on a Gantt Screen

Keep building and innovating with Gridfox.